
On this page
- Before You Start
- Step 1: Install Windows App
- Step 2: Turn On Always Import RDP Files
- Step 3: Have Your Password Ready
- Step 4: Get Your RDP File
- Step 5: Import It into Windows App
- Next Time You Connect
- Prefer to Type It In?
- You're All Set
- Tips for Mobile Use
- Troubleshooting Tips
- Security Best Practices
- Need Assistance?
You can access your QuantVPS server from anywhere using the Windows App (formerly Microsoft Remote Desktop) on your iPhone or iPad. Whether you're traveling or just away from your desk, this mobile connection method keeps your trading environment within reach.
Prefer to watch? Our 2:22 video walks through installing Windows App, importing your RDP file and signing in on an iPhone or iPad: watch "How to connect to your VPS". It plays the film for your device, so choose iPhone & iPad in the player if you open it on another device. The RDP file steps start at 0:48.
Before You Start
Open your Setup Guide in Safari. It shows the same five steps as this article, with the buttons you need.
- In Safari, sign in to your QuantVPS dashboard.
- Tap Control Panel in the dashboard menu (the tab bar at the bottom of the screen on an iPhone). Or tap Manage Server on your VPS.
- Open Setup Guide, then Connect to Your VPS. The guide shows the steps for the device you're on.
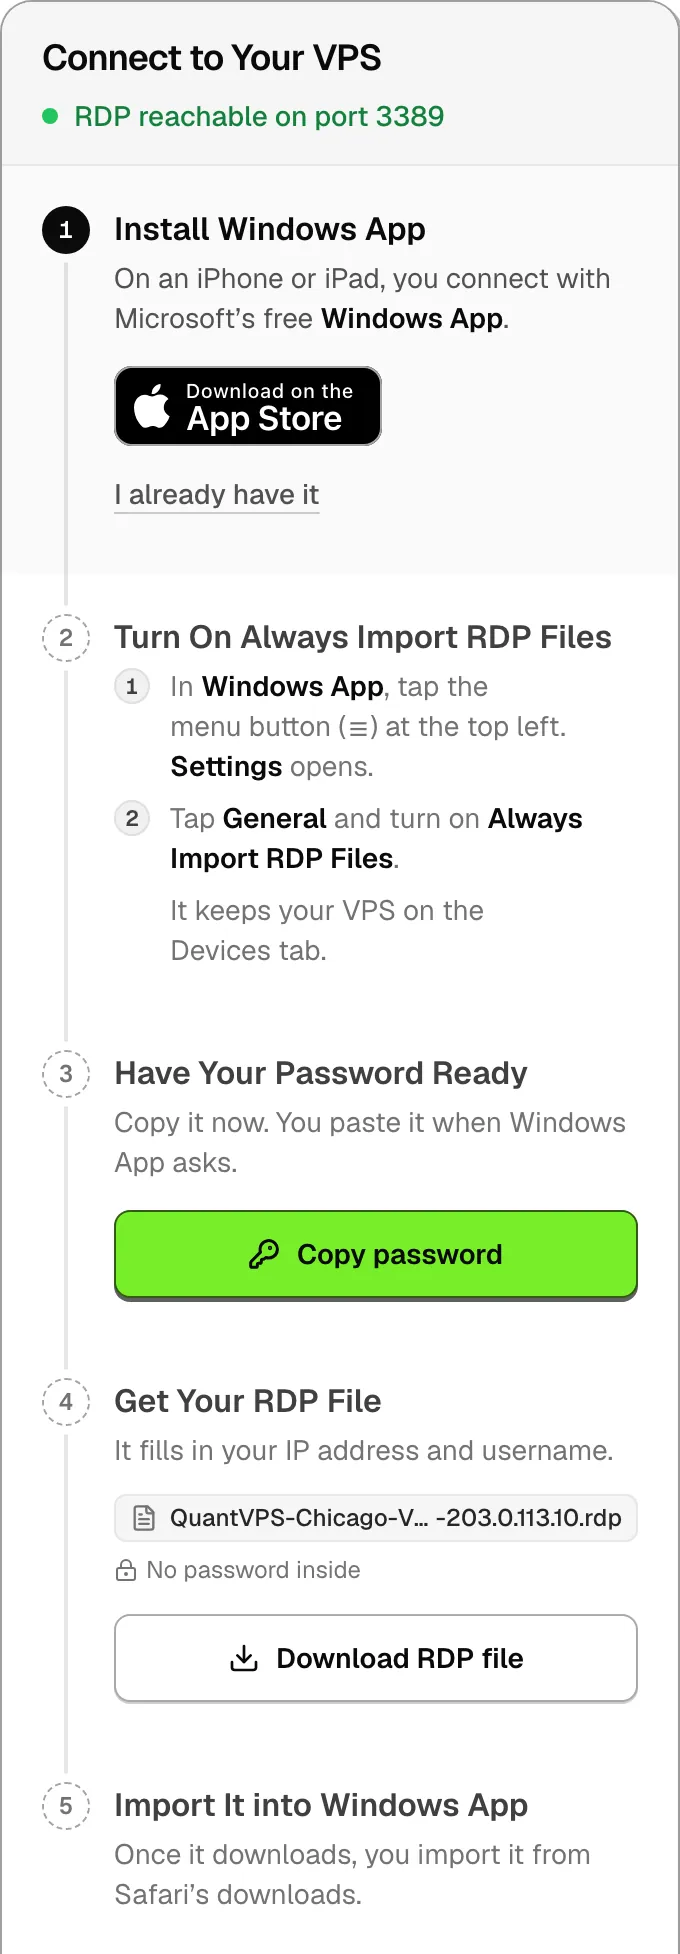
Step 1: Install Windows App
You connect with Microsoft's free Windows App. Already have it? Tap I already have it in the guide and go to Step 2.
- Open the App Store on your iPhone or iPad and search for "Windows App" by Microsoft Corporation. Or tap Download on the App Store in your Setup Guide. Its page says Windows App Mobile. (If you already have the older Microsoft Remote Desktop app installed, Microsoft has retired it in favor of Windows App; download the new one.)
- Tap Get under the app's name, then Open. Asked to confirm? Use Face ID, Touch ID or your Apple Account password.
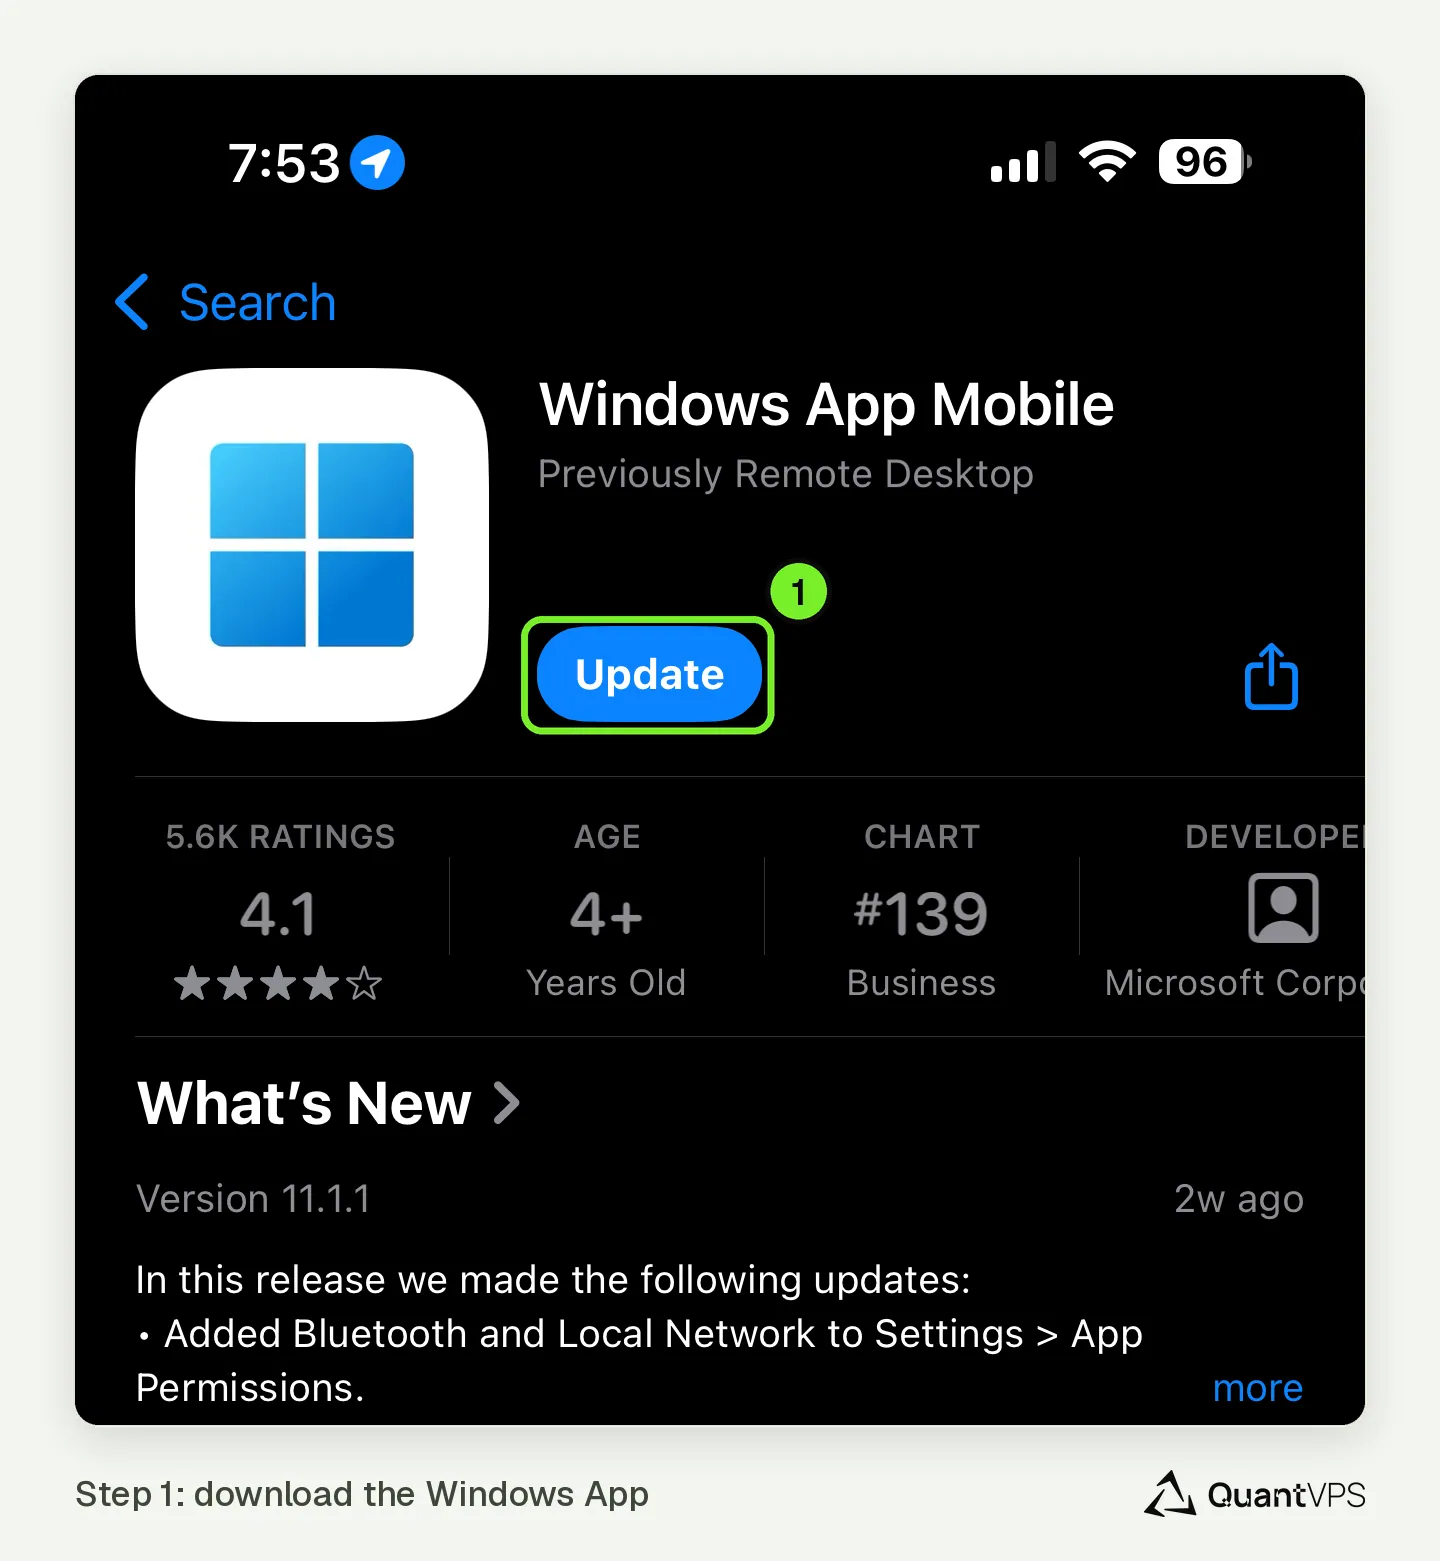
- The first time Windows App opens, tap Allow when it asks to use Bluetooth and your local network. If a short tour shows, tap Skip at the bottom.
- You see No Devices on the Devices tab. Your VPS will be saved here.
Step 2: Turn On Always Import RDP Files
- In Windows App, tap the menu button (☰) at the top left. Settings opens.
- Tap General.
- Near the bottom, turn on Always Import RDP Files. It's just above Share Data with Microsoft.
This setting keeps your VPS on the Devices tab. No menu button? Tap the Settings cog or your account picture.
Step 3: Have Your Password Ready
- Before you open Windows App, tap Copy password on the Setup Guide. A tick shows, and the button says Copied.
- You paste it when Windows App asks.
Step 4: Get Your RDP File
Your RDP file fills in your IP address and username, so you don't type them in.
- Tap Download RDP file. The file saves to your Downloads. Its name starts with QuantVPS and ends in .rdp. The guide marks it No password inside.
Step 5: Import It into Windows App
- In Safari, next to the search field, tap the Downloads button. Then tap Downloads.
- Your RDP file is in the list. Tap it, then tap Share, then tap Windows App.
- Windows App opens. It saves your VPS on the Devices tab and asks for your password.
- When Windows App asks for your password, touch and hold the password box. Tap Paste, then continue.
- The first time, Windows App may ask you to verify the certificate. That's normal for a new server. Tap Accept.
Your VPS's Windows desktop fills the screen. Nothing to paste? Switch back to Safari and tap Copy password again.
File not in Safari's downloads? Open the Files app. Tap Browse, tap iCloud Drive, then tap Downloads. Tap your RDP file, then Share and Windows App.
Next Time You Connect
Open Windows App and tap your VPS on the Devices tab (at the bottom left on an iPhone). You don't need to download the file again.
Prefer to Type It In?
You can add your VPS to Windows App by hand instead. You copy your login details from Connection details on your Control Panel and paste them in.
Add a New PC
- In Windows App, tap + at the top right (beside the bell on an iPhone).
- On the Add screen, tap PC. Older versions say Add PC.
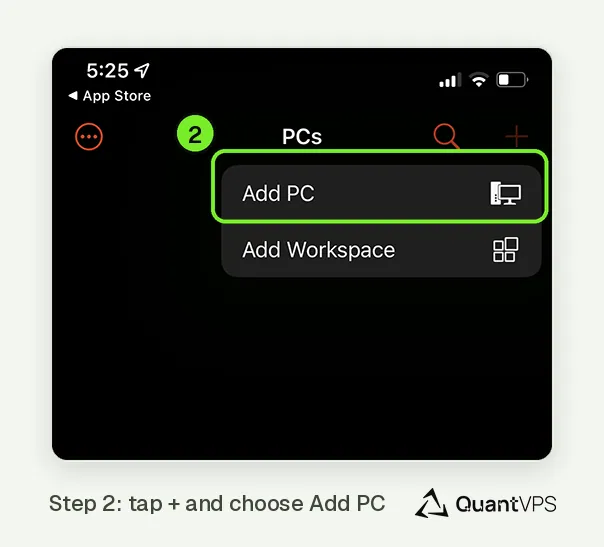
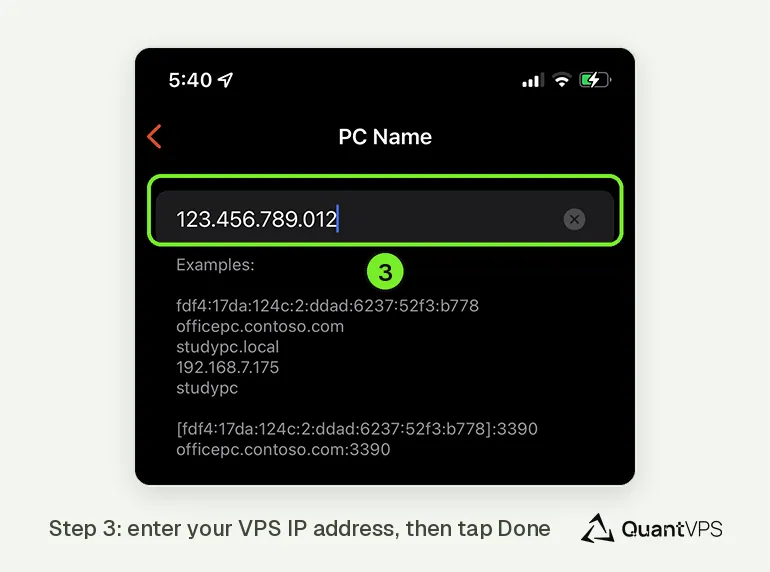
Enter Your VPS IP Address
- In Safari, on your Control Panel, copy your IP address from Connection details.
- Switch back to Windows App: swipe up from the bottom and pause (or double-click Home), and tap it.
- Touch and hold the PC Name box, then tap Paste. Still on a typing screen? Tap Done to go back.
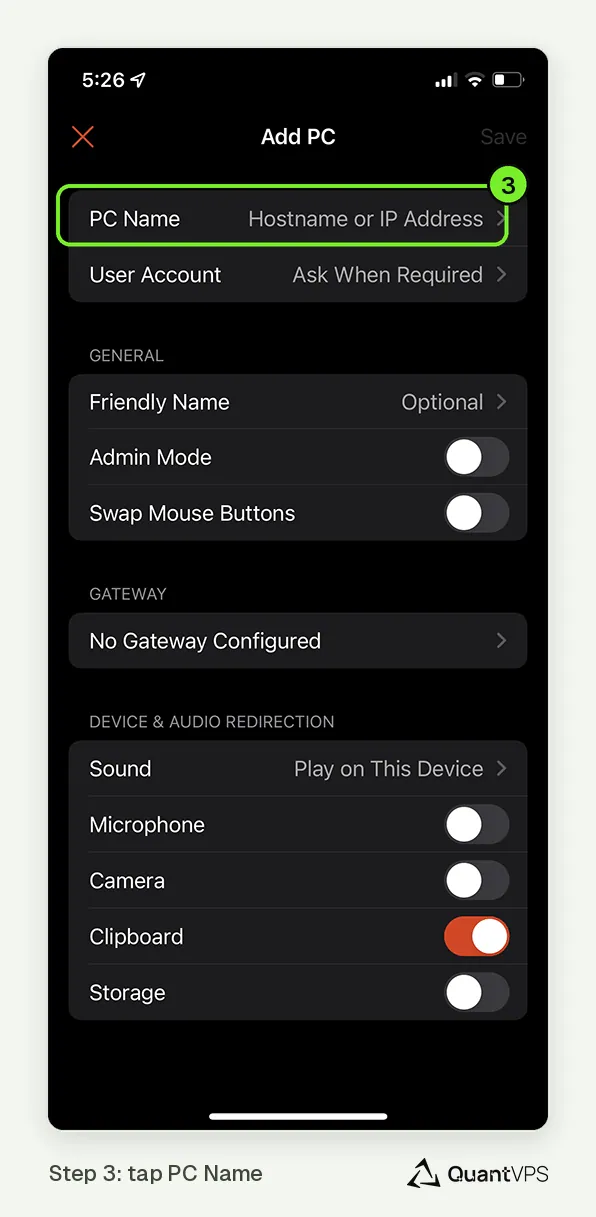
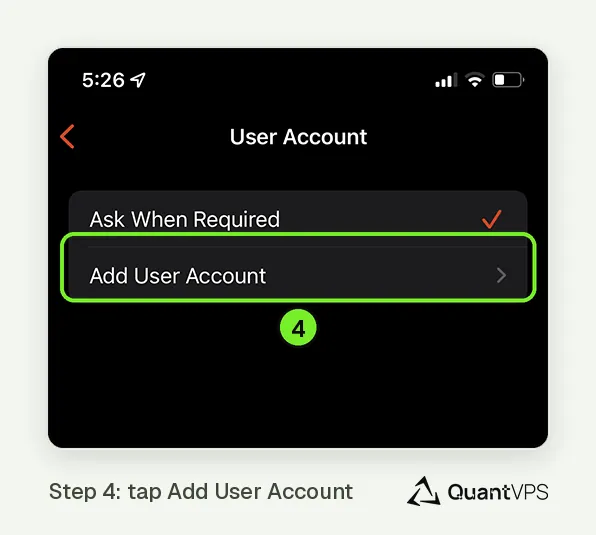
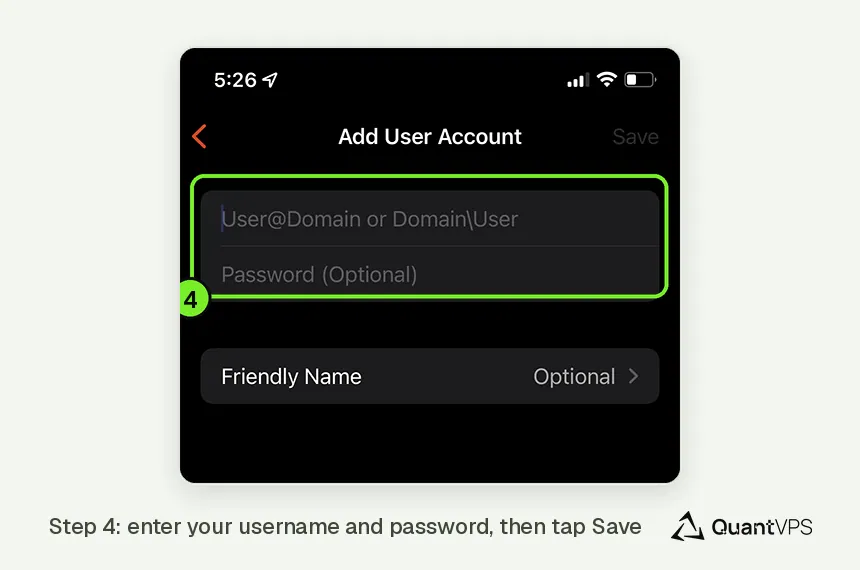
Add Your User Account
- Tap Credentials, then Add Credentials. Older versions say User Account and Add User Account.
- Copy your username from Connection details. Touch and hold the Username box and tap Paste. It's usually Administrator.
- Copy your password the same way. Touch and hold the Password box and tap Paste.
- Tap Save at the top right to store your credentials.
Save and Connect
- Back on the PC screen, tap Save at the top right. Some versions say Add.
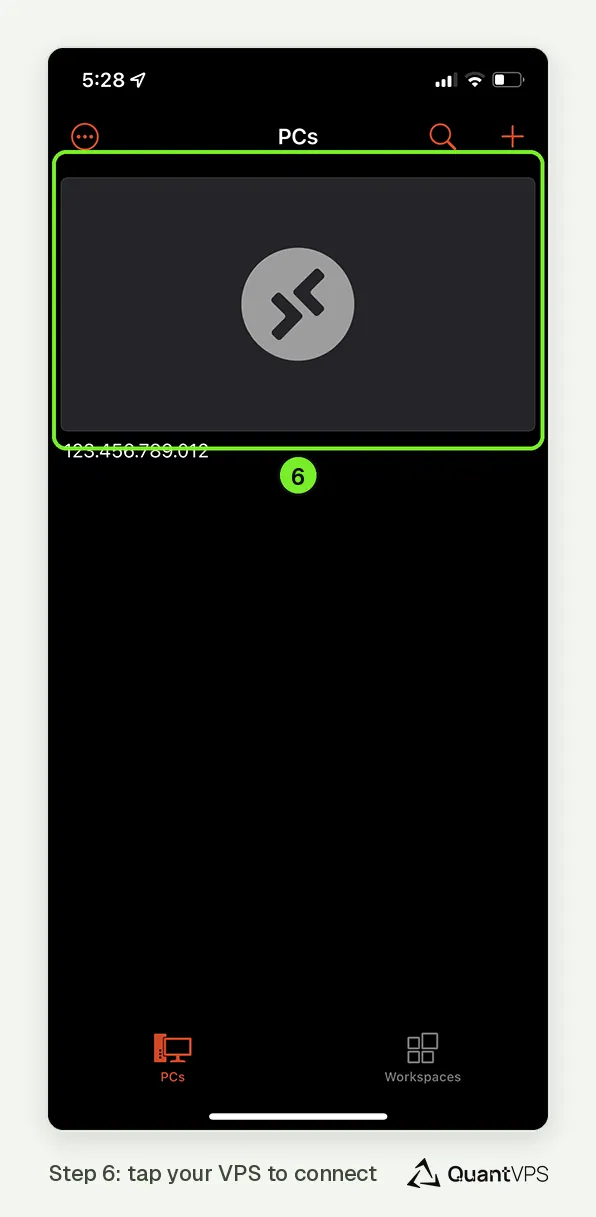
- Your VPS shows on the Devices tab. Tap it to connect. The first time, tap Accept if Windows App asks you to verify the certificate.
You're All Set
Once connected, you'll see your VPS desktop, just like on your computer. You can open your trading platform, monitor markets, and execute trades securely from anywhere.
Close Windows App when you're done. Your VPS stays online, market data keeps flowing and your strategies keep running.
Tips for Mobile Use
- Use a stable network: Wi-Fi is preferred for smoother performance, but 5G/LTE also works well.
- Prefer larger screens: An iPad offers better usability for managing charts, platforms, and terminals.
- Watch battery usage: Prolonged remote sessions can drain battery quickly; keep your device charged during use.
- Signing in elsewhere: Only one connection can use the same Windows account at a time. Signing in with that account from a second device, from inside the VPS, or from the browser console disconnects the first one with "another connection was made". Connecting from your phone disconnects your computer, and the other way round.
Troubleshooting Tips
If you run into any issues:
- Windows App doesn't open the file: install Windows App first. It's free on the App Store. Then, in the Files app, open Downloads, tap the file, then Share and Windows App. Still nothing? Type your login details in instead (see Prefer to Type It In?).
- Your VPS isn't on the Devices tab after you connect: in Windows App's settings, turn on Always Import RDP Files. Then open your RDP file again.
- The app can't connect to your VPS: download your RDP file again from your dashboard, so it has your current IP address. Typed it in by hand? Touch and hold your VPS, tap Edit and paste your IP address into PC Name. If your VPS just started, wait a few minutes. Otherwise, restart it from Manage Server in your dashboard. Some work, school and public networks block Remote Desktop. Try another network.
- The login fails: copy your password again from your dashboard and paste it. Don't type it. Check that the username is right. It's usually Administrator.
- Reach out to QuantVPS Support for help anytime.
Security Best Practices
- Protect your credentials: Never share your VPS login. Use a secure password manager if needed.
- No password in the file: Your RDP file has no password inside. Windows App asks for it when you connect.
- Secure your device: Use Face ID, Touch ID, or a strong passcode on your mobile device to prevent unauthorized access.
Need Assistance?
Our support team is available 24/7. If you have any questions or run into issues, open a support ticket from your QuantVPS dashboard and we'll get back to you as quickly as possible.