
The stochastic oscillator is a powerful tool for scalping on 1-minute charts, but success hinges on fine-tuning its settings to balance speed and accuracy. Default settings like 14,3,3 are too slow for fast trades, while overly aggressive setups like 3,3,3 can lead to false signals. The best settings depend on market conditions:
- 5,3,3: Quick signals with reduced noise, suitable for balanced scalping.
- 9,3,1: Ideal for trending markets, offering a balance of speed and reliability.
- 14,1,3: Fewer, more precise signals for volatile or uncertain conditions.
- 5,2,2: High-speed signals for volatile markets, best for experienced scalpers.
To improve accuracy, consider pairing the stochastic with tools like moving averages, Bollinger Bands, or volume analysis. Risk management is crucial - stick to a 1% risk-per-trade rule, use tight stop-losses, and backtest trading strategies with at least 30-100 trades.
For scalping success, combine optimized stochastic settings with disciplined execution, robust risk controls, and a low-latency trading environment like QuantVPS.
How Stochastic Indicator Parameters Work
The stochastic oscillator relies on three key parameters that shape how it behaves: the %K period, the %D period, and the smoothing (or slowing) value. Each of these plays a role in balancing the speed and reliability of the signals, making them critical for fine-tuning the oscillator - especially in scalping strategies where precision matters.
How %K Affects Signal Speed
The %K period is the heart of the stochastic oscillator. It measures where the current closing price sits within the range of the highest high and lowest low over a set number of candles. A shorter %K period - like 5 or 9 - makes the oscillator extremely sensitive, reacting almost instantly to price changes and capturing quick momentum shifts. On the other hand, a longer %K period, such as 14, smooths out minor fluctuations, producing fewer but more reliable signals.
As Reza Bagheri puts it:
"A shorter %K period means the oscillator will react more swiftly to recent price changes, generating more frequent signals".
For scalpers aiming to catch small, rapid price movements, a %K setting between 3 and 5 offers maximum responsiveness. However, traders who value accuracy over speed might prefer a %K of 14 to avoid getting caught in whipsaw trades. During volatile markets, a longer %K period helps filter out insignificant price noise, while shorter periods work better in calmer conditions.
What %D Does: The Signal Line
The %D line acts as a moving average of %K, providing a smoother view of momentum shifts. For fast-paced scalping, especially on 1-minute charts, %D is crucial for confirming signals when %K crosses above or below it. A bullish signal occurs when %K crosses above %D, while a bearish signal happens when %K drops below %D.
Many scalpers stick to a %D setting of 3 periods, keeping it tightly aligned with %K for quicker reactions to price changes. Crossovers within extreme zones - below 20 for potential buys or above 80 for potential sells - can also signal stronger chances of a reversal. Using an exponential moving average (EMA) for %D can further enhance responsiveness, which ties into the importance of smoothing to manage volatility.
Smoothing: Reducing Noise Without Losing Accuracy
Smoothing is the final piece of the puzzle, helping to reduce noise and refine the oscillator's effectiveness. It filters the raw %K data before calculating the %D signal line. A smoothing value of 1 creates a "fast stochastic" that reacts to nearly every price tick, while higher values result in a "slow stochastic" with fewer but often more dependable signals. Smoothing values between 1 and 3 are commonly used to balance quick entries with noise reduction.
While higher smoothing values clarify trends by reducing erratic movements, they also introduce lag, which can lead to missed opportunities. Studies suggest that adjusting smoothing periods based on Average True Range (ATR) can cut false signals by up to 30% during volatile market conditions. Starting with a smoothing value of 3 - commonly seen in setups like 5,3,3 or 14,3,3 - offers a practical middle ground. It filters out excessive noise while staying responsive enough for 1-minute scalping strategies.
Run 24/7 while you sleep. Keep bots, platforms, and trade copiers online on a dedicated VPS.
Low-latency VPS hosting for your trading platform.
From $59.99/mo
Best Stochastic Settings for 1-Minute Charts
Fine-tuning stochastic settings is key to making the most of 1-minute charts. These configurations aim to balance speed, accuracy, and noise reduction, helping scalpers navigate rapid price changes effectively. Below are some setups tailored for different market conditions, often used alongside other best trading indicators to confirm entries.
5,3,3 Settings: Quick Responses with Reduced Noise
The 5,3,3 setup is perfect for traders who need fast signals without being overwhelmed by minor fluctuations. With a %K period of 5, this configuration responds swiftly to price shifts, while the smoothing value of 3 helps filter out false signals. This makes it a solid choice for scalping on 1-minute charts.
"Default settings (14,3,3) are too slow [for scalping]. Use (5,3,3) or (9,3,1) for faster signals." - Brady Young, Marketing Specialist at LuxAlgo
9,3,1 Settings: Ideal for Trending Markets
If you're trading in trending conditions, the 9,3,1 setup offers a balance of speed and accuracy. The %K period of 9 provides better filtering, while the minimal smoothing value of 1 ensures the oscillator remains highly responsive to momentum shifts. This configuration is particularly effective during high-volatility sessions, like the New York open, allowing traders to capitalize on strong price movements without jumping in too early.
14,1,3 Settings: Fewer but Stronger Signals
For traders who prefer quality over quantity, the 14,1,3 setup is a great option. The extended %K period of 14 eliminates much of the short-term noise, ensuring that only significant price movements trigger signals. The %D smoothing set to 1 keeps the signal line responsive, while a smoothing value of 3 adds an extra layer of noise reduction. This setup is best suited for choppy or uncertain market conditions where precision is crucial.
5,2,2 Settings: High-Speed Signals for Volatile Markets
The 5,2,2 configuration is designed for maximum speed, making it a go-to choice during periods of extreme market volatility. With a short %K period and minimal smoothing on both the %D line and the oscillator, this setup captures nearly every price movement. While it increases the risk of false signals, it shines during major news events or the first 30 minutes of the New York session, where rapid price changes create prime scalping opportunities. Experienced traders often switch to this setting only when the market conditions demand such heightened sensitivity.
Comparing Stochastic Settings Performance
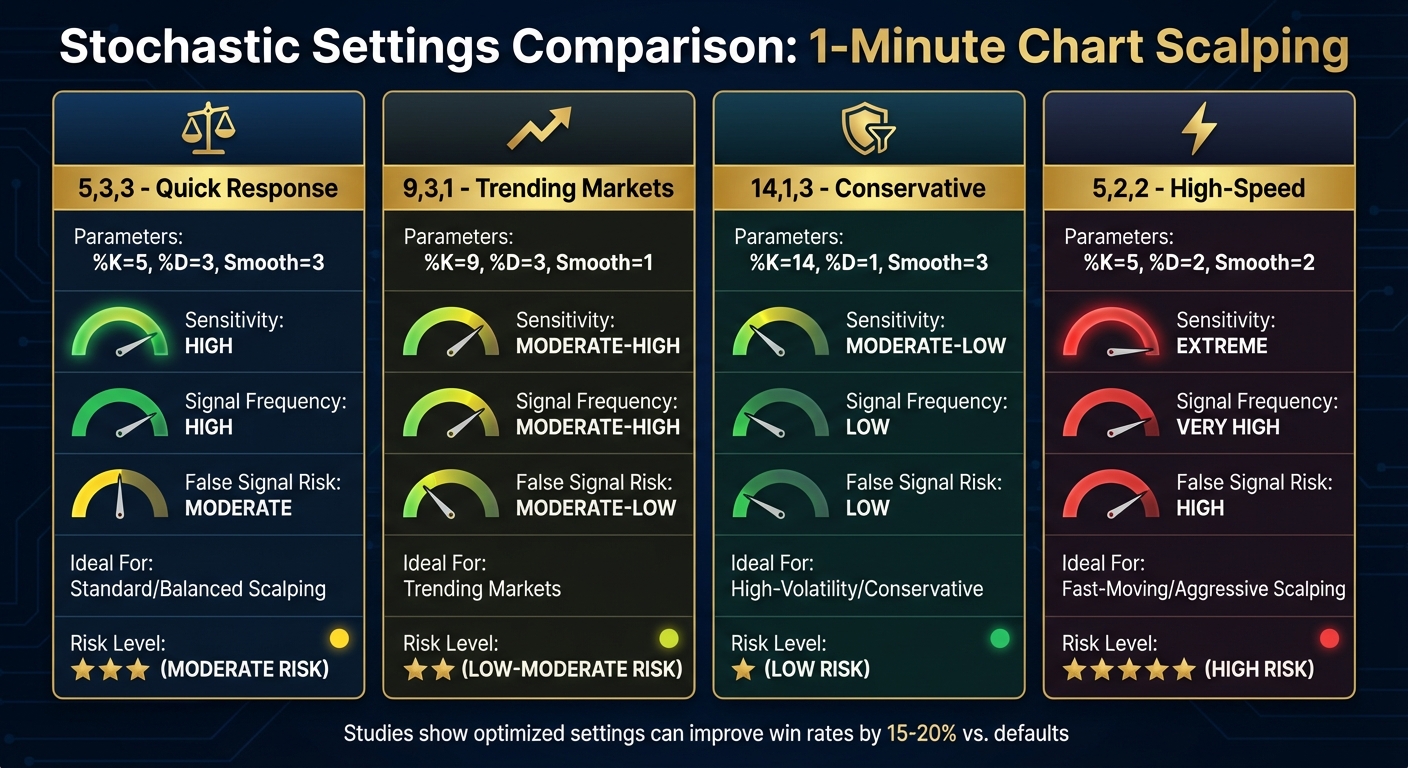
Stochastic Settings Comparison for 1-Minute Chart Scalping
Selecting the right stochastic settings can make a big difference in how effectively you trade, especially in fast-moving markets. Your choice should align with your trading style and the specific market conditions you're dealing with. Each setup has its strengths, and understanding these differences can help you make better decisions.
The 5,3,3 setup strikes a good balance, offering a mix of sensitivity and reliability, making it one of the best indicators for day trading. It’s flexible enough for most scalping strategies, providing consistent signals while keeping noise at a manageable level. If you’re looking for something more responsive, the 9,3,1 configuration is a strong choice. It works well in clearly trending markets where you want to ride the momentum without overthinking every price movement. On the other hand, the 14,1,3 setup focuses on quality over quantity. It generates fewer signals but reduces the chances of false entries, making it great for volatile or uncertain conditions - especially if you’re still gaining confidence with 1-minute scalping. Lastly, the 5,2,2 setting is the most sensitive of the group. It reacts to almost every price move, offering plenty of opportunities but also increasing the risk of false signals. This setup is best suited for experienced traders who can quickly filter out market noise.
Studies indicate that fine-tuning your stochastic settings can improve win rates by 15% to 20% compared to sticking with default configurations. This improvement comes from aligning your settings with the market environment, rather than relying on a generic approach.
Settings Comparison Table
| Setting (%K, %D, Smooth) | Sensitivity | Signal Frequency | False Signal Risk | Ideal Market Condition |
|---|---|---|---|---|
| 5,3,3 | High | High | Moderate | Standard/Balanced Scalping |
| 9,3,1 | Moderate-High | Moderate-High | Moderate-Low | Trending Markets |
| 14,1,3 | Moderate-Low | Low | Low | High-Volatility/Conservative |
| 5,2,2 | Extreme | Very High | High | Fast-Moving/Aggressive Scalping |
This table highlights the trade-offs between speed and reliability. Faster settings like 5,2,2 deliver more signals but come with a higher risk of false entries. In contrast, slower setups like 14,1,3 offer fewer signals but with greater accuracy. Your choice should depend on your comfort with risk and how volatile the market is at the moment.
Setting Up Stochastic Indicators on QuantVPS
You can set up your stochastic indicator on QuantVPS in just a few minutes, leveraging its ultra-low latency, Windows-based infrastructure. Designed for rapid 1-minute scalping, QuantVPS provides a stable, 24/7 virtual server environment optimized for financial markets. With execution speeds under 50 milliseconds, it’s ideal for scalping strategies where every millisecond counts. Fine-tuning your execution environment on QuantVPS ensures your stochastic settings perform at their best for precise, high-speed trading.
To get started, connect to QuantVPS via RDP and open your trading platform, such as MetaTrader 4/5 or NinjaTrader. For MetaTrader users, go to "Insert" > "Indicators" > "Oscillators" > "Stochastic Oscillator", then input your preferred parameters. A common setup is 5,3,3 - where 5 represents %K, 3 is %D, and 3 is the slowing factor. If you’re using TradingView, click on the "Indicators" (fx) section, search for "Stochastic", and adjust the %K and %D values accordingly.
For better performance on 1-minute charts, set the %D line to use the Exponential Moving Average (EMA), which reacts more quickly to price changes. Tailor the overbought and oversold levels to match market conditions: 85/15 for volatile markets or 70/30 for more stable, range-bound conditions.
A low-latency setup is essential to minimize slippage between signal generation and trade execution. Hosting your QuantVPS instance in a data center close to your broker’s server can shave off critical milliseconds, increasing your chances of capturing price movements.
"Your execution environment matters just as much as your strategy." - PropTraderz
Finally, make sure to configure auto-start for your trading platform. This ensures uninterrupted monitoring of the market, allowing scalpers using automated strategies to capitalize on momentum shifts in real time.
Entry and Exit Rules for Scalping
For bullish entries, look for the %K line to cross above the %D line below 20, signaling potential upward momentum. Confirm this signal with two additional factors: the price trading above a 50-period SMA and the appearance of a bullish reversal candlestick pattern, such as a hammer or engulfing candle. This "triple confirmation" approach is particularly useful on 1-minute charts, helping to filter out false signals.
For bearish entries, the opposite applies. Enter when the %K line crosses below the %D line above 80. Ensure confirmation by checking that the price is trading below the 50-period SMA and that a bearish reversal candlestick, like a shooting star, is present. Additionally, watch for the ANTI strategy's "hook" pattern, where the %K line briefly retraces before resuming alignment with the trend direction.
Stay online and closer to execution. Choose a VPS location for CME futures, New York markets, London FX, API trading, and more.
Host your platform near the market route that matters.
From $59.99/mo
Beyond these crossovers, divergence signals can add another layer of precision to your entries. A bullish divergence occurs when the price makes a lower low, but the stochastic shows a higher low, indicating that downward momentum is weakening. On the flip side, bearish divergence happens when the price forms a higher high while the stochastic creates a lower high. Studies suggest that combining stochastic signals with volume confirmation can boost entry accuracy by about 22% in fast-moving markets.
For exits, there are two main strategies:
- Exit when the stochastic reaches the opposite extreme (e.g., close a long trade when %K falls below 80).
- Use a fixed risk-reward ratio, typically between 1:1.5 and 1:2.
To manage noise, set stop-loss orders 5–10 pips away or just beyond the most recent swing. Adjust your thresholds based on market conditions: use 85/15 in volatile markets and 70/30 in ranging markets to fine-tune your exit timing.
Another effective approach is the "Double Threshold Method." This involves waiting for the stochastic to cross both the 20/80 and 30/70 levels before entering a trade. While this method reduces the frequency of trades, it has been shown to cut false signals by 37% in high-volatility conditions, making it a valuable tool for traders focused on precision over quantity.
Using Additional Indicators with Stochastic
Pairing the stochastic oscillator with other indicators can significantly enhance precision. Research suggests that combining stochastic with complementary tools can increase scalping profits by 31%. The trick is to select indicators that provide unique insights rather than duplicating the same information. By integrating these tools with your stochastic settings, you can fine-tune your automated trading strategy.
Moving averages are excellent for identifying trends. A 50-period Exponential Moving Average (EMA) works well as a trend filter. For example, focus on buy signals when the price is above the EMA and sell signals when it’s below. Since EMAs respond faster to recent price changes compared to simple moving averages, they’re particularly effective on fast-paced 1-minute charts. This approach helps you avoid counter-trend trades, keeping your strategy aligned with the dominant market direction.
Bollinger Bands add a layer of volatility analysis to your stochastic signals. When the price touches or dips below the lower band while the stochastic oscillator is under 20, it can indicate a strong reversal opportunity. Similarly, if the price reaches the upper band and the stochastic is above 80, it may signal a potential short. Backtesting strategies using Bollinger Bands (20, 2) alongside stochastic settings (5, 3, 3) on 5-minute charts have shown positive results across various market conditions - whether bullish, bearish, or sideways. A common approach is to set stop-losses 10 pips beyond the piercing candlestick and aim for take-profit targets around 20 pips.
For added confidence, volume analysis can improve entry accuracy by 22% in cryptocurrency scalping. Look for volume spikes that align with stochastic crossovers to filter out false signals and confirm significant price movements. Additionally, the Average True Range (ATR) can help fine-tune your stochastic settings. When ATR values are high, consider extending your %K period to reduce noise. Conversely, lower ATR values allow for quicker adjustments to market changes.
These supporting indicators provide a solid foundation for refining your entry and exit strategies, which will be explored further in the next section.
Risk Management for 1-Minute Scalping
When it comes to 1-minute scalping, having precise indicator settings is just the starting point. The real backbone of success lies in solid risk management. Without it, the fast-paced nature of scalping can quickly drain your account. A widely followed rule is the 1% risk rule - never put more than 1% of your total account balance on the line for a single trade. This approach helps preserve your capital, giving you room to make multiple trades without wiping out your funds too quickly.
For position sizing, many scalpers lean on the 3:1 Micro Model strategy. This method combines a tight stop-loss (ranging from 0.10% to 0.25%) with a take-profit target of 0.30% to 0.80%. A smart move within this strategy is to shift your stop-loss to break-even once your trade reaches a +0.20% profit. If momentum starts to fade, it's better to cut your losses and exit promptly.
Here’s a quick breakdown of the key parameters for the 3:1 Micro Model:
| Parameter | Value |
|---|---|
| Max Risk Per Trade | 1% of Account Balance |
| Stop-Loss Range | 0.10%–0.25% |
| Take-Profit Range | 0.30%–0.80% |
| Break-Even Trigger | +0.20% Profit |
| Session Stop Rule | 3–5 Wins or 2 Losses |
Fine-tuning your stop-loss placement is another critical element. A good rule of thumb is to place stops just beyond the most recent micro-swing high or low. If volatility spikes - something you can spot through higher ATR (Average True Range) values - consider widening your stop-loss. On the flip side, tighten it when the market is calmer.
Trading on 1-minute charts can stir up strong emotions like greed and fear - both of which can cloud your judgment. To keep these emotions in check, set session-based limits. For example, stop trading after 3–5 wins or 2 losses in a session. And if the market looks chaotic - signaled by tangled EMAs - it might be better to sit that trade out entirely.
Another tip: take a short break every 30–60 minutes to stay sharp and avoid burnout. Before diving in with real money, backtest your strategy on at least 30 to 100 trades using tick data. This helps you understand how factors like spreads can affect your results.
Conclusion
Scalping on 1-minute charts requires sharp precision, quick decision-making, and unwavering discipline. To thrive in this fast-paced environment, pairing the right stochastic settings with efficient execution and sound risk management is essential. The default 14,3,3 setting isn't well-suited for such rapid trading. Instead, configurations like 5,3,3 for quicker responsiveness or 9,3,1 for a balance between speed and accuracy can give you the edge needed to capitalize on fleeting micro-momentum shifts.
"Scalping success comes from balancing speed and accuracy." – Brady Young, Marketing Specialist, LuxAlgo
That said, settings alone won't guarantee profits. Even the most refined configurations lose their value if execution is slow or risk management is neglected. Using services like QuantVPS, which offers ultra-low latency (0–1 ms), ensures that your trades execute with the speed required to compete when every millisecond matters.
Equally important is a solid risk management plan. Stick to a conservative risk-per-trade ratio and use tight stop-losses to safeguard your capital. The intense, fast-moving nature of 1-minute scalping can easily lead to emotional decisions, so having clear rules in place helps you stay grounded.
Before trading live, thorough backtesting is a must. Test your settings on at least 30 to 100 trades using tick data to understand how spreads and execution impact your strategy. Additionally, combining stochastic indicators with other complementary tools can further refine your approach. Ultimately, consistent success in scalping comes from aligning precise settings with current market conditions, maintaining disciplined execution, and adapting as needed. This methodical approach lays the groundwork for profitable scalping on 1-minute charts.
FAQs
How do I choose between 5,3,3 and 9,3,1 on a 1-minute chart?
When deciding between 5,3,3 and 9,3,1, it all comes down to your trading style and how quickly you want to react to market changes. The 5,3,3 setting is quicker, making it a great choice for aggressive scalping strategies where timing is critical. On the other hand, 9,3,1 is slower, but it helps filter out false signals, providing a steadier approach. Your decision should match your risk tolerance and the level of accuracy you aim for when scalping on 1-minute charts.
Should I use 70/30 or 85/15 overbought/oversold levels for scalping?
When scalping with the stochastic oscillator, it's smart to adjust the levels based on market conditions. In volatile markets, setting the levels to 85/15 helps filter out false signals, making it easier to spot true overbought and oversold conditions. On the other hand, in less volatile or ranging markets, using 70/30 levels provides more sensitivity, allowing for faster entries and exits. Tweaking these thresholds ensures your strategy stays sharp and better aligned with the market's behavior.
How do I backtest stochastic scalping correctly on 1-minute data?
To test stochastic scalping on 1-minute charts, begin with high-quality historical data that mirrors actual market conditions, including bid-ask spreads and potential slippage. Apply fast stochastic settings, such as (5,3,3) or (9,3,1), to generate quick and responsive signals. When simulating trades, factor in realistic execution costs - like transaction fees, slippage, and spreads - to ensure your results are practical. Evaluate key metrics like win rate, risk-to-reward ratio, and drawdowns to fine-tune your approach and improve scalping performance.


