
Automating your Interactive Brokers (IBKR) trading is now easier with PickMyTrade and QuantVPS. Here's how it works:
- PickMyTrade: A no-code platform that links TradingView alerts to IBKR using the Trader Workstation (TWS) API. It processes trades in milliseconds and supports unlimited strategies.
- QuantVPS: A 24/7 cloud-based Windows VPS with ultra-low latency, ensuring uninterrupted trading even if your home computer or internet fails.
- Interactive Brokers (IBKR): Provides the brokerage platform for executing trades, managed via TWS.
What You'll Need:
-
QuantVPS Subscription:
- Plans start at $59.99/month.
- Includes Windows Server 2022 with ultra-low latency.
-
PickMyTrade Subscription:
- Starts at $50/month, with a 5-day free trial.
-
Interactive Brokers Account:
- Requires TWS installation, API access, and real-time market data subscriptions.
-
TradingView Strategies:
- Alerts must be configured with webhook notifications and JSON payloads.
Full Video Guide:
Key Steps:
- Set Up QuantVPS: Choose a plan, apply the referral code for discounts, and connect via Remote Desktop.
- Install TWS and PickMyTrade: Log into TWS and connect PickMyTrade to IBKR.
- Configure TradingView Alerts: Use webhook URLs and JSON payloads to trigger trades.
Benefits:
- Reliability: VPS ensures 99.9% uptime with no interruptions.
- Speed: Sub-50ms latency minimizes slippage.
- Automation: Hands-free trading with precise execution.
By combining these tools, you can automate your trading strategies seamlessly while ensuring speed and stability.
What You Need to Get Started
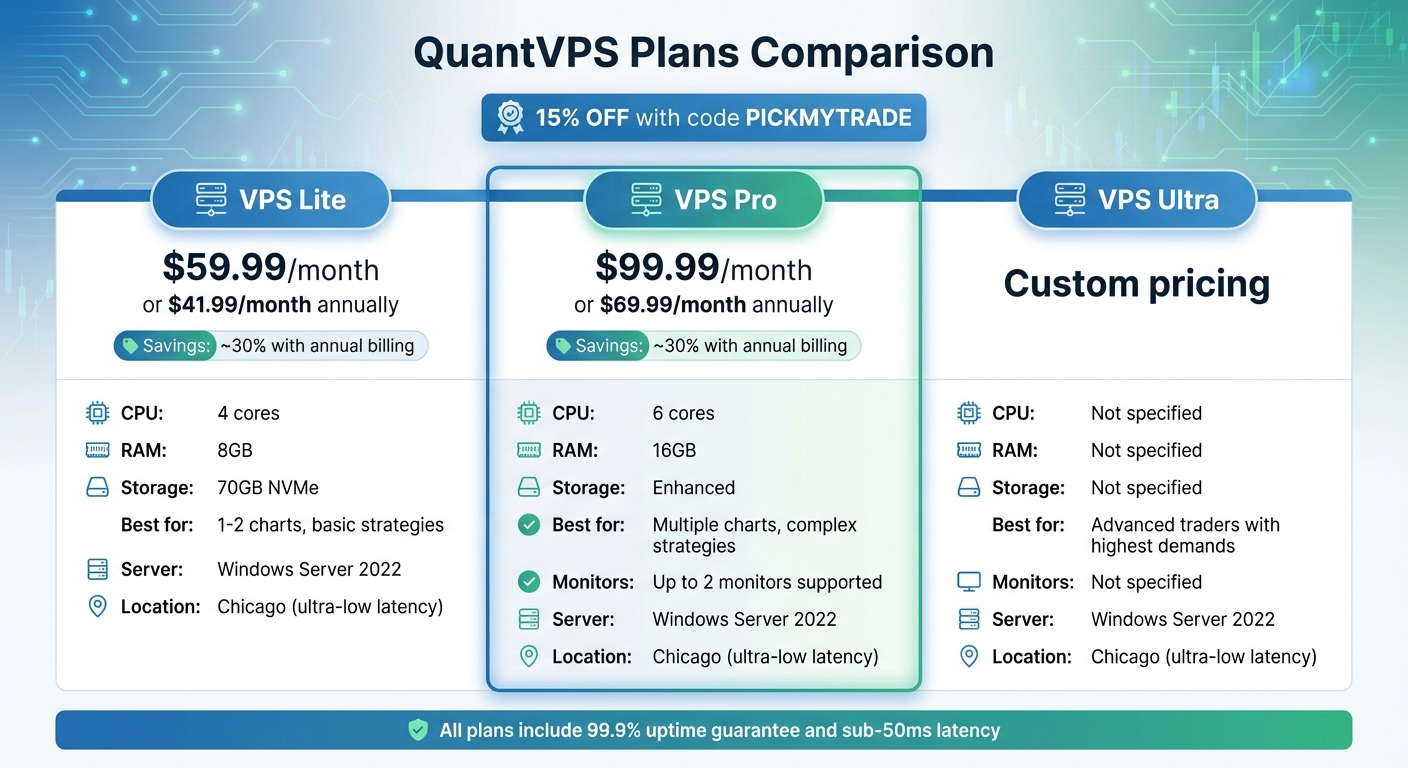
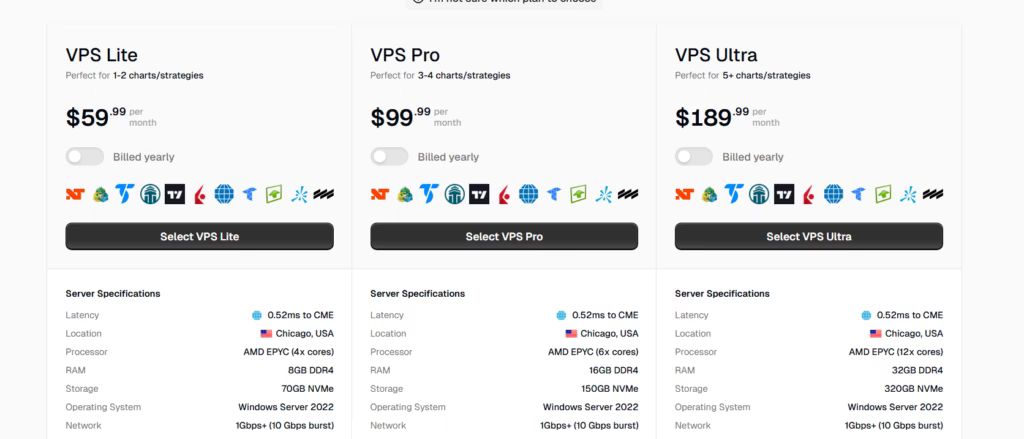
QuantVPS Pricing Plans Comparison for Automated Trading
Before diving into automating your trades with Interactive Brokers (IBKR), you'll need to have a few key components in place. Here's a breakdown of everything you'll need to ensure a smooth setup.
QuantVPS Account and Server
To keep your trading automation running 24/7, you'll need a reliable virtual private server (VPS). QuantVPS offers Windows-based servers specifically configured for trading, including Windows Server 2022. Their plans start at $59.99/month for the VPS Lite option (or $41.99/month if billed annually). This plan comes with 4 cores, 8GB of RAM, and 70GB of NVMe storage - ideal for running 1-2 charts. If your strategies are more complex and involve multiple charts, the VPS Pro plan at $99.99/month (or $69.99/month annually) provides 6 cores, 16GB of RAM, and support for up to two monitors. These servers ensure your trading system operates without interruptions.
PickMyTrade Subscription
PickMyTrade acts as the bridge between TradingView alerts and Interactive Brokers, enabling automated trade execution. They offer a 5-day free trial (no credit card required). After the trial, you can choose from the following plans:
- $50/month (billed monthly)
- $135 for 91 days (10% savings)
- $500/year (16.67% savings)
All plans include unlimited trading strategies, automated trade execution, and round-the-clock support.
Interactive Brokers Account with TWS
An Interactive Brokers account with Trader Workstation (TWS) is essential for executing trades. You'll need to install TWS on your QuantVPS server and keep it logged in to ensure continuous operation. Additionally, make sure your IBKR account has:
- API access enabled
- Market data subscriptions for real-time analysis
- Two-factor authentication for added security
TWS serves as the hub for managing and executing trades, so it's a critical part of your setup.
TradingView Strategies
Your TradingView strategies are the backbone of your automated trading system. These strategies generate alerts that trigger trades. Each alert must be configured to send webhook notifications containing detailed trade instructions. This includes data like entry price, position size, and stop-loss levels. Properly setting up these alerts ensures accurate and timely trade execution.
Understanding Webhooks and Automation
Run 24/7 while you sleep. Keep bots, platforms, and trade copiers online on a dedicated VPS.
Low-latency VPS hosting for your trading platform.
From $59.99/mo
A basic understanding of webhooks will go a long way in setting up and optimizing your system. Webhooks are automated HTTP requests triggered by specific events, used to send data between systems. In this case:
- TradingView sends a webhook (a POST request) containing trade data in JSON format to a unique URL provided by PickMyTrade.
- PickMyTrade processes this data and converts it into trade orders, which are then sent to IBKR through TWS.
Knowing how webhooks work will help you troubleshoot and fine-tune your setup as needed.
Setup Instructions
Ready to integrate QuantVPS, PickMyTrade, and IBKR into a seamless trading system? Follow these step-by-step instructions to get everything up and running.
1. Choose a QuantVPS Plan
Head over to QuantVPS using the PickMyTrade referral link to snag a 15% discount on your subscription. Select the plan that matches your needs - VPS Lite works for basic setups, while VPS Pro or VPS Ultra is better for more complex strategies with multiple charts. All plans run on Windows Server 2022 and are hosted in Chicago, offering ultra-low latency connections. Want to save even more? Opt for annual billing and cut costs by about 30% compared to monthly payments.
After selecting a plan, confirm these settings:
- Operating system: Windows Server 2022
- Location: Best region (as per your choice)

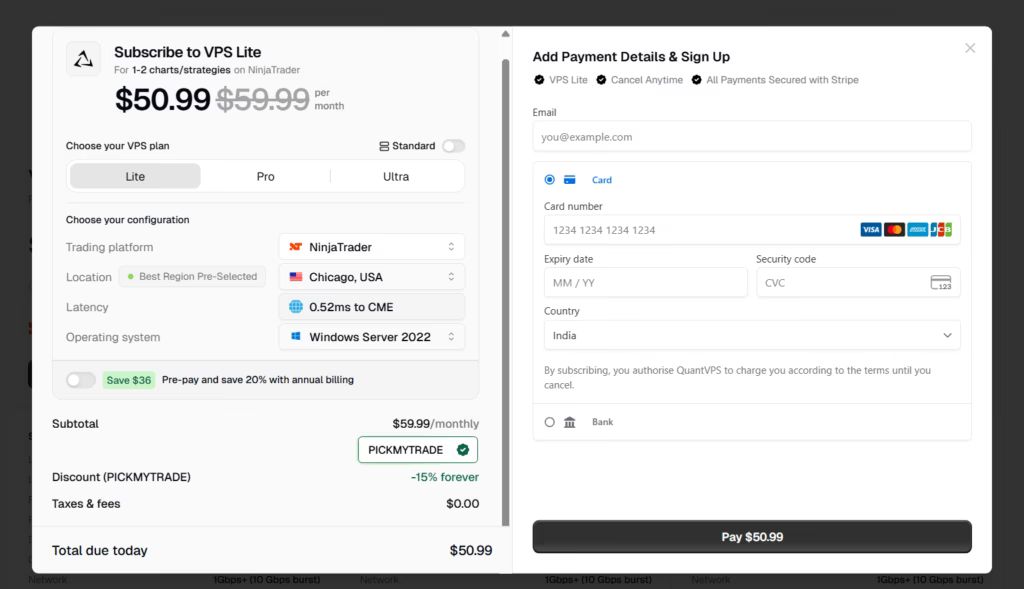
2. Apply the PickMyTrade Referral Code
During checkout, enter the referral code PICKMYTRADE in the designated field to activate your 15% discount.
Once the code is applied, the discount appears immediately. After that, complete the payment to start VPS deployment. As soon as the payment finishes, QuantVPS begins setting up your server.
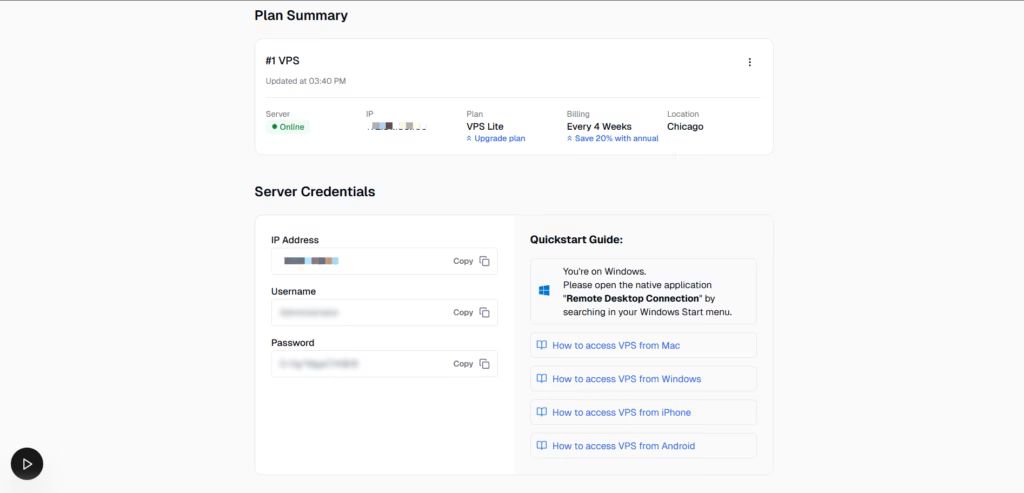
3. Retrieve Your VPS Credentials from the QuantVPS Dashboard
Once you've completed your payment, QuantVPS will deploy your server and provide your login credentials. Check your QuantVPS dashboard or confirmation email for these details. Keep this information handy for the next step.
Here you can find:
- VPS IP address
- Username
- Password
- Server status
You will need these details in the next step, so keep them ready.
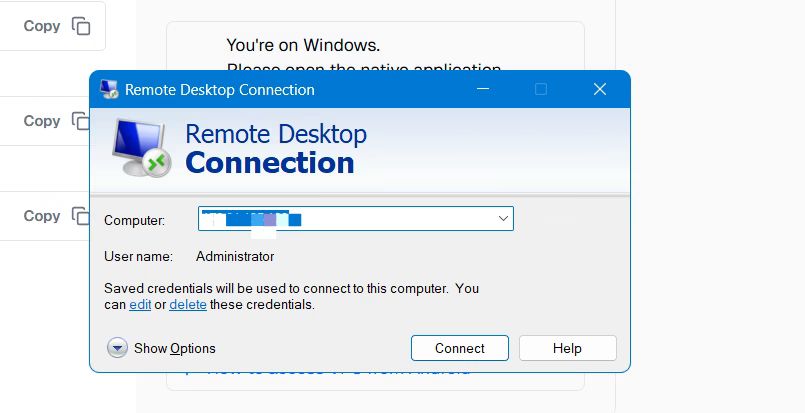
4. Connect to Your VPS using Remote Desktop
To access your VPS from a Windows PC, open Remote Desktop Connection, input your VPS IP, username, and password, and click "Connect." If prompted, enter your password again and click "Yes" on any security warnings. You’ll then see your VPS desktop, which operates independently of your local machine.
If you’re using a Mac, download the Windows Remote Desktop App by Microsoft from the Mac App Store. Open the app, click the "+" icon, and enter your VPS IP, username, and password. Once added, double-click your VPS tile to connect.
5. Check for Pre-Installed Software
After connecting to your VPS, confirm that
- IBKR Trader Workstation (TWS) and the
- PickMyTrade IB app are already installed on the desktop.
Because QuantVPS prepared the VPS in advance, you do not need to install anything manually.

6. Log into Interactive Brokers Trader Workstation (TWS)
Launch Trader Workstation (TWS) on your VPS.
Next, enter your Interactive Brokers (IBKR) username and password to log in.
Sometimes, IB may ask for additional security verification. Complete the verification if prompted.
After logging in, make sure TWS remains open and connected. PickMyTrade relies on a live TWS connection to place trades, so do not close the application while automation is active.
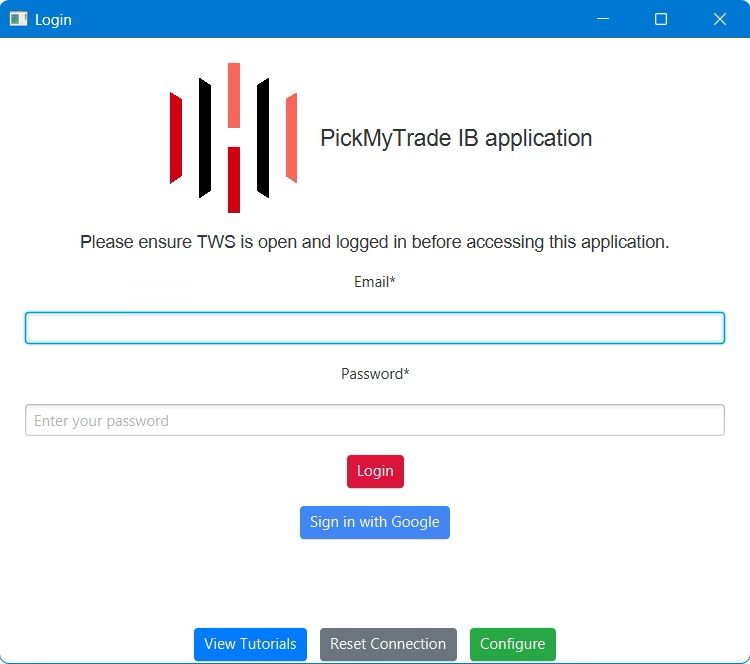
7. Connect PickMyTrade to Interactive Brokers
Once TWS is running, open the PickMyTrade IB application on the VPS.
Then follow these steps:
- Log in to your PickMyTrade account
- Check your IB connection status inside the application
- If not connected, click the “IB Connection” button in the navigation bar
- Wait for the connection confirmation
Before moving forward, always confirm that PickMyTrade shows an active connection to Interactive Brokers. Alerts and trading actions depend on this connection.
8. Next Steps: Automated TradingView Strategies
Now it’s time to configure your TradingView alerts to send trade signals. Start by generating an alert in your PickMyTrade account to receive a Webhook URL and a JSON payload tailored to your setup.
- Copy the JSON payload and paste it into the "Message" box when creating a new alert in TradingView.
- Then, copy the Webhook URL and paste it into the "Webhook URL" field under the Notifications tab in TradingView's alert settings.
For added security, make sure 2-Factor Authentication (2FA) is enabled on your TradingView account. Define your alert conditions - such as a VWAP band cross or an indicator signal - and set the alert to trigger "Once per bar." Once the condition is met, TradingView will send an HTTP POST request with your JSON payload to the Webhook URL. PickMyTrade will then convert this data into trade orders and send them to IBKR via TWS.
For detailed instructions on creating your JSON payload and configuring alerts, refer to the PickMyTrade documentation below. With these steps completed, your automated trading system is good to go!
- Automating TradingView Strategies for Futures & Stocks in Interactive Brokers (IB)
- Automating TradingView Strategies for Options & Futures Options in Interactive Brokers (IB)
Benefits of Using a VPS for Automated Trading
A VPS provides a dependable and efficient solution for hosting PickMyTrade and IBKR, ensuring your automated trading strategies run seamlessly.
Continuous Operation
A VPS operates 24/7 in a professional data center, keeping TWS and PickMyTrade connected at all times. Unlike your personal computer, it doesn’t pause for software updates, enter sleep mode, or suffer from power outages. This ensures your automated strategies are always active, capturing market opportunities day and night. With backup power systems and redundant internet connections, VPS providers deliver up to 99.9% uptime. This reliability guarantees that trades execute right when your TradingView alerts trigger, without interruptions or missed signals.
Faster Execution
Stay online and closer to execution. Choose a VPS location for CME futures, New York markets, London FX, API trading, and more.
Host your platform near the market route that matters.
From $59.99/mo
In trading, speed can make or break a deal. QuantVPS servers offer ultra-low latency of less than 0.52ms to the CME Group exchange, drastically reducing the delay between alerts and trade execution. By comparison, home internet connections often experience latency ranging from 50 to 500ms. This difference in speed minimizes slippage - the gap between the expected price and the actual execution price. On average, traders save 2.5–3.5 pips per trade by using a low-latency VPS. As AvaTrade explains:
"Automated trading systems can analyse market conditions and execute trades within milliseconds, far outpaces human reaction times. This speed ensures that traders can enter and exit positions in the market at the best prices possible, taking maximum advantage of market opportunities." - AvaTrade
These performance gains highlight why a dedicated VPS is essential for optimizing automated trading.
Consistent Connection and Ready-to-Use Setup
A VPS ensures a stable connection between TradingView, PickMyTrade, and IBKR, free from interruptions caused by home network issues. With dedicated resources - like the 6 cores and 16GB RAM offered in VPS Pro - your trading software operates smoothly, without competing for resources with other applications. Additionally, Remote Desktop Protocol allows you to access your VPS from any device, anywhere, giving you full control over your automated strategies no matter where you are. These features work together to keep your trading system efficient and reliable, perfectly complementing the QuantVPS-PickMyTrade approach.
Best Practices
Once your setup is complete, follow these best practices to improve performance and reduce the risk of errors.
Test with Paper Trading First
Before diving into live trading, always start with Interactive Brokers' paper trading mode. This step is crucial for evaluating your trading strategy without risking real money. Activate paper trading in your platform, deposit virtual funds, and make sure you’re using the specific API keys and endpoints meant for paper trading - these are different from live trading credentials. Observe how your bot reacts to market conditions, such as sudden price swings and volume changes, and adjust your parameters accordingly. While paper trading doesn’t account for factors like latency-induced price slippage or regulatory fees, it’s an important first step in validating your setup.
Check TWS API Settings
After setting up your testing environment, ensure your Trader Workstation (TWS) is correctly configured for automated trading. Go to File (or Edit) → Global Configuration → API → Settings in TWS. Enable "ActiveX and Socket Clients" by checking the box, and uncheck "Read-Only" to allow API orders. Confirm that the Socket Port is set to PickMyTrade's default: 7496 for live trading or 7497 for paper trading. Since PickMyTrade operates on your QuantVPS, uncheck "Allow connections from localhost only" and add your QuantVPS IP address to the "Trusted IPs" list. To keep the system running smoothly, enable auto-restart by checking "Auto restart" and disable "Auto log off" under Global Configuration → Lock and Exit.
Name Alerts Clearly
Create clear and descriptive names for alerts, including specific risk parameters. Use a consistent naming format that reflects the asset, timeframe, strategy, and condition. For instance, labels like "BTC-1H-RSI-Oversold-Long" or "ETH-Daily-MA-Golden-Cross" make it easy to identify the alert’s purpose. When setting up automated trading alerts, format the message in JSON and include key details such as "action" (buy/sell), "symbol", "quantity", and "price" type (market/limit). Leverage TradingView's dynamic variables - like {{close}}, {{volume}}, and {{time}} - to send real-time market data to PickMyTrade. Before going live, test webhook messages with small positions or paper trading accounts, and use a JSON validator to confirm the message format is correct.
Review Execution Logs Regularly
Regularly review execution logs to monitor performance and catch potential issues early. This is essential for maintaining a smooth connection between TradingView, PickMyTrade, and IBKR. Enable API message logging in TWS by selecting "Create API message log file" under API → Settings. Check active alerts frequently to resolve any conflicting signals, and set alert triggers to "Once Per Bar Close" to avoid excessive notifications during volatile market periods. This ongoing review helps ensure your system operates as intended.
Common Problems and Solutions
If you run into issues during setup or while executing trades, here are some focused troubleshooting steps to help you resolve the most common problems.
Check TWS Connection
If your orders aren't going through, start by confirming that TWS is running on your VPS and shows an active status. TWS acts as the communication link between PickMyTrade and Interactive Brokers - without it, trades won't execute. Look at the TWS Message/Log Window for any error messages.
If you're facing connection problems, check whether antivirus software or firewall settings are interfering. Also, keep in mind that Interactive Brokers performs daily server resets, which might disrupt connections temporarily, especially if you're trading across different time zones.
Verify Webhook Configuration
About 18.7% of webhook alerts fail due to errors in the URL or JSON formatting. Double-check your TradingView alert settings for mistakes like typos, extra spaces, or missing characters in the webhook URL. Make sure the URL uses HTTPS and is set to port 80 or 443 - other ports will be rejected. Use a JSON validator to confirm the structure of your alert message is correct.
You can test webhook delivery using TradingView's "Test Webhook" feature. Then, review the Alert Manager History to ensure alerts are firing as expected. Your webhook endpoint needs to return a 2xx HTTP status code (like 200, 201, or 204) within 30 seconds for successful processing. If problems continue, check the execution logs in PickMyTrade to see if alerts are being received and whether trades are being attempted.
Confirm PickMyTrade Status
Before placing trades, ensure that PickMyTrade shows an active status with Interactive Brokers. Both the PickMyTrade IB App and TWS must be running on your VPS. Avoid running TWS and IB Gateway at the same time, as this can cause conflicts. Log into your Interactive Brokers Account Management, then go to Settings → User Settings → API Settings and confirm that "Enable ActiveX and Socket Clients" is enabled and read-only API mode is turned off.
Make sure the port number in your PickMyTrade IB connection matches the one set in TWS (default: 7497) or IB Gateway (default: 4001). If you see a "disconnected" status, temporarily disable any VPN, antivirus, or firewall that might be blocking the connection. Keeping both your PickMyTrade IB App and TWS updated can also help avoid communication issues.
Fix Permission and Data Feed Errors
Once you've confirmed your connection and configuration settings, address any permission or data feed problems. Check the TWS Message/Log Window for specific error messages. Interactive Brokers requires symbols to be defined precisely - make sure the TradingView alert symbols match the corresponding IBKR contract symbols. A common error is "No security definition found", which usually points to a symbol mismatch or an unsupported instrument.
Additionally, confirm that your IB account has the required trading permissions and active market data subscriptions for the instruments you're trading. Orders may be rejected if these permissions or subscriptions are missing. If you encounter insufficient margin errors, try reducing trade size or reviewing your buying power in TWS. Always use JSON generated directly by the PickMyTrade dashboard, as manual edits can lead to syntax errors. To pinpoint the issue, try placing a manual order for the same symbol directly in TWS. If the manual order works, the problem likely lies in your PickMyTrade setup or alert configuration.
Conclusion
Automated trading becomes a streamlined and efficient process when you combine QuantVPS, PickMyTrade, and Interactive Brokers. PickMyTrade acts as a no-code bridge, seamlessly routing TradingView signals to Interactive Brokers without the need for complicated API coding. Interactive Brokers provides a versatile, multi-asset platform with global API access, while QuantVPS offers a dependable, low-latency server environment to keep everything running smoothly.
The real advantage lies in how these tools work together. PickMyTrade processes alerts and sends orders to brokers in just milliseconds. QuantVPS hosting ensures sub-50ms latency for Interactive Brokers connections, with API latencies typically ranging between 10 and 100ms for a variety of crypto and equity trades. Recent updates have even introduced WebSocket polling that’s 30% faster. This integration eliminates manual delays, allowing your strategies to execute 24/7 - even when your personal computer is offline.
"By setting the right configurations, you ensure every trade is executed precisely as intended - whether you're trading futures, stocks, or options." - PickMyTrade Documentation
Precise execution depends on proper configuration. Success in automated trading starts with setting up IBKR API permissions, fine-tuning PickMyTrade settings, and crafting accurate TradingView alerts. Testing with paper trading is a must to ensure strategies perform as expected, and monitoring execution logs helps catch any issues early.
With this setup, you gain the speed, accuracy, and discipline of automated systems while maintaining full control over your trading parameters. The reliability of QuantVPS, the user-friendly nature of PickMyTrade, and the extensive market access provided by Interactive Brokers give you a solid foundation for consistent, emotion-free trading. This setup ensures your trading operations remain uninterrupted and efficient when it matters most.
References
The PickMyTrade documentation provides detailed, step-by-step instructions to help you integrate and troubleshoot your automated trading system. From setting up a VPS to configuring advanced alerts, these resources cover everything you need. Below are links to the most relevant guides.
PickMyTrade QuantVPS Setup Guide
For a complete walkthrough on deploying QuantVPS, visit this guide. It explains the entire process, including logging into the VPS, configuring TWS (Trader Workstation), and verifying the connection.
PickMyTrade Alert Configuration
This documentation outlines how to set up alerts with PickMyTrade, including generating webhook URLs and formatting JSON payloads for TradingView alerts. It covers two automation methods:
-
Strategy-based automation: Uses
{{strategy.order.action}}for seamless execution. - Indicator-based automation: Supports limit orders and customizable stop-loss settings.
For troubleshooting, PickMyTrade also offers an "Alert Errors, Causes & Solutions" guide. It addresses common issues, error messages, and their fixes. Additionally, there are sections dedicated to resolving Interactive Brokers connection problems, such as TWS API permissions and symbol mapping.
FAQs
How can I properly configure my TradingView alerts for automated trading with PickMyTrade?
To make sure your TradingView alerts integrate smoothly with PickMyTrade, you'll need to format the alert message as valid JSON. Include key details like ticker, action (buy/sell), price, and quantity in the payload. When creating the alert, enter the correct webhook URL provided by PickMyTrade in the "Webhook URL" field under alert actions.
Start by testing with simple JSON payloads to ensure everything works as expected. Verify that the alert triggers the correct response and double-check that your JSON structure is accurate. Also, confirm the webhook URL is entered correctly. It's a good idea to test everything in a paper trading environment first before moving on to live accounts.
What are the advantages of using a VPS for automating trades with IBKR?
Using a VPS for automated trading with IBKR brings some clear benefits that can make a real difference for traders. One major perk is 24/7 uptime. With a VPS, your trading system keeps running no matter what - whether your personal computer is off or your internet connection decides to take a break. This means you won’t have to worry about missing trades because of power outages or connectivity hiccups.
Another standout advantage is low-latency execution. VPS servers are often located near major financial exchanges, which means your orders can be placed faster. For strategies that depend on speed and precision, this can be a game-changer.
In short, a VPS boosts reliability and stability, ensuring your automated trading system runs smoothly without interruptions. For traders who take their craft seriously, it’s a key tool to keep everything running efficiently and consistently.
What should I do if my PickMyTrade and IBKR setup isn’t working?
If you're running into problems, first ensure that Trader Workstation (TWS) is up and connected properly. Double-check that the API settings in TWS allow remote automation and that your IBKR account is active. Also, make sure your webhook URLs and JSON payloads are correctly set up in TradingView alerts. Lastly, confirm that PickMyTrade indicates an active connection to IBKR.
If trades are still not going through, take a closer look at your account permissions and data feed settings - these can sometimes block orders from being placed. For ongoing issues, revisit your automation setup to make sure everything is configured correctly, and if needed, reach out to support for further help.


