
Connecting TradingView strategies to Interactive Brokers (IBKR) for automated trading involves using webhook alerts from TradingView and IBKR’s API via Trader Workstation (TWS) or IB Gateway. Since there’s no direct integration, a third-party automation tool or custom script acts as a bridge to execute trades. Here’s what you need to know:
- TradingView Setup: Use Pine Script to create strategies and configure webhook alerts with JSON payloads. Alerts require a Pro, Pro+, or Premium TradingView subscription.
- IBKR Configuration: Enable API access in TWS or IB Gateway. Use port 7497 for paper trading and 7496 for live accounts. Map TradingView symbols to IBKR’s contract IDs to prevent errors.
- Automation: Use tools like TradersPost or a custom script to process alerts and send orders to IBKR. A VPS ensures stable connectivity and uptime.
- Testing: Use IBKR’s paper trading to verify your setup before live trading. Monitor execution times and test for slippage.
This process minimizes delays (typically 1–2 seconds for API execution) but isn’t suitable for high-frequency trading. Focus on security by restricting API access to trusted IPs and using firewalls. Regular monitoring and maintenance are key to avoiding errors.
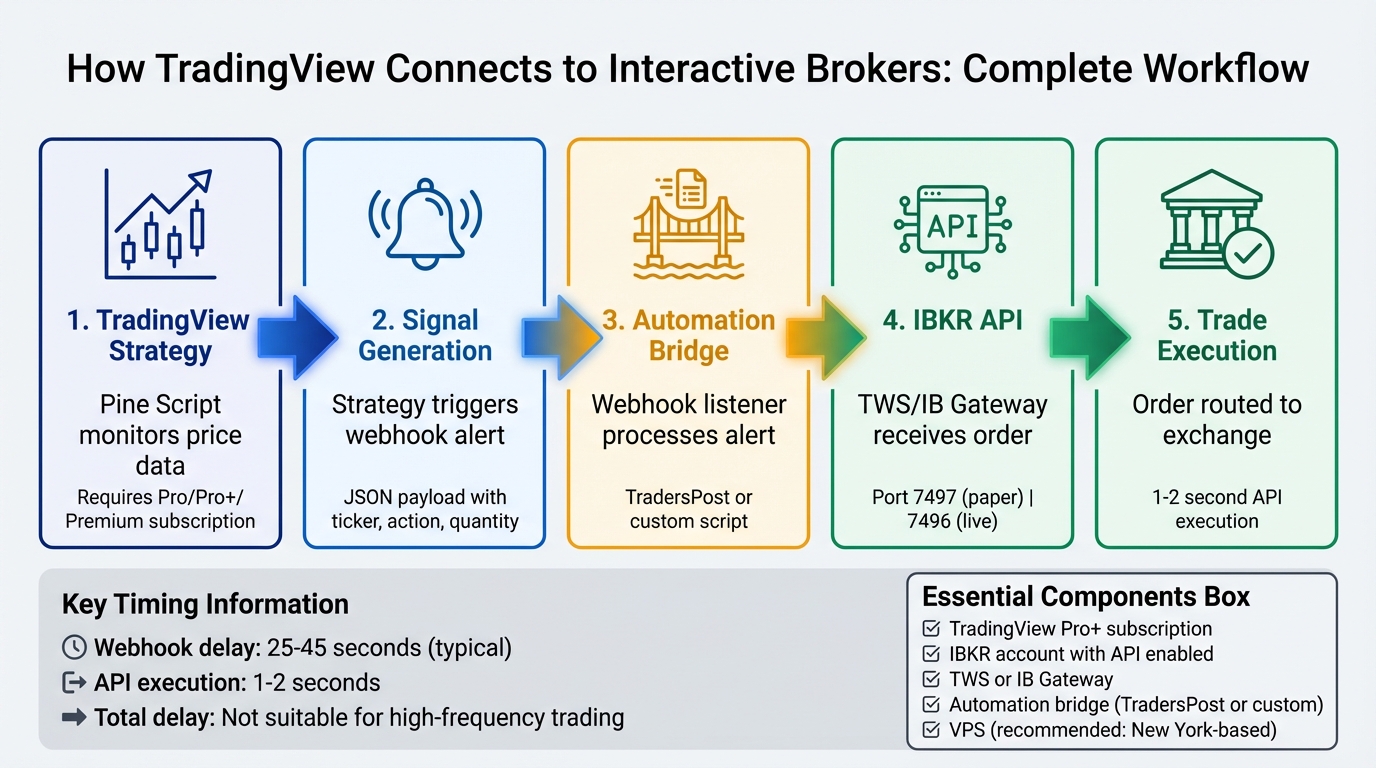
TradingView to Interactive Brokers Integration Workflow
Prerequisites and System Requirements
Required Accounts and Software
To get started, you’ll need a few essential accounts and tools. First, ensure you have a TradingView subscription that supports webhook alerts – this means either the Pro, Pro+, or Premium plan. Next, you’ll need an active Interactive Brokers (IBKR) account with API access enabled and the appropriate market data subscriptions in place. Additionally, you’ll need to run either Trader Workstation (TWS) or IB Gateway in API mode. For automated setups, IB Gateway is often the preferred option.
Another key component is an automation bridge to convert TradingView signals into commands the IBKR API can execute. You can use a third-party tool like TradersPost or set up a custom-hosted webhook listener for this purpose. Lastly, it’s recommended to use a New York-based VPS for IBKR to maintain a reliable, always-on connection to the IBKR API by choosing the best VPS for algorithmic trading.
How the Workflow Operates
Once everything is set up, here’s how the system works to turn TradingView signals into live trades.
Your TradingView strategy, built with Pine Script, monitors price data and generates signals based on your predefined logic. When a signal is triggered, TradingView sends a webhook alert containing a JSON packet. This packet includes key details like the ticker symbol, action (buy/sell), quantity, and order type.
The automation bridge then steps in, receiving the webhook alert, authenticating it, and converting it into an API call compatible with IBKR. From there, the IBKR API, through either TWS or IB Gateway, processes the order and routes it to the exchange for execution in your account.
Safety Practices Before Going Live
Before risking real money, it’s critical to test your setup thoroughly. Use an IBKR paper trading account to verify that your strategies and webhook configurations work as intended. Make sure to configure TWS or IB Gateway to connect through the paper trading port during this phase.
"It’s important to understand the differences between building a strategy for a backtest and building a strategy for live automated execution. It is possible to build a strategy that works well in a backtest, but cannot be automated." – TradersPost Documentation
When you’re ready to go live, start small. Use minimal position sizes to reduce risk while you monitor performance. Ensure your VPS maintains stable connectivity to avoid interruptions. For added security, limit API access to specific IP addresses and set up firewall rules to allow only trusted traffic to and from TWS or IB Gateway. Within the IBKR API settings, configure position limits and risk controls to guard against errors, such as unintended "runaway" strategies.
Configuring TradingView Strategies and Alerts
Setting Up Pine Script Strategies
When writing Pine Script for TradingView, make sure to use the strategy() function instead of indicator(). This is crucial because strategies allow backtesting and automated order tracking. They also enable a single alert per ticker using the {{strategy.order.alert_message}} placeholder, simplifying automation.
In Pine Script v5, you can include an alert_message directly in functions like strategy.entry(), strategy.exit(), or strategy.close(). For example, you might use a JSON payload like this:
alert_message='{"ticker":"{{ticker}}", "action":"buy", "quantity":{{strategy.order.contracts}}}'.
To avoid race conditions – like sending multiple alerts when switching between long and short positions – stick to a single strategy.entry() call for side swaps. Also, consider setting up a trading window using input.session() to restrict strategy execution to high-liquidity hours.
Make sure your script avoids future-looking data or lookahead features, as these can generate misleading backtest results. Double-check that your strategy doesn’t repaint by confirming signals remain fixed once the bar closes.
Creating Webhook Alerts
Once your Pine Script strategy is set up, the next step is creating alerts that integrate with your automation system.
Go to the TradingView Alerts panel and select your strategy condition. Set the alert frequency to "Once Per Bar Close" – this ensures only confirmed signals trigger an alert, reducing the risk of repainting (where signals appear and disappear during a live bar).
In the alert message field, craft a JSON payload that your automation tool can interpret. Key fields to include are:
- ticker: Use
{{ticker}}to dynamically insert the trading symbol. - action: Use
{{strategy.order.action}}for buy/sell signals. - market position: Use
{{strategy.market_position}}to indicate long, short, or flat states. - quantity: Use
{{strategy.order.contracts}}for the number of shares or contracts.
Enter your automation bridge’s webhook URL in the "Webhook URL" field, ideally hosted on a low-latency VPS for TradingView. Keep in mind that this feature typically requires a paid TradingView subscription (Essential, Plus, or Premium).
Webhook delays can vary. While some alerts may process in 2–3 seconds, delays of 25–45 seconds are more typical. Occasionally, delays can exceed 60 seconds, so plan accordingly.
Finally, ensure your JSON payload adheres to US trading conventions for seamless execution.
Formatting Alerts for US Traders
When setting up API-driven trading, your JSON payloads need to follow specific formatting rules to align with US trading standards. For example:
- Stock tickers: Use uppercase symbols like "AAPL" or "TSLA".
- Futures contracts: Specify exact contract symbols (e.g., "MNQU2025") instead of continuous ones like "NQ1!" to avoid mapping errors with brokers like Interactive Brokers.
- Timestamps: Use ISO-8601 format (
YYYY-MM-DDTHH:MM:SSZ) for compatibility with global trading systems, even though the US typically uses MM/DD/YYYY. - Decimal separators: Stick to periods (e.g., 191.25) rather than commas to ensure proper interpretation of prices and quantities.
Before going live, test your alert setup using an Interactive Brokers Paper Trading account. Even small formatting errors can disrupt automation, so thorough testing is essential to avoid costly mistakes.
Setting Up Interactive Brokers for API Access
Installing and Configuring TWS/IB Gateway

To get started, download and install the latest version of either Trader Workstation (TWS) or IB Gateway from Interactive Brokers. Both platforms support API connections, but IB Gateway is streamlined for automated trading, as it doesn’t include charting tools.
Once installed, navigate to Global Configuration (File > Global Configuration > API > Settings). Here’s what you need to do:
- Enable "ActiveX and Socket Clients" to allow third-party API connections.
- Use port 7496 for live accounts and port 7497 for paper trading. This separation ensures you don’t accidentally execute real trades while testing.
- Turn on "Download open orders on connection" to ensure your automation system can detect and manage any existing positions when it connects.
For added security, restrict API access by specifying your webhook listener or VPS IP address in the "Trusted IPs" list. Also, configure your firewall to accept traffic only from these trusted sources.
Once your API access is set up and secured, you’re ready to dive into how Interactive Brokers handles order routing.
Understanding IBKR Order Routing
Interactive Brokers supports automated trading strategies across various asset classes like stocks, futures, options, and cryptocurrencies. Their API accommodates multiple order types, including Market (MKT), Limit (LMT), Stop (STP), Stop Limit, and Trailing Stop orders. Additionally, you’ll need to define a Time-in-Force (TIF) setting, which determines how long an order remains active. Here’s a quick rundown of TIF options:
| Time-in-Force | Description |
|---|---|
| Day | Expires at market close if not filled. |
| GTC | Stays active until filled or manually canceled. |
| OPG | Executes only at market open. |
| CLS | Executes only at market close. |
| IOC | Fills immediately or cancels any unfilled portion. |
| FOK | Fills the entire order or cancels it entirely. |
It’s important to note that TradingView symbols may not directly match Interactive Brokers contract IDs (conids). For instance, a continuous futures symbol like "NQ1!" in TradingView might correspond to a specific contract month like "MNQU2025" in Interactive Brokers. To avoid errors, use the IBKR /iserver/secdef/search endpoint to verify the correct contract identifier before executing trades.
Once you’re familiar with these order types and TIF settings, you’re ready to test your API connection.
Testing the API Connection
With your API configured and order routing understood, the next step is to test the connection using a paper trading account. This allows you to fine-tune your setup without risking real funds.
Ensure that TWS or IB Gateway is listening on the correct port – 7497 for paper accounts. Then, create a simple "Price Crossing" alert in TradingView and manually trigger it. Check if the corresponding order appears in the TWS "Orders" tab. Monitor webhook responses to confirm whether they return success or error codes.
Keep in mind that execution delays are inevitable. Expect a 2–3 second lag for order processing, while TradingView webhooks may add an additional 25–45 seconds. Automated execution generally introduces another 1–2 seconds between the signal and broker fill. Because of these delays, this setup isn’t ideal for high-frequency or sub-minute scalping strategies.
Full Stack IBKR API (4/4): TradingView Webhooks with Interactive Brokers
Connecting TradingView Alerts to IBKR Execution
Once your API connection is up and running, the next step is deciding how TradingView alerts will trigger trades in Interactive Brokers (IBKR). Your choice depends on your trading preferences and the level of automation you’re comfortable with. Below, we’ll explore three methods to integrate TradingView alerts with IBKR for executing trades.
Alert Automation via API
For traders seeking a hands-off approach, webhook alerts offer a way to automate trade execution through the IBKR API. When TradingView generates a signal, it sends a JSON payload to a webhook listener, which can be set up using a custom script or a third-party service like TradersPost.
The JSON payload carries essential details like the ticker, action (buy/sell), quantity, and order type. By using dynamic variables such as {{strategy.order.action}} and {{strategy.market_position}}, you can configure a single alert per ticker to manage all trade actions automatically.
Here’s a quick comparison of the two main approaches:
| Feature | Direct API (Custom Script) | Third-Party Bridge (TradersPost) |
|---|---|---|
| Requires Coding | High (Python/PHP/C++) | None (No-code) |
| Infrastructure | Self-hosted (Local or VPS) | Cloud-based (24/7) |
| Setup Complexity | High | Low |
| Cost | Free (excluding hosting) | Subscription-based |
| Multi-Broker Support | Manual implementation | Built-in |
Keep in mind that automated execution may experience a slight delay. The API bridge typically adds a 1–2 second lag, while TradingView webhook delays can range from 2–45 seconds. Because of this, automation isn’t ideal for high-frequency or sub-minute scalping strategies. However, for most other strategies, this setup ensures reliable and scalable trade execution.
As always, prioritize security by following best practices and thoroughly test your setup using IBKR’s paper trading feature.
Alert-Driven Manual Execution
If full automation feels too rigid or complex, manual execution is an alternative. TradingView can be configured to send visual, sound, or email alerts without relying on automation. When an alert triggers, you review the signal and manually input trade details into IBKR’s Trader Workstation or mobile app.
This method works well for traders who prefer to have the final say before executing a trade. It’s also the easiest to set up – no need for API configurations, webhook scripts, or JSON formatting.
However, there are trade-offs. Manual execution is slower because it relies on human reaction time, and it’s more susceptible to hesitation or emotional decision-making. Additionally, you’ll need to be available whenever your strategy generates signals, which can be a challenge, especially if your strategy trades outside regular market hours.
Dual-Platform Strategy Execution
For traders dealing with multiple markets, a hybrid approach might be the best fit. In this setup, TradingView is used solely for signal generation, while trades are executed on specialized platforms tailored to different asset classes. For instance, you might use NinjaTrader and Interactive Brokers for futures and equities, both triggered by the same TradingView strategy logic.
This approach allows you to optimize execution for each asset class. Each platform operates independently, executing trades based on the same strategy without needing to copy trades from one broker to another.
To make this work, you’ll need to configure separate webhook endpoints or alert destinations for each platform. While this adds an extra layer of complexity, it offers flexibility for traders managing diverse portfolios across multiple markets.
Optimizing Infrastructure with QuantVPS
Benefits of a New York VPS
Relying on local systems can expose you to outages, network disruptions, and interruptions that might delay time-sensitive trades. By using a New York-based VPS, you can run TWS or IB Gateway continuously, reducing latency and enhancing order execution speed near major U.S. exchanges like the NYSE and NASDAQ.
Automation platforms often introduce a lag of 1–2 seconds between signal generation and broker execution, which can make sub-minute scalping nearly impossible. A New York VPS minimizes these delays, ensuring your trades execute as quickly as possible.
Additionally, a dedicated VPS provides consistent CPU and memory performance, which is crucial for running multiple TradingView strategies without experiencing lag. This stable environment is essential for uninterrupted automated trading.
Matching QuantVPS Plans to Your Trading Setup
Finding the right QuantVPS plan depends on the demands of your trading setup. Here are the options:
- VPS Lite: Priced at $59.99/month (or $41.99/month annually), this plan includes 4 cores, 8GB RAM, and 70GB NVMe storage. It’s ideal for running a single strategy with basic scripts.
- VPS Pro: At $99.99/month (or $69.99/month annually), this plan offers 6 cores and 16GB RAM, making it suitable for managing 3–5 strategies with multiple charts alongside TWS.
- VPS Ultra: For $189.99/month (or $132.99/month annually), you get 24 cores, 64GB RAM, and 500GB NVMe storage – perfect for traders running 5–7 strategies or operating across multiple accounts.
- Dedicated Server: Designed for institutional-grade setups, this plan costs $299.99/month (or $209.99/month annually) and provides 16+ dedicated cores and 128GB RAM, capable of handling 7+ strategies or heavy algorithmic workloads.
VPS Maintenance Best Practices
Maintaining a VPS requires regular attention to ensure smooth operation. As highlighted in the TradersPost documentation:
"TradersPost is designed to automate the execution of trading strategies, but it is not a fully autonomous, self-healing system. Things can and will go wrong."
To keep your VPS running effectively, follow these tips:
- Regularly check that TWS or IB Gateway remains connected. Enable the "Download open orders on connection" option in TWS settings to maintain session synchronization.
- Monitor signal logs and open positions frequently to identify potential execution issues early. Compare your alert price (using the
{{close}}placeholder in TradingView) with the actual fill price to assess slippage. - Schedule system updates during off-market hours to avoid disruptions.
- Keep backups of all trading scripts and TWS configurations to safeguard against unexpected issues.
Risk Management and Testing
Testing with Paper Accounts
Before diving into live trading, test your TradingView-to-IBKR workflow in IBKR’s paper trading environment. Use port 7497 for paper accounts (live accounts use port 7496). Include the "test": true flag in your JSON payload to ensure signals are routed correctly. One critical step is verifying contract mapping – make sure TradingView symbols accurately translate to IBKR’s internal Contract IDs (conid). This step is especially important for futures and options to avoid costly execution errors.
To track slippage, pass the {{close}} price as signalPrice. This allows you to compare the alert price with the actual fill price in your paper account. Also, ensure that position swaps are sent as a single combined order. This testing phase is essential to gauge execution quality and refine your setup before moving to live trading.
Setting Risk Controls in IBKR
Once your paper trading workflow is validated, the next step is implementing strong risk controls in your live account. Start by setting hard limits in TWS to cap potential losses. Restrict API access to trusted IP addresses and configure firewall rules for added security. Activating two-factor authentication (2FA) on your Interactive Brokers account is another vital measure to protect against unauthorized API connections.
For position sizing, use dynamic methods like risk_dollar_amount or percent_of_equity, and always include stop-loss orders to limit downside risk. Attach stop-loss and take-profit orders directly to your entry orders to ensure immediate protection. Additionally, use trading windows in your Pine Script to limit execution to specific hours, avoiding times of low liquidity or extreme volatility.
| Risk Control Feature | IBKR Support | Description |
|---|---|---|
| Paper Trading | Supported | Test strategies with virtual funds using TWS port 7497 |
| Stop Loss Legs | Supported | Attach stop-loss orders directly to entry signals |
| Trailing Stops | Supported | Use fixed dollar or percentage offsets to protect gains |
| IP Restriction | Supported | Restrict API access to trusted IP addresses |
Monitoring and Maintenance
Even with risk controls in place, continuous monitoring is essential. Automated trading is not a "set-it-and-forget-it" system. As TradersPost documentation warns:
"TradersPost is designed to automate the execution of trading strategies, but it is not a fully autonomous, self-healing system. Things can and will go wrong."
Regularly compare TradingView alert logs with IBKR execution statements to catch missed signals, failed orders, or broker-side issues. Keep an eye on slippage by comparing your signalPrice (the {{close}} value from TradingView alerts) with actual fill prices. To measure latency, use ISO-8601 timestamps from the {{timenow}} variable in alerts, which can help you calculate the delay between signal generation and trade execution. While TradingView notes webhook delays of 25 to 45 seconds as normal, most automation setups experience lags closer to 1 to 2 seconds.
Finally, review automation logs after any configuration changes, and schedule system updates during off-market hours to avoid disruptions during active trading sessions. Regular maintenance ensures your system remains reliable and responsive.
Conclusion
Connecting TradingView strategies to Interactive Brokers requires understanding that there’s no built-in integration between the two platforms. Your success hinges on selecting the right connection method – whether through API automation, a third-party bridge, or manual execution – and ensuring your API settings are secure at all times.
But technical setup is only part of the equation. Hosting TWS or IB Gateway on a dedicated VPS with a stable IP address can significantly improve uptime, protect API access, and reduce the chances of interruptions. These steps naturally lead to the next critical phase: thorough pre-live testing.
Before going live, use IBKR’s paper trading environment (port 7497) to rigorously test every component of your setup. This includes verifying webhook payloads, ensuring contract symbol mappings are accurate, and confirming that your strategy logic runs smoothly without issues like repainting. Testing at this stage can help you catch potential problems, such as JSON formatting errors or race conditions, that could lead to costly mistakes in a live trading environment.
Once your system is live, it’s essential to actively monitor and manage it. Automation isn’t a "set-it-and-forget-it" solution. Keep a close eye on signal logs, compare alert prices with actual trade fills to assess slippage, and double-check broker connections after making any configuration changes. To add an extra layer of security, implement hard risk controls in TWS – restrict API access to trusted IPs and set strict trading limits to minimize potential risks.
FAQs
How can I securely connect TradingView strategies to Interactive Brokers using the API?
To maintain secure API access between TradingView and Interactive Brokers (IBKR), it’s important to safeguard both the IBKR API and the data flow. Start by enabling API access exclusively through the official IBKR Trader Workstation (TWS) or IB Gateway. You can configure this by navigating to Global Configuration → API → Settings. Use IBKR’s REST API with short-lived authentication tokens, which should be generated and rotated regularly to enhance security.
When forwarding TradingView alerts, ensure you send them to a secure webhook endpoint using HTTPS. Protect the payload by incorporating a secret passphrase or HMAC signature. For sensitive credentials like IBKR tokens and webhook secrets, store them securely in environment variables on a VPS instead of embedding them in your code. To further secure your VPS, limit access to specific IP addresses. Additionally, enable two-factor authentication on both your TradingView and IBKR accounts for an extra layer of security.
By combining encrypted communication, secure token handling, and strict access controls, you can establish a safe and dependable setup for automated trading.
What should I watch out for when automating trades between TradingView and Interactive Brokers?
When linking TradingView alerts to Interactive Brokers, a few common missteps can disrupt your trading setup if not addressed.
First, double-check that your alert logic is clear and specific. Vague or overly broad conditions can result in unnecessary trades. Each alert should include the exact symbol, order type, size, and direction that align with your trading strategy.
Second, keep Interactive Brokers’ API limits in mind. Sending more than 50 messages per second can lead to dropped orders or temporary restrictions. To minimize issues, use a stable VPS – preferably located in New York – to lower latency and avoid interruptions caused by local PC problems. Always test your configuration in a paper trading account to catch potential errors before going live.
Lastly, prioritize strict risk management. Set daily trading limits, cap order sizes, and closely monitor executions to prevent unexpected trades. By tackling these key areas, you can build a dependable and efficient automated trading system.
Why should I use a New York-based VPS for connecting TradingView strategies to Interactive Brokers?
A VPS based in New York is a smart choice for traders because it ensures low latency and stable connectivity to Interactive Brokers’ servers, which are mainly located in the U.S. This close proximity minimizes the delay in executing trades triggered by TradingView alerts, allowing for quicker and more efficient trade execution.
On top of that, using a VPS means your trading setup enjoys round-the-clock uptime. It also removes the risk of disruptions caused by local PC issues like power outages or internet failures, keeping your automated trading system running smoothly without interruptions.


