
Prediction market bots are reshaping trading in 2026. With tools like Python libraries and Polymarket's API, even beginners can create bots that trade faster and smarter than humans. Imagine this: a bot turned $63 into $131,000 in 30 days by automating trades in Bitcoin prediction markets. Bots monitor prices 24/7, spot opportunities, and execute trades in milliseconds. This guide walks you through building your own bot, from setting up the environment to deploying it on a VPS for continuous performance. By the end, you'll have a bot ready for live trading and trading bot strategies to scale its potential.
Key Takeaways:
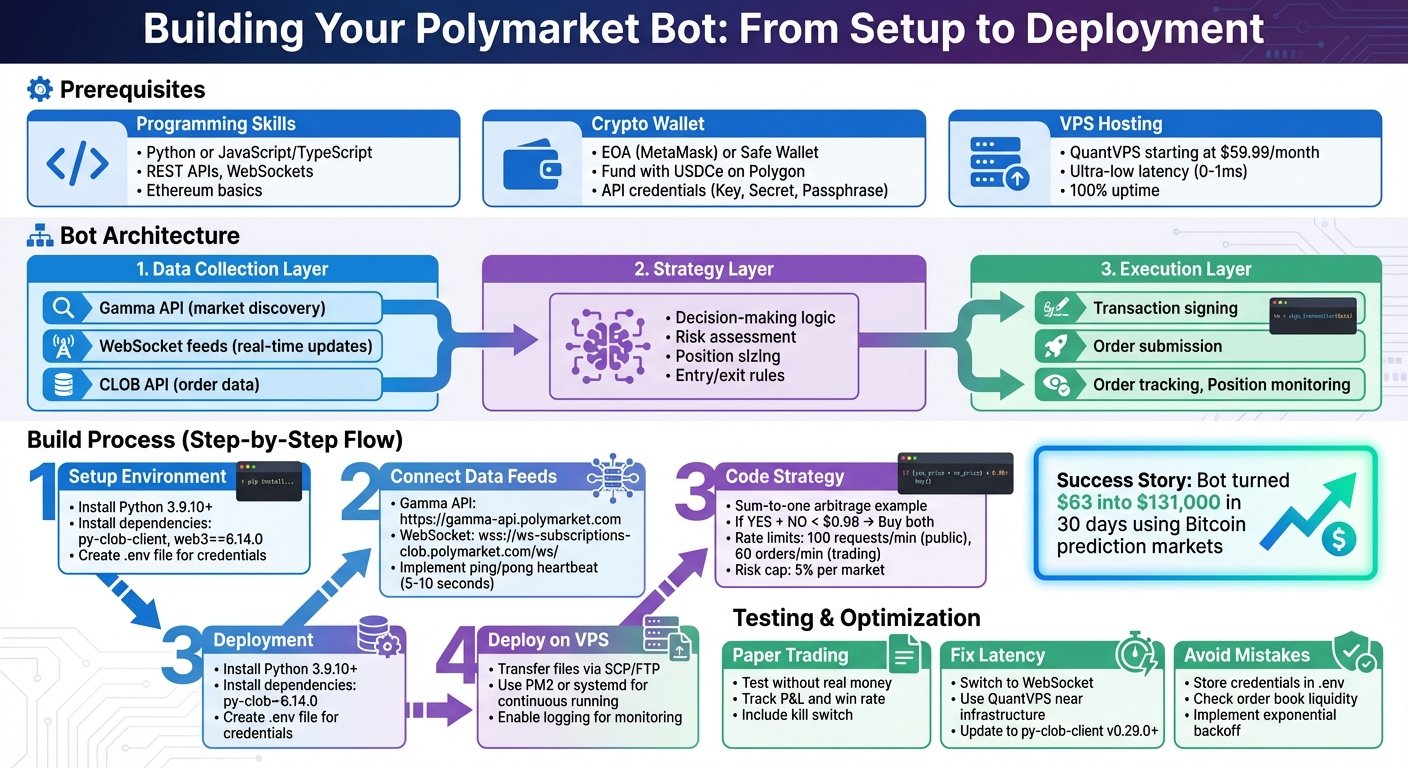
- What You'll Need: Basic Python or JavaScript skills, a crypto wallet, and a VPS.
- Bot Structure: Three parts - data collection, strategy logic, and execution.
- Tools: Use Polymarket's APIs, WebSockets for real-time data, and QuantVPS for low-latency trading.
- Strategies: Start with simple mispricing detection or arbitrage, then expand to market making.
Ready to dive in? Let’s build your first Polymarket bot.
How to Build a Polymarket Trading Bot: Complete Setup Process
What Are Polymarket Bots?
Polymarket and Prediction Markets Explained
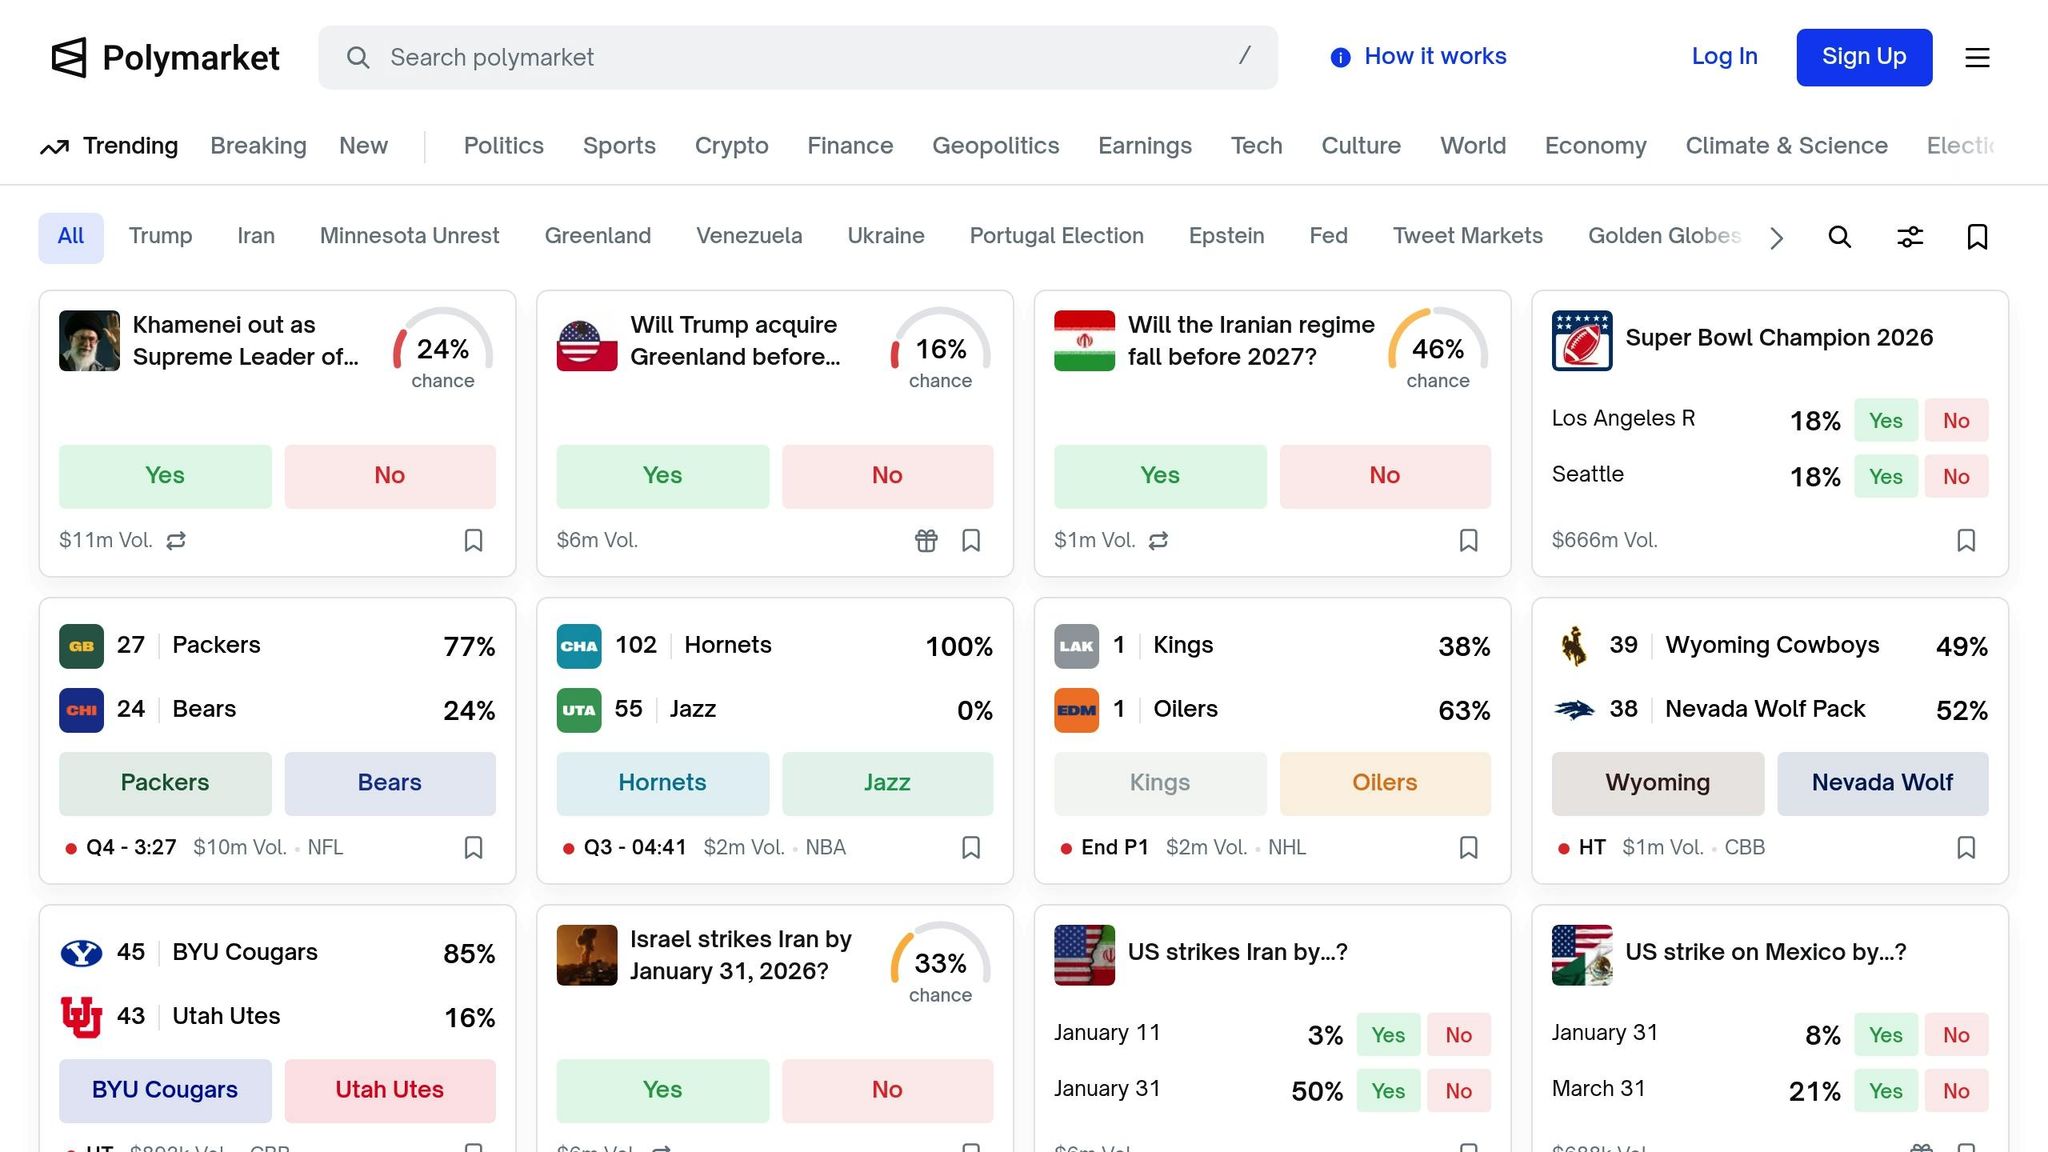
Polymarket is an on-chain prediction market platform where users trade "shares" based on the outcomes of future events. These events can range from whether Bitcoin will hit $100,000 by March 2026 to whether it will rain in New York tomorrow. The structure of these markets is straightforward: they operate on YES/NO binary outcomes, with shares priced between $0.00 and $1.00.
Here’s the interesting part: the price of a share directly reflects the probability of the event. For example, if a YES share is priced at $0.20, it implies a 20% chance of the event happening. If the event occurs, you earn $0.80 in profit. If it doesn’t, you lose your $0.20. This price-to-probability link makes prediction markets easy to interpret for both individual traders and bots.
Polymarket employs a hybrid system that combines off-chain order matching through a Central Limit Order Book (CLOB) for fast transactions with on-chain settlement on the Polygon blockchain. This setup ensures both speed and security. All transactions are settled in USDC, a stablecoin tied to the U.S. dollar, which simplifies profit and loss calculations.
How Bots Monitor and Trade Markets
Bots play a key role in prediction markets by constantly scanning for trading opportunities. They connect to Polymarket's data feeds, keeping an eye on price changes in real time and matching these movements to their programmed strategies.
One common tactic is mispricing detection. For instance, if a bot spots a YES share priced at $0.45 but calculates the actual probability to be closer to 60%, it can buy at what it perceives as a discount, expecting the market to correct itself. Another widely used strategy is arbitrage, where bots capitalize on price differences between related markets. For example, if the combined price of YES and NO shares doesn’t equal $1.00, a bot can buy the undervalued side and sell the overvalued side, locking in a risk-free profit.
Bots are also effective at market making, where they provide liquidity by quoting prices for both YES and NO outcomes simultaneously. They profit from the bid-ask spread while ensuring the market remains active. Mastering these strategies is the first step to understanding how Polymarket bots operate.
3 Main Parts of a Polymarket Bot
Every Polymarket bot relies on three key components that work together seamlessly:
1. Data Collection Layer: Think of this as the bot’s sensory system. It connects to Polymarket's Gamma API to gather market details, such as available markets and their closing times. It also uses WebSocket feeds to receive instant updates on prices and order book changes. WebSockets are vital because they deliver data to the bot in milliseconds, giving it a significant edge over slower REST API polling.
2. Strategy Layer (The Brain): This is where the bot’s decision-making happens. The strategy engine processes incoming market data and applies predefined rules. For instance, it might be programmed to act when a YES share drops below $0.45, buying 100 shares automatically. This layer calculates position sizes, assesses risks, and decides when to enter or exit trades with precision.
3. Execution Layer: Once the strategy layer makes a call, the execution layer steps in to handle the technicalities. This includes signing transactions and submitting orders to Polymarket’s CLOB. It manages various order types, like limit orders that wait for a specific price or fill-or-kill orders that execute immediately or cancel. It also tracks completed orders and monitors open positions.
These layers work in harmony: real-time data flows into the Data Layer, which feeds the Strategy Layer, and trade decisions are executed by the Execution Layer. Understanding this structure is essential before diving into building your own bot.
Run 24/7 while you sleep. Keep bots, platforms, and trade copiers online on a dedicated VPS.
Low-latency VPS hosting for your trading platform.
From $59.99/mo
What You Need Before You Start
Basic Programming Skills You'll Need
To get started, you'll need a solid grasp of Python or JavaScript/TypeScript, as Polymarket provides SDKs for both languages. For Python, there's py-clob-client, and for Node.js, you can use @polymarket/clob-client. These tools simplify the complex processes of authentication and signing.
You'll also need to be comfortable working with RESTful APIs for tasks like retrieving market data and managing orders, as well as WebSockets (WSS) for real-time updates. On the blockchain side, understanding Ethereum-based concepts is key. This includes securely managing private keys, signing transactions, and interacting with the Polygon network (Chain ID 137).
| Skill/Tool | Purpose | Relevant Technology |
|---|---|---|
| Programming Language | Core bot logic and execution | Python, JavaScript, TypeScript |
| Data Streaming | Real-time price and orderbook updates | WebSockets (WSS) |
| Market Discovery | Finding tradeable events and token IDs | Gamma API (REST) |
| Order Management | Placing, canceling, and viewing orders | CLOB API (REST) |
| Blockchain Interaction | Signing transactions and managing funds | Ethers.js, Web3.py, Polygon Network |
When building your bot, stick to a modular design. Create distinct layers for data handling (API/WebSockets), strategy (logic), execution (placing orders), and risk management (position limits). This structure also applies to wallet integration, ensuring secure handling of credentials while interacting with the Polygon network. To keep your private keys safe, store them in environment variables and add these files to .gitignore. With these basics in place, the next step is setting up a crypto wallet for live trading.
Setting Up Your Crypto Wallet
You'll need a crypto wallet to manage your trades. Your options include an Externally Owned Account (EOA) like MetaMask or a Gnosis Safe-based wallet. For high-frequency bots, Polymarket recommends using the Safe wallet because it supports gasless transactions and allows for batched operations through their relayer.
Fund your wallet on the Polygon network with USDCe by transferring from an exchange that supports direct Polygon deposits. Your bot will require two layers of security: the wallet's private key (L1) and API credentials (L2), which include an API Key, Secret, and Passphrase. These credentials allow your bot to sign orders without exposing the private key for every trade.
Before trading, you'll need to approve Polymarket's exchange contracts to spend your USDCe and outcome tokens. You can handle this through the Polymarket UI for the first trade or programmatically using the setApprovalForAll() method in the Conditional Token Framework (CTF) contracts.
| Feature | EOA (Standard Wallet) | Safe Wallet (Recommended) |
|---|---|---|
| Gas Fees | User pays for all transactions | Gasless (paid by Polymarket relayer) |
| Complexity | Simple to set up | Requires deployment via Relayer Client |
| Advanced Features | Basic trading | Batched transactions and contract logic |
| Signature Type ID | 0 |
2 |
To export your private key from Polymarket, go to "Cash", click the three-dot menu, and select "Export Private Key". Immediately save this key in your .env file, and never share or commit it to version control. Once your wallet is ready, the next step is deploying your bot on a reliable VPS.
Why You Need a VPS Like QuantVPS
A Virtual Private Server (VPS) is crucial for running a crypto trading bot. Prediction markets operate 24/7, and your bot needs to monitor them continuously to catch opportunities, even when you're not around.
Speed is critical in prediction markets. When a pricing discrepancy arises, you're competing with other bots to act first. Hosting your bot on a VPS close to Polymarket's infrastructure can shave milliseconds off your response time - often the difference between securing a profitable trade or missing out.
QuantVPS offers plans starting at $59.99/month for basic needs and $99.99/month for advanced strategies. Features include ultra-low latency (0-1ms), 100% uptime, unmetered bandwidth, DDoS protection, automatic backups, and full root access.
Using a VPS also removes emotional decision-making from the equation. Once deployed, your bot will execute its strategy automatically, even during volatile market conditions when manual traders might hesitate or panic. To set up your VPS, you'll need basic command-line skills to install Python (version 3.9.10 or higher) and dependencies like py-clob-client and web3==6.14.0. QuantVPS also provides system monitoring, making it easy to manage your bot remotely from anywhere.
Step-by-Step: Building Your First Bot
Setting Up Your Development Environment
Start by creating a project folder. Make sure you have Python version 3.9.10 or higher installed for compatibility. Then, install the core dependencies using the terminal command: pip install py-clob-client web3==6.14.0 python-dotenv. Here’s what these do: py-clob-client is Polymarket's official SDK, while web3==6.14.0 manages blockchain interactions - pin this specific version to avoid issues with eth-typing.
Next, create a .env file in your project root to store sensitive credentials, such as your private key (without the '0x' prefix), API Key, Secret, and Passphrase. Be sure to add .env to your .gitignore file to keep these details secure. For better organization, structure your project with separate Python files for data handling, strategy logic, and execution. This modular setup will make debugging easier down the road.
"Python is the most popular language for building Polymarket trading bots and analytics tools." - AL, Founder of PolyTrack
With your environment ready, the next step is connecting your bot to Polymarket's data feeds.
Connecting to Polymarket's Data Feeds
Polymarket provides three main APIs: the Gamma API for discovering markets, the CLOB API for trading and price data, and the WebSocket feed for real-time updates. To find active markets, query https://gamma-api.polymarket.com/events?active=true&closed=false. This filters out expired events and provides clobTokenIds for YES and NO outcomes, which are essential for monitoring specific markets.
For real-time price tracking, connect to the WebSocket at wss://ws-subscriptions-clob.polymarket.com/ws/ using Python's websocket-client library. Once connected, send a JSON subscription message specifying the channel (usually "market") and the token_ids you want to follow. To maintain the connection, implement a ping/pong heartbeat by sending "PING" every 5–10 seconds. This WebSocket approach is much more efficient than continuously polling REST endpoints, especially when tracking multiple markets.
| API/Service | Base URL | Primary Use Case |
|---|---|---|
| Gamma API | https://gamma-api.polymarket.com |
Discovering new markets, categories, and metadata |
| CLOB API | https://clob.polymarket.com |
Fetching current prices, orderbook depth, and placing orders |
| CLOB WebSocket | wss://ws-subscriptions-clob.polymarket.com/ws/ |
Real-time orderbook updates and order status changes |
With your data feeds connected, you’re ready to start building your trading strategy.
Coding a Simple Mispricing Strategy
A great starting point is a sum-to-one arbitrage strategy. Since YES and NO outcomes should always total $1.00, any deviation creates a trading opportunity. Use the get_price or get_order_book methods from py-clob-client to fetch midpoint prices for both tokens. In your strategy loop, calculate total_cost = price_yes + price_no. If this sum is below $0.98, it leaves room for a 2% profit margin after fees, prompting your bot to execute buy orders for both outcomes.
To handle rate limits, implement exponential backoff for HTTP 429 errors. Polymarket’s public endpoints allow about 100 requests per minute, while authenticated trading endpoints are capped at 60 orders per minute. Add a risk management layer by capping exposure to 5% of your portfolio per market. This helps protect your account from significant losses during volatile periods.
When setting up your ClobClient, choose the right signature_type: use 0 for standard EOA wallets like MetaMask, 1 for Polymarket Email/Magic accounts, and 2 for Gnosis Safe/browser wallets. This ensures your orders are signed correctly and accepted by the exchange.
Once your strategy is coded, the final step is deploying your bot for live trading.
Deploying Your Bot on QuantVPS
After successful testing on your local machine, transfer the project files to your QuantVPS server using scp or an FTP client. Install Python and your dependencies on the VPS, repeating the earlier pip install commands. To ensure your bot runs continuously, use a process manager like PM2 or set it up as a systemd service.
QuantVPS plans start at $59.99/month for basic strategies and $99.99/month for more demanding bots. These servers provide ultra-low latency and unmetered bandwidth, allowing your bot to monitor markets and execute trades without delays. Configure your bot to log all trades and errors to a file for easy remote monitoring - this way, you can troubleshoot without needing constant SSH access.
Stay online and closer to execution. Choose a VPS location for CME futures, New York markets, London FX, API trading, and more.
Host your platform near the market route that matters.
From $59.99/mo
"Automated trading bots have transformed prediction market trading on Polymarket... a well-designed bot can analyze market conditions and execute trades in milliseconds." - AL, Founder of PolyTrack
Testing Your Bot and Fixing Common Problems
How to Test Without Risking Real Money
Before risking actual money, it's smart to test your bot in paper trading mode. In this mode, the bot runs its logic but doesn't send any real transactions to the Polygon network. Track important metrics like profit and loss (P&L), win rate, and slippage to validate its performance. For instance, one bot achieved an impressive 74% accuracy by analyzing news feeds and on-chain data.
Start with a simple version that only monitors prices and sends alerts - via Discord or Telegram - before incorporating execution logic. This step ensures your data feeds are functioning correctly and your strategy triggers at the right moments. Include a kill switch, too - an emergency mechanism to shut down trading if the bot acts unpredictably or hits a preset loss limit. Once your strategy works well in simulation, you can shift your focus to improving speed and reducing latency.
Fixing Latency and Speed Issues
After verifying your bot's logic through simulations, tackle latency and performance issues. Latency can significantly affect profitability in fast-moving prediction markets. A slow bot might miss opportunities or get poor fill rates. A common issue is relying on REST API polling instead of a real-time WebSocket connection. Switching to the CLOB WebSocket at wss://ws-subscriptions-clob.polymarket.com/ws/ for live order book updates can eliminate delays caused by REST polling.
Server location is another critical factor. Hosting your bot on a VPS like QuantVPS, located close to Polymarket’s infrastructure, reduces network round-trip times. This proximity can make the difference between seizing an arbitrage opportunity and missing it entirely.
For Python developers, using the latest version of the py-clob-client library (v0.29.0 or higher) is recommended. This version supports HTTP2 and persistent connections, boosting performance. If even faster execution is needed, consider asynchronous programming libraries like aiopolymarket or quantpylib to handle data streams and order execution simultaneously. Addressing these latency challenges is essential before moving your bot to live deployment and scaling its performance.
Common Mistakes to Avoid
As you progress from testing to live trading, steer clear of common mistakes that could undermine your bot’s performance. First, always store sensitive credentials in environment variables. A frequent error among beginners is confusing their wallet address with their Polymarket "funder address" (a proxy wallet). Remember, USDC must be deposited in the funder address for the bot to function properly.
Another pitfall is failing to verify order book liquidity. A trade that looks profitable can quickly turn unprofitable if there isn’t enough volume, leading to significant slippage that eats into potential gains. Research shows that well-managed liquidity has enabled mechanical arbitrage strategies on Polymarket to extract approximately $40 million.
To handle rate limits effectively, implement exponential backoff using a library like tenacity. Public endpoints typically allow around 100 requests per minute, while authenticated trading endpoints cap at 60 orders per minute. Without proper retry logic, your bot could crash when these limits are exceeded. Finally, log all API requests, responses, and timestamps. This practice makes troubleshooting much easier when unexpected issues arise.
Next Steps and Advanced Topics
What You've Learned
You've successfully built a functional Polymarket bot, mastering everything from development and connecting to data feeds to coding strategies and deploying on QuantVPS. Your bot's architecture now covers key components: data acquisition, strategy execution, risk management, and monitoring. By automating trading, you eliminate emotional decision-making, ensuring consistent execution of predefined strategies - even in volatile markets.
Critical practices, such as testing in paper trading mode before committing real funds, implementing kill switches for emergencies, and selecting low-latency infrastructure, set successful bots apart from failed attempts. With continuous market monitoring, your bot can seize opportunities 24/7 - provided you've incorporated robust error handling and safety measures into your code. Having established these essentials, you're ready to explore advanced strategies to take your bot's performance to the next level.
Advanced Strategies to Try Next
Now that your bot's core functionality is in place, it's time to expand its potential. Arbitrage strategies are a great next step. For instance, sum-to-one arbitrage takes advantage of situations where YES and NO outcomes don't sum to $1.00, while combinatorial arbitrage identifies pricing inefficiencies across markets with multiple outcomes. While arbitrage opportunities on Polymarket can be fleeting - often lasting just seconds before bots capture them - they remain a lucrative option for those prepared.
Market making is another promising direction. This approach allows you to profit from the bid-ask spread by quoting prices on both sides of the market. However, managing inventory risk is crucial, and techniques like quote skewing can help mitigate potential losses. For signal-based trading, you might explore integrating news sentiment analysis using natural language processing (NLP), tracking trades with significant volume, or automating trades based on new polling data for political markets.
At this stage, performance optimization becomes essential. Upgrading to QuantVPS Pro plans with dedicated cores and increased RAM can help you manage multiple WebSocket connections and process larger datasets without latency issues. If you're comfortable with lower-level programming, rewriting performance-critical parts of your bot in Rust can further reduce execution times to milliseconds.
Start Building Your Bot Today
A good starting point is a simple alert bot that monitors a single market. As you gain experience, you can add execution logic and refine your strategies. Use risk-adjusted metrics like Sharpe and Sortino ratios to evaluate your bot's performance and confirm its effectiveness.
Leverage your existing QuantVPS setup and risk management framework as you experiment with new strategies. Keep in mind that profitable strategies often attract competition over time, leading to "edge decay." To stay ahead, continuously develop new approaches and diversify your strategies. Deploying on QuantVPS ensures 24/7 uptime and low latency, giving you an edge in fast-moving markets.
The tools and knowledge are now at your fingertips. Start experimenting, manage your risk wisely, and let automation take your trading in prediction markets to the next level.
How to Use the Polymarket API with Python (Step by Step)
FAQs
What risks should I consider before using a Polymarket bot for trading?
Using a Polymarket bot can streamline trading, but it’s not without its challenges. One of the biggest concerns is security. Bots with unaudited or malicious code might compromise your private keys or drain your funds. To protect yourself, it’s crucial to thoroughly review the bot’s code and test it in a controlled, secure environment before putting it into action.
There’s also the risk of technical hiccups. For example, delays in data updates or latency issues could result in trades being executed at outdated prices, potentially leading to unexpected losses. Without tools like stop-loss limits or careful position sizing, these errors could escalate into significant financial setbacks. On top of that, regulatory changes or updates to APIs can disrupt the bot’s functionality, making ongoing maintenance and monitoring a necessity.
To reduce these risks, stick to bots from reputable sources, audit their code carefully, and set up strong safety measures. Keep a close eye on the bot’s performance and stay informed about market developments and regulatory shifts to help ensure smooth and secure trading operations.
How can I safely test my Polymarket bot before using real money?
If you're looking to fine-tune your Polymarket bot without any financial risk, the developer sandbox or testnet is the perfect place to start. By connecting your bot to the testnet API or WebSocket endpoints, you can access simulated market data and execute mock trades using testnet tokens. This setup lets you refine your bot's performance and troubleshoot any problems before diving into live trading.
What are the best strategies to improve my Polymarket bot's performance?
To get better results from your Polymarket bot, focus on three key areas: speed, signal accuracy, and risk management.
Start by tackling latency. Run your bot on a low-latency VPS, which ensures faster communication with Polymarket. Instead of relying on the slower REST API, switch to Polymarket’s WebSocket feed for real-time data updates. Combine this setup with asynchronous Python libraries to speed up order placement and improve response times.
Next, zero in on high-probability opportunities. Look for situations where YES and NO prices in a market don’t align to $1.00, uncover mismatches in multi-outcome markets, or spot price differences across platforms. To sharpen these signals, consider integrating AI or statistical models that can catch unusual price movements with greater precision.
Lastly, establish solid execution and risk management practices. Adjust position sizes dynamically based on market depth to avoid overexposure. Protect your strategy by setting stop-loss or hedge orders to guard against sudden volatility. Stay within rate limits to avoid being throttled, and consistently back-test your strategies on testnets. Regular tweaks to your bot’s logic will keep it effective and profitable over time.


