
NinjaTrader and Tradovate are two futures trading platforms with distinct strengths. NinjaTrader, established in 2003, is known for its advanced charting tools and C# automation capabilities, making it ideal for experienced traders who prioritize customization and high-performance tools. Tradovate, launched in 2016, offers a modern, cloud-based experience with cross-device compatibility, making it more accessible and user-friendly for traders on the go.
Both platforms now share a unified login system, but their core differences remain: NinjaTrader excels in infrastructure and customization, while Tradovate focuses on simplicity and mobility.
Quick Overview
- NinjaTrader: Advanced C# automation, desktop-focused, Windows-only (or virtualization for Mac), steep learning curve, high-frequency trading tools.
- Tradovate: Cloud-based, works on any device, integrates with TradingView, beginner-friendly, limited automation options.
Quick Comparison
| Feature | NinjaTrader | Tradovate |
|---|---|---|
| Platform Type | Desktop (Windows) + Web/Mobile | Fully Cloud-Based |
| Automation | NinjaScript (C#) | Pine Script via TradingView |
| Ease of Use | Medium (steep learning curve) | High (beginner-friendly) |
| Customization | Extensive (1,000+ add-ons) | Limited |
| Device Support | Windows (Mac via virtualization) | Mac, PC, Web, Mobile |
| Pricing | Free, $99/month, or $1,499 lifetime | Free, $99/month, or $1,499 lifetime |
| Execution Speed | High-precision (local resources) | Cloud-optimized |
If you need advanced tools for algorithmic trading, NinjaTrader is the better choice. If you prefer a simpler, mobile-friendly setup, Tradovate is the way to go.
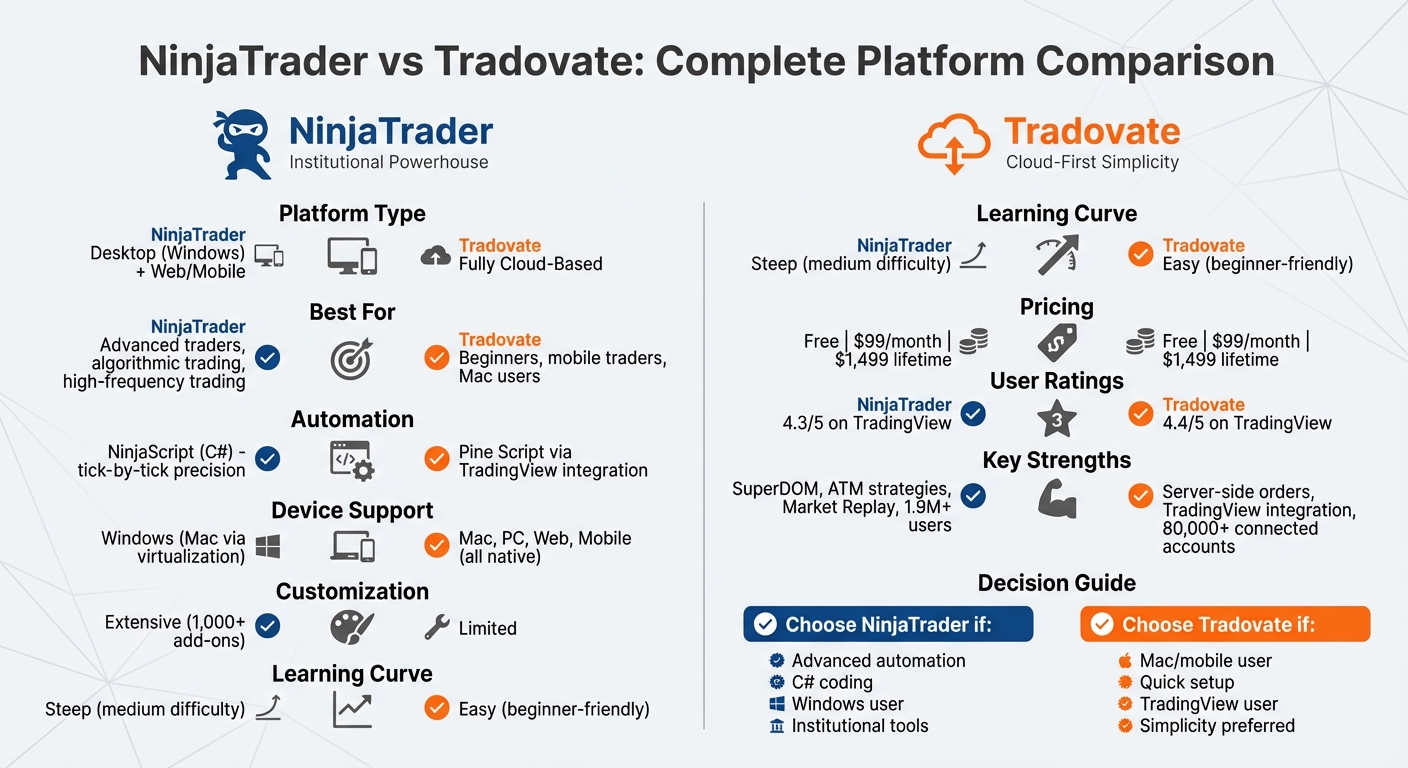
NinjaTrader vs Tradovate Platform Comparison Chart
NinjaTrader Overview
NinjaTrader is tailored for traders who need high-performance, professional-grade tools. Since its founding in 2003, the platform has grown to serve a community of over 1.9 million users, earning recognition as a go-to for algorithmic trading and advanced technical analysis. Its focus on speed, precision, and customization makes it a favorite among experienced traders.
Designed for Windows 8 or later with at least 8GB of RAM, NinjaTrader leverages local resources to deliver faster chart rendering and efficient data processing. Unlike cloud-based platforms, it gives users full control over their trading environment. Key features include the SuperDOM for precise order entry, Advanced Trade Management (ATM) for automated position handling, and Market Replay for testing strategies with historical data. Darrell Martin, CEO of Apex Trader Funding, highlights its strengths:
"NinjaTrader is the institutional powerhouse for those who need C# algorithmic automation and the most advanced Desktop SuperDOM."
The platform also boasts over 100 built-in technical indicators and supports more than 1,000 third-party add-ons, thanks to its extensive developer ecosystem.
Although NinjaTrader introduced a web-based version that achieved 90% feature parity with its desktop counterpart by 2026, the desktop platform remains the preferred choice for traders requiring deep customization and high-frequency capabilities. For Mac users, full access requires virtualization software. These features contribute to NinjaTrader's reputation as a powerful tool for serious traders.
Key Features of NinjaTrader
NinjaTrader is packed with tools that cater to advanced trading needs, setting it apart from many other platforms.
At its core is NinjaScript, a C#-based programming environment. This tool allows traders to create custom strategies, perform tick-by-tick backtesting, and build complex algorithms that outstrip the capabilities of standard web-based tools. Whether you're designing simple indicators or advanced high-frequency trading systems, NinjaScript provides the flexibility to bring your ideas to life.
The platform's SuperDOM and Market Depth tools offer professional-grade order execution. With point-and-click precision, traders can view real-time market depth and execute trades instantly, all without navigating through multiple screens. Paired with ATM, which automates stop-loss and profit-target brackets, these tools help traders make decisions with less emotional interference.
Another standout feature is the Market Analyzer, a real-time quote board that tracks technical indicator levels across hundreds of symbols at once. This is especially useful for traders monitoring multiple markets or looking for quick trading opportunities. Additionally, NinjaTrader excels in multi-instrument analysis, allowing users to compare historical price data, spot correlations, and even visualize bond yield curves. For quantitative traders, the "headless" mode eliminates the graphical interface, maximizing execution speed for algorithmic trading.
NinjaTrader Pros and Cons
| Pros | Cons |
|---|---|
| Advanced C# automation with NinjaScript | Steep learning curve that can take time to master |
| Precise tick-by-tick backtesting | Requires local installation on Windows (8GB RAM minimum) |
| SuperDOM and ATM for professional-grade order management | High resource demands for optimal performance |
| Access to 1,000+ third-party add-ons and an active developer community | $25 monthly inactivity fee if no trading occurs |
| Market Replay for testing strategies risk-free | Mac users need virtualization or the web platform |
| Flexible pricing tiers, including a lifetime license option | Web platform still lacks some desktop features despite nearing parity |
NinjaTrader holds a 4.3/5 rating on TradingView and has been voted the "#1 rated futures broker" by its user base. While its depth and customization options are highly praised, its complexity may be a hurdle for beginners looking for a more straightforward trading solution.
Run 24/7 while you sleep. Keep bots, platforms, and trade copiers online on a dedicated VPS.
Low-latency VPS hosting for your trading platform.
From $59.99/mo
Tradovate Overview
Tradovate is a cloud-based trading platform designed to run directly in web browsers, eliminating the need for heavy software installations or manual updates. Launched in 2015, the platform aims to make futures trading approachable for everyone, from complete beginners to seasoned professionals. In 2022, NinjaTrader acquired Tradovate for $115 million, and since then, the platform has continued to grow while staying true to its modern, user-friendly approach.
One of Tradovate's standout features is its cross-device accessibility. Traders can switch effortlessly between Windows, Mac, web browsers (like Chrome), and mobile devices (iOS/Android) with a single account. Custom templates sync automatically across devices, so you can execute trades seamlessly no matter where you are. Mac users, in particular, benefit from native support on Apple silicon through Safari or Chrome - no need for additional virtualization software.
Tradovate also prioritizes reliability. Orders are managed server-side, either on Tradovate's servers or directly at the exchange. This ensures trades remain active even if your computer crashes or you lose internet connectivity. As Tradovate explains:
"Tradovate's cloud-based platform holds all orders either securely at the exchange or server-side, never on your device. Trade confidently knowing that a computer crash or internet disruption will not cause your exit orders or strategies to fail."
To enhance its accessibility, Tradovate integrates natively with TradingView, giving users access to TradingView's powerful charting tools and Pine Script strategies while leveraging Tradovate's cloud-based execution. By 2026, over 80,000 accounts are connected to TradingView through Tradovate, with unified login credentials and shared market data subscriptions. With a 4.4/5 rating on TradingView and over 40 advanced trading tools, Tradovate has earned its reputation as a user-friendly, ready-to-go platform for modern traders.
Key Features of Tradovate
Tradovate is built around simplicity, speed, and accessibility. With no minimum deposit requirement and a two-week free trial that includes live market data, it’s easy for newcomers to get started.
One standout feature is the Market Replay tool. Instead of downloading large files, Tradovate streams historical market data directly from the cloud, allowing traders to test and refine strategies in real-world conditions without risking any money. This cloud-based approach makes strategy testing both efficient and accessible.
Tradovate also offers cost-effective pricing. Membership-based plans provide savings for high-volume traders. For example, day trading margins can be as low as $50 for popular contracts like Micro E-minis. The Lifetime License plan reduces commissions to $0.09 per Micro contract and $0.59 per Standard contract. In addition, advanced risk management tools - such as bracket orders, daily loss caps, and volume controls - help traders maintain discipline. Other features include Order Flow+ tools like TPO (Time Price Opportunity) and footprint charts, as well as a Pulse Indicator that tracks real-time sentiment in the top 10 futures markets.
Tradovate Pros and Cons
| Pros | Cons |
|---|---|
| No software installation required - fully cloud-based | Limited automation compared to traditional desktop platforms |
| Works seamlessly on Mac, PC, mobile, and web | Fewer customization options for algorithmic trading |
| Server-side order management protects against crashes | Basic charting tools may not meet institutional needs |
| Integrated with TradingView, including Pine Script support | Paid membership required for lowest commission rates |
| No minimum deposit - easy for beginners | Less ideal for high-frequency trading strategies |
| Unified login with NinjaTrader and shared market data | Limited advanced backtesting tools |
| Intuitive design with a minimal learning curve |
Tradovate's features make it a strong choice for traders who value efficiency and mobility.
Darrell Martin, Founder and CEO of Apex Trader Funding, highlights the platform's appeal:
"Tradovate is the best 'plug-and-play' option for Mac/Web users who prioritize TradingView integration."
While Tradovate shines in accessibility and ease of use, traders who rely on deep C# coding or advanced desktop customization might find it less accommodating. However, for those who prioritize a modern design, mobile-friendly tools, and straightforward execution, Tradovate is a solid fit for the needs of today’s futures traders.
Feature Comparison: NinjaTrader vs Tradovate
This comparison dives into how NinjaTrader and Tradovate cater to different trading needs. As Darrell Martin put it, the choice boils down to Interface vs. Infrastructure. NinjaTrader is a Windows-based desktop platform built for institutional-level automation, while Tradovate focuses on cloud-based simplicity and instant accessibility.
Since 2026, both platforms have shared a unified NinjaTrader ID, enabling real-time syncing of account balances, positions, and market data. This integration makes switching between platforms a breeze.
Here's a side-by-side look at their features:
| Feature | NinjaTrader | Tradovate |
|---|---|---|
| Platform Type | Desktop (Windows) + Web/Mobile | Cloud-based (Web/Mobile/Mac) |
| Pricing | Free, $99/month, or $1,499 lifetime | Free, $99/month, or $1,499 lifetime |
| Charting Tools | Institutional-grade with deep customization | Modern, streamlined with drag-and-drop orders |
| Automation | NinjaScript (C#) for tick-by-tick strategies | Pine Script via TradingView integration |
| Order Management | Advanced ATM strategies and SuperDOM | Bracket orders with cloud-held execution |
| Execution Speed | High-precision execution | Cloud-optimized |
| Ease of Use | Medium (steep learning curve) | High (beginner-friendly) |
| Reliability | High (best with VPS hosting) | High (server-side order storage) |
| Asset Classes | Futures, Forex, Stocks, Options | Primarily Futures |
By 2026, NinjaTrader's web platform has achieved 90% parity with Tradovate's cloud-based features. However, NinjaTrader's full desktop experience still requires Windows. Tradovate, on the other hand, is a go-to option for Mac users, offering seamless access across devices without the need for software installation. Both platforms maintain strong user ratings, scoring above 4.3/5 on TradingView.
Next, we’ll explore the specific pros and cons of each platform in greater detail.
Detailed Pros and Cons
Building on the feature comparison above, this section takes a closer look at the advantages and drawbacks of each platform. This detailed breakdown can help you decide which platform aligns best with your trading style.
NinjaTrader: Pros and Cons Table
| Pros | Cons |
|---|---|
| Advanced Automation: The NinjaScript (C#) framework offers professional-grade algorithmic trading with tick-by-tick precision. | Steep Learning Curve: The interface can be complex, requiring significant time to master, which may deter beginners. |
| Deep Customization: Thousands of third-party add-ons allow for highly personalized trading setups. | Windows-Centric: Full desktop functionality is only available on Windows or through virtualization tools for Mac users. |
| Institutional Tools: Includes advanced charting, robust backtesting with Market Replay, and SuperDOM for precise order management. | Resource Intensive: Optimal performance demands substantial system resources. |
| Broker Flexibility: Connects with multiple third-party brokers beyond its own brokerage. | Costly Add-ons: Advanced features and third-party tools can make the overall cost higher than the base subscription. |
| Professional Backtesting: Features a built-in strategy builder for tick-by-tick analysis, ensuring thorough strategy validation. | Mobile Limitations: The mobile app lacks the full functionality of the desktop version. |
NinjaTrader is a powerhouse for traders seeking institutional-level tools and extensive customization. However, additional fees, such as the 1% currency conversion fee and the $25 monthly inactivity fee, can add to the overall expense.
Tradovate, on the other hand, offers a distinct set of features tailored for traders looking for a more modern and mobile-friendly experience.
Tradovate: Pros and Cons Table
| Pros | Cons |
|---|---|
| Cloud-Native: Offers seamless access across web, mobile, and desktop without requiring software installation or updates. | Basic Automation: Automation capabilities are limited and often depend on API or TradingView integration. |
| User-Friendly: A modern and intuitive interface allows traders to get started quickly, often within hours. | Limited Customization: Lacks extensive options for creating highly specific custom indicators or setups. |
| TradingView Integration: Syncs effectively with TradingView for advanced charting and Pine Script automation. | Broker Lock-in: Primarily functions as its own brokerage, restricting third-party connectivity. |
| Cost Efficiency: Features a commission-free membership option at $199/month or a $1,499 lifetime fee, appealing to high-frequency traders. | Basic Native Charting: Relies heavily on TradingView for advanced technical analysis tools. |
| Mac Compatibility: Works natively on Mac without needing Windows or virtualization tools. | Internet Dependency: Performance hinges on internet stability and browser responsiveness. |
Tradovate shines with its accessibility and ease of use. It boasts an execution speed averaging under 1 second from a TradingView alert to order fill, and its server-side order management safeguards trades during local internet outages. However, its focus on futures and options means it doesn’t cater to equity traders.
Pricing Comparison
When it comes to pricing, both NinjaTrader and Tradovate follow a similar three-tier structure. They each offer a Free plan at $0 per month, a Monthly plan at $99 per month, and a Lifetime plan for a one-time payment of $1,499 (or four installments of $499). However, the real difference emerges in commission rates and additional fees.
Commission Rates
The commission structure is aligned across both platforms. Here's how it breaks down:
- Free plan: Standard contracts cost $1.29 per side, while micro contracts are priced at $0.39 per side.
- Monthly plan: Rates drop to $0.99 for standard contracts and $0.29 for micro contracts.
- Lifetime plan: The most competitive rates are $0.59 per side for standard contracts and $0.09 for micro contracts.
Tradovate also offers Nano and Event contracts for smaller accounts, with commissions as low as $0.20 per side on the Free plan, $0.15 on the Monthly plan, and $0.05 on the Lifetime plan.
Stay online and closer to execution. Choose a VPS location for CME futures, New York markets, London FX, API trading, and more.
Host your platform near the market route that matters.
From $59.99/mo
| Plan Type | Monthly Cost | Standard Contracts | Micro Contracts | Tradovate Nano/Event |
|---|---|---|---|---|
| Free | $0 | $1.29 per side | $0.39 per side | $0.20 per side |
| Monthly | $99 | $0.99 per side | $0.29 per side | $0.15 per side |
| Lifetime | $1,499 (one-time) | $0.59 per side | $0.09 per side | $0.05 per side |
Additional Fees
While the base commissions are similar, additional fees can influence total trading costs. NinjaTrader adds $0.15 per contract for clearing and $0.25 for order routing. In contrast, Tradovate incorporates these fees into its all-in rates. Both platforms also impose inactivity fees: NinjaTrader charges $25 per month for inactive accounts, while Tradovate’s Free plan users face a $35 fee if they log in without trading.
For traders requiring professional market data, Tradovate charges around $156 per month per exchange for CME, CBOT, COMEX, and NYMEX. However, funded accounts generally include Level I market data for retail traders.
Lifetime Plan Value
The Lifetime plan caters to high-frequency traders and scalpers. By saving $0.70 per side on standard contracts (from $1.29 to $0.59), the $1,499 cost is recouped after approximately 2,142 contract sides. This makes it an attractive option for those with cost-sensitive, high-volume strategies.
Understanding these pricing structures is crucial for traders evaluating which platform aligns best with their trading style and budget, especially for strategies like scalping or high-volume trading where costs can quickly add up.
Performance and Best Use Cases
NinjaTrader's desktop application, built on C# (NinjaScript), offers precise tick-by-tick backtesting and advanced ATM strategies, making it a powerful tool for institutional-grade trading. On the other hand, Tradovate's cloud-based platform provides fast, device-independent execution, which is perfect for scalpers and intraday traders. These differences shape which platform works best for your trading style and goals.
As of 2026, both platforms use unified credentials, allowing real-time syncing of market data and account balances. This integration lets traders seamlessly switch between the two platforms. Additionally, NinjaTrader's Web platform now mirrors 90% of Tradovate's cloud features, giving Mac users access to advanced tools like charts and the SuperDOM - no virtualization required.
Platform Reliability and Infrastructure
Reliability depends on each platform's infrastructure. NinjaTrader Desktop requires a stable Windows setup and significant system resources, which may be a hurdle for non-Windows users. In contrast, Tradovate's cloud-based model works across devices, from Macs to tablets and smartphones, ensuring consistent performance. For traders using complex algorithms or high-frequency strategies, a VPS is crucial to minimize latency and maintain 24/7 uptime.
When to Choose NinjaTrader
NinjaTrader shines for traders who need C# automation or advanced order management. If your strategy involves deep historical backtesting, intricate ATM strategies, or third-party add-ons, NinjaTrader's desktop platform offers unmatched precision and control. Darrell Martin, CEO of Apex Trader Funding, emphasizes:
NinjaTrader Desktop utilizes NinjaScript (C#). This is the institutional gold standard, allowing for tick-by-tick backtesting, high-frequency execution, and complex 'Automated Trade Management' (ATM) strategies.
For power users relying on custom indicators, automated systems, or compatibility with proprietary trading firms, NinjaTrader's features are hard to beat. Its SuperDOM interface, for example, provides granular control over order placement, making it ideal for managing multiple positions with exceptional accuracy.
When to Choose Tradovate
Tradovate is tailored for traders who prioritize simplicity and speed. If you're a scalper executing frequent trades on a Mac or mobile device, Tradovate's cloud-based platform eliminates the need for desktop installations or Windows dependencies. Its compatibility with TradingView's Pine Script also appeals to those seeking lightweight automation without diving into C#.
Tradovate's cloud-based structure means orders are placed quickly across devices... Its focus on simplicity + speed makes it a favorite for scalpers. - Darrell Martin, CEO of Apex Trader Funding
Tradovate has gained popularity among active retail traders, with over 80,142 connected accounts on social charting platforms compared to NinjaTrader's 24,025. Its focus on accessibility and modern design resonates with this audience.
Using VPS Hosting with Both Platforms
A VPS can enhance the performance of both platforms by ensuring stable internet, uninterrupted power, and protection from system crashes. For NinjaTrader users, a VPS is particularly helpful since the desktop application requires a Windows environment. Mac users can access the full NinjaTrader feature set via a VPS without needing virtualization software like Parallels. Advanced setups can even run NinjaTrader headlessly for optimal performance.
Tradovate users also benefit from VPS hosting, especially when running automated strategies or during critical trading sessions. With unified credentials introduced in 2026, traders can sync account balances and positions across both platforms while heavy-duty automation operates on a VPS. This ensures uninterrupted strategy execution, regardless of local system issues.
QuantVPS offers tailored plans for different trading needs:
- VPS Lite: $41.99/month (billed annually) for basic execution with 1–2 charts.
- VPS Pro: $69.99/month for 3–5 charts and standard automation.
- VPS Ultra: $132.99/month for high-frequency trading, supporting up to 4 monitors.
- Dedicated Server: $209.99/month for institutional-grade performance.
All plans include ultra-low latency, DDoS protection, and automatic backups, ensuring a secure and responsive trading environment.
Which Platform Should You Choose?
When deciding between NinjaTrader and Tradovate, your choice will largely depend on your trading style, technical skills, and the infrastructure you need. NinjaTrader is the go-to platform for traders who require advanced automation capabilities through C# (NinjaScript), institutional-level backtesting, and the ability to trade across multiple asset classes like futures, forex, stocks, and options. While it has a steeper learning curve, the platform offers unparalleled levels of customization and control.
On the other hand, Tradovate is designed for traders who value simplicity and speed. Its cloud-based design and smooth integration with TradingView allow you to get started quickly - often within hours. This makes it especially attractive to futures traders who need reliable access across devices like Macs, tablets, and smartphones, without relying on Windows.
If you're a quantitative trader who needs tick-level precision and complete control, NinjaTrader is the better fit. However, if you prefer a straightforward, plug-and-play experience, Tradovate is your best bet. Both platforms now offer unified credentials, allowing you to sync account balances and positions seamlessly across both systems.
The infrastructure requirements for these platforms also highlight different advantages. NinjaTrader's Windows-based desktop application demands robust system resources, making it a strong candidate for VPS hosting to ensure stability and low-latency execution. In contrast, Tradovate’s cloud-native design works smoothly across all devices, regardless of operating system. QuantVPS offers tailored hosting solutions optimized for both platforms, ensuring uninterrupted trading and enhanced performance.
Device compatibility is another important factor. Tradovate is optimized for Apple Silicon and works effortlessly on any device with a browser. Meanwhile, NinjaTrader Desktop requires a Windows system or virtualization software to run on a Mac. However, as of 2026, NinjaTrader’s web platform has achieved 90% feature parity with Tradovate, giving Mac users access to advanced tools like SuperDOM and advanced charting without needing virtualization. For prop traders, running NinjaTrader in a headless state on a VPS - using tools like CrossTrade - lets you combine TradingView’s analysis capabilities with NinjaTrader’s robust execution engine.
Both platforms offer similar pricing options: free, $99 per month, or a $1,499 lifetime license. For a detailed breakdown of pricing and commission structures, check the Pricing Comparison section. Ultimately, the decision comes down to your priorities: NinjaTrader for deep automation and customization or Tradovate for a cloud-first, user-friendly experience. Whichever you choose, pairing it with reliable VPS hosting from QuantVPS ensures smooth and efficient trading, no matter your local system setup.
FAQs
Can I use both NinjaTrader and Tradovate on the same account?
No, you can't use NinjaTrader and Tradovate with the same account. Since these platforms operate independently, you'll need to create separate accounts to access each one.
Do I need a VPS for NinjaTrader or Tradovate?
Using a VPS (Virtual Private Server) is a smart choice for NinjaTrader users who want consistent, low-latency performance - especially when running automated trading strategies. For Tradovate users, VPS hosting can also provide dependable access and seamless execution. By using a VPS, both platforms can achieve greater stability and performance, which is crucial for uninterrupted trading in critical scenarios.
Which platform is better for automated trading?
NinjaTrader stands out as a strong choice for automated trading, thanks to its advanced capabilities, powerful backtesting tools, and support for creating custom strategies in C#. It's particularly well-suited for traders who prioritize automation and rely heavily on technical analysis.
On the other hand, Tradovate emphasizes simplicity, offering user-friendly, cloud-based access at lower costs. This makes it a great option for beginners or those looking for straightforward automation features. That said, NinjaTrader's edge lies in its extensive customization options and professional-level tools.


