
Want uninterrupted access to your remote trading platforms? RDP auto-login lets you securely save credentials, ensuring seamless reconnections to your trading VPS. This feature is especially useful for traders running automated strategies or managing multiple accounts. By enabling auto-login, you can minimize downtime, keep trading bots active 24/7, and simplify workflows.
Key Takeaways:
- What is RDP? A Microsoft tool for remote desktop access, widely used by traders on Windows VPS.
- Why Auto-Login Matters: Saves time and ensures trading operations continue after reboots.
- Setup Requirements: Compatible Windows OS (e.g., Windows Server 2016-2025, Windows 10/11 Enterprise), reliable RDP client, and stable internet.
- Security Tips: Use MFA, Network Level Authentication (NLA), and Remote Credential Guard to protect saved credentials.
- Common Issues: Credential prompts, authentication errors, or disconnections can often be fixed by updating settings or credentials.
Learn how to configure RDP auto-login securely, manage credentials with Windows tools, and protect your trading environment against risks like data breaches or unauthorized access.
Enable or Disable Saving of Credentials for Remote Desktop (RDP) in Windows 11/10!
Setup Requirements and Security Guidelines
Let’s dive into the essential system requirements and security measures needed for safe and efficient RDP auto-login.
System Requirements for RDP Auto-Login
To enable RDP auto-login, your trading VPS must run a compatible Windows operating system. Supported options include Windows Server 2016, 2019, 2022, and 2025 for Remote Desktop Services, as well as Windows 10 Enterprise and Windows 11 Enterprise for Virtual Desktop Infrastructure setups.
Your hardware needs will depend on your trading workload:
| Trading Workload | Single-Session Requirements | Multi-Session Requirements |
|---|---|---|
| Light (basic charting) | 2 vCPUs, 8 GB RAM, 32 GB storage | 8 vCPUs, 16 GB RAM, 32 GB storage |
| Medium (multiple platforms) | 4 vCPUs, 16 GB RAM, 32 GB storage | 8 vCPUs, 16 GB RAM, 32 GB storage |
| Heavy (complex algorithms) | 8 vCPUs, 32 GB RAM, 32 GB storage | 8 vCPUs, 16 GB RAM, 32 GB storage |
| Power (high-frequency trading) | Specialized single-session setup | 6 vCPUs, 56 GB RAM, 340 GB storage |
For smooth trading, use a reliable RDP client (available for Windows, macOS, iOS, Android, and Linux) over a stable internet connection. If you're setting up a multi-user environment, you'll also need proper Windows Server licensing and an RDS license server to manage Client Access Licenses (CALs). Keep in mind, the default RDP server only supports two connections, so expanded licensing is often necessary for trading teams.
Once the technical setup is in place, it's crucial to address security concerns to protect your trading environment.
Security Risks and Protection Methods
Saving RDP credentials can expose you to significant risks. Since RDP is involved in 90% of cyberattacks, implementing strong security measures is essential to protect your trading data and capital.
RDP clients version 6 and above encrypt saved credentials using CryptProtectData, which ties them to your Windows account. However, this encryption isn’t foolproof - any malicious program running under your user account could potentially access these credentials if your system is compromised.
Here’s why this matters: The global average cost of a data breach reached $4.45 million in 2023, a 15% increase over the past three years. For traders, this could mean unauthorized access to accounts, stolen strategies, or leaked financial information.
To mitigate these risks:
- Use Remote Credential Guard: This Microsoft feature keeps your credentials local by redirecting Kerberos requests to your client. It allows single sign-on functionality without exposing credentials during trading sessions.
- Enable Multi-Factor Authentication (MFA): Even if your credentials are compromised, MFA adds an extra verification layer, significantly reducing unauthorized access risks.
- Turn on Network Level Authentication (NLA): This ensures users must authenticate before establishing a full RDP session.
- Adopt Strong Password Policies: Use passwords with at least 16 characters, including a mix of uppercase, lowercase, numbers, and symbols. Avoid reusing passwords across services, and consider using a password manager to securely generate and store them.
US Security Standards for Trading
In the United States, trading environments must comply with strict security standards, which directly impact how RDP is configured. For example, the University of California, Berkeley’s Information Security Office recommends using RDP gateways or VPN connections when accessing networks from public internet sources.
Directly exposing RDP to the internet is a bad idea - 37% of all traffic from threat actors in 2022 was RDP-related. To secure your setup:
Run 24/7 while you sleep. Keep bots, platforms, and trade copiers online on a dedicated VPS.
Low-latency VPS hosting for your trading platform.
From $59.99/mo
- Restrict RDP Access: Use a whitelist of trusted IPs and change the default port (3389) to something less predictable. While these steps help, they should be combined with other security measures.
- Account Lockout Policies: Lock accounts after three failed login attempts. This discourages automated attacks while minimizing disruption for legitimate users.
- Regular Audits and Updates: Conduct frequent security audits and ensure your operating system, RDP software, and trading platforms are updated with the latest patches. Monitor RDP access logs for unusual activity that could signal unauthorized attempts.
For added protection, use VPN tunneling to encrypt all RDP traffic. This prevents outsiders from even detecting that RDP services exist on your trading VPS, reducing your exposure to potential threats. By combining these measures, you can secure your auto-login process and protect your trading capital effectively.
How to Set Up RDP Auto-Login
This section explains how to configure RDP auto-login in three straightforward steps: setting up the connection, managing credentials, and troubleshooting common issues. These steps help ensure your trading VPS remains accessible and secure for uninterrupted use.
Setting Up Auto-Login in Remote Desktop Connection
The simplest way to enable auto-login is by using Windows' built-in Remote Desktop Connection client. Start by launching the application - type "mstsc" into the Windows search bar or Run dialog to open it.
Next, click "Show Options" to reveal additional connection settings. In the Computer field, input your trading VPS's IP address or hostname. For the User name field, enter your credentials. Use DOMAIN\USERNAME for domain accounts, or just the username for local accounts. Be sure to match capitalization exactly.
Here’s the key step: check the box for "Allow me to save credentials." This enables Windows to securely store your login details via the Windows Credentials API. Enter your password when prompted.
Before saving, confirm that Network Level Authentication (NLA) is enabled in the Advanced settings. If you're connecting over a public network, enabling "Public mode" might also be necessary.
Once everything is configured, click "Save As" to create an RDP file that includes your saved credentials. Give the file a clear name, such as "TradingVPS-AutoLogin.rdp", and store it in a secure location on your local device. In the future, you can simply double-click this file to connect automatically.
Test the saved RDP file immediately. If everything is set up correctly, you’ll connect to your trading VPS without being prompted for credentials.
Managing Credentials with Windows Credential Manager
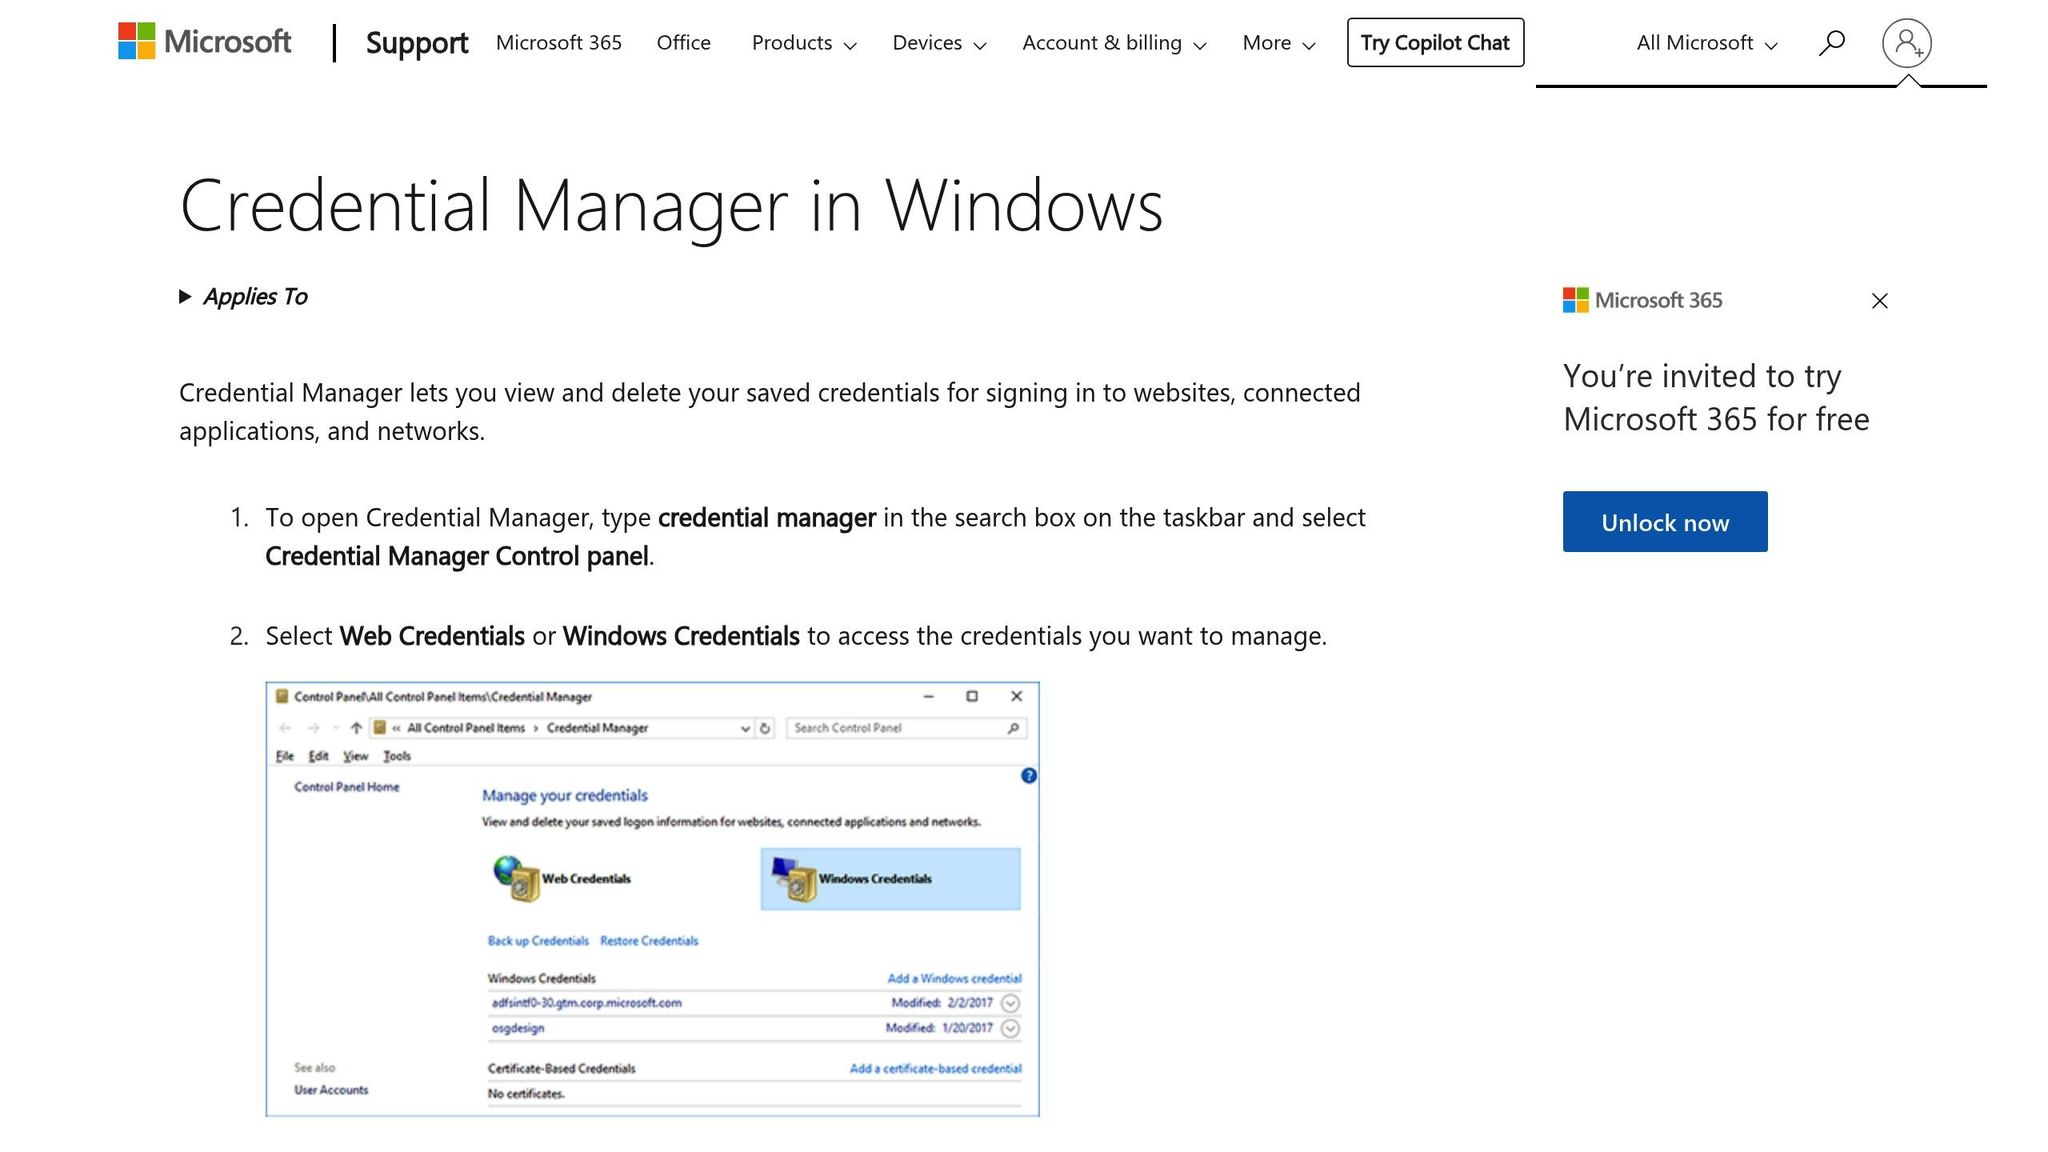
For a more secure way to handle your RDP credentials, consider using Windows Credential Manager. This tool encrypts and securely stores your credentials, linking them to your Windows account.
Here’s how to use it:
- Open Control Panel and navigate to User Accounts > Credential Manager, or search for "Credential Manager" in the Windows search bar.
- Select "Windows Credentials" to view and manage stored credentials.
- To add new RDP credentials, click "Add a Windows credential." In the Internet or network address field, enter your VPS address in this format:
TERMSRV/your-vps-ip-address(e.g.,TERMSRV/192.168.1.100). - Provide your username and password. For domain accounts, use
DOMAIN\USERNAME. Click "OK" to save the credentials.
Credential Manager centralizes your login details, making them available to any RDP connection to the specified server. When you connect using the Remote Desktop Connection client, the system will automatically retrieve and use these stored credentials.
To update existing credentials, locate the relevant entry in Credential Manager, click the dropdown arrow, and select "Edit." If you no longer need the credentials, choose "Remove" to delete them.
Fixing Common Problems
Even with proper setup, issues with RDP auto-login can arise. Here are some common problems and solutions:
Credential prompts still appearing:
Check for duplicate or outdated entries in Credential Manager. Remove them using the command cmdkey /delete:TERMSRV/your-vps-address.
Authentication failures despite correct credentials:
Double-check the username format. Use DOMAIN\USERNAME for domain accounts, or just the username for local accounts. If you're using a Microsoft account, try the local account name (you can find it by running whoami on the target machine). Also, ensure the account is part of the "Remote Desktop Users" group on the VPS.
"Avoid storing credentials in RDP files: While storing login details makes access convenient, it poses a significant security risk if unauthorized users gain access to the file. Instead, use credential management strategies or require manual entry upon connection." - NinjaOne
CredSSP authentication errors:
Ensure both your local machine and VPS have the latest Windows updates. If the problem persists, adjust Group Policy settings under Computer Configuration > Administrative Templates > System > Credentials Delegation to enable "Allow delegating saved credentials with NTLM-only server authentication." Apply changes with gpupdate /force.
Certificate warnings blocking connections:
Ensure your VPS has a valid certificate. On your local machine, open Certificate Manager (certmgr.msc) and check that the root Certificate Authority certificate is under Trusted Root Certification Authorities. On the VPS, verify the certificate under Local Computer > Remote Desktop Services > Certificates and request a new one if it has expired.
Unexpected disconnections after connecting:
This can happen on Windows 10 systems that don’t have a password set. To resolve this, assign a password to the Windows account on your VPS or sign out locally before connecting. Alternatively, use the "Switch user" option on the remote PC before initiating the connection.
Network and firewall blocks:
Ensure that Windows Defender Firewall on your VPS allows "Remote Desktop" for the appropriate network profiles. Confirm that TCP port 3389 is open in the firewall's inbound rules. If another application is using port 3389, use netstat -ano | find "3389" to identify the conflict, then run tasklist /svc | find "<process-id>" to locate the responsible service.
For DNS issues, try connecting using your VPS’s IP address or run ipconfig /flushdns.
Securing RDP Access for Trading VPS
Using auto-login for your trading VPS is undoubtedly convenient, but it can also open the door to potential security threats. Protecting your trading systems and sensitive financial data requires a balance between efficiency and robust security measures.
Turn On Network Level Authentication (NLA)
Network Level Authentication (NLA) is like a security checkpoint for your VPS. It ensures users authenticate themselves before a full RDP session begins, reducing the risk of brute-force attacks and blocking unauthorized access to your desktop.
Here’s how it works: NLA uses the CredSSP (Credential Security Support Provider) protocol to verify a user’s identity at the network level. To enable it, navigate to System Properties, select Advanced system settings, go to the Remote tab, and check the box for Enable Network Level Authentication. Keep in mind, this feature is supported by Windows 10, Windows 11, and most modern third-party RDP clients. You can confirm it’s active by revisiting the Remote Desktop settings in System Properties.
The best part? NLA integrates smoothly with Windows Credential Manager, so you can still enjoy the ease of auto-login while adding a critical layer of protection. For even greater security, consider restricting access to specific, trusted IP addresses.
Limit Access to Trusted IP Addresses
Limiting RDP access to trusted IP addresses is like building a moat around your VPS. Only connections from approved locations - like your home office or trading desk - can get through.
To set this up, adjust your QuantVPS firewall to allow RDP connections on port 3389 only from your trusted IPs. Open Windows Defender Firewall with Advanced Security by typing wf.msc into the Run dialog. Then, locate the Remote Desktop rules under Inbound Rules, right-click, and select Properties. Head to the Scope tab, choose These IP addresses under Remote IP address, and click Add to input your trusted IPs. If you’re unsure of your current IP address, use an online tool or another preferred method to check.
This step is particularly crucial for traders handling large sums or high trade volumes. Even if someone has your RDP credentials, they won’t be able to connect unless they’re using one of your approved IPs.
One thing to watch out for: many residential internet connections use dynamic IP addresses, which can change over time. Be sure to monitor for changes and update your firewall rules as needed. Additionally, stay vigilant for any changes in your server’s fingerprint, as this could indicate a potential security issue. Use Windows Event Viewer to track login attempts - both successful and failed - and keep a close eye on your system’s activity.
Stay online and closer to execution. Choose a VPS location for CME futures, New York markets, London FX, API trading, and more.
Host your platform near the market route that matters.
From $59.99/mo
Check and Update Saved Credentials
Keeping your saved credentials up to date is another key step in maintaining security. This involves reviewing stored login details, updating passwords, and monitoring for suspicious activity.
To start, open Windows Credential Manager and look under Generic Credentials for any entries related to your VPS. Make sure all stored credentials are accurate and necessary. If you’ve updated your VPS password or no longer use certain connections, delete the outdated entries to reduce risks.
"While storing login details makes access convenient, it poses a significant security risk if unauthorized users gain access to the file. Instead, use credential management strategies or require manual entry upon connection." - NinjaOne
It’s a good habit to update your VPS password every 60–90 days and immediately adjust the corresponding Credential Manager entry. Regularly check Windows Event Viewer for signs of unusual activity, such as unexpected login times, unfamiliar IP addresses, or multiple failed login attempts. These could be early warnings of potential threats.
QuantVPS Features for Secure RDP Access
Once you've set up auto-login, maintaining a secure and efficient infrastructure becomes essential. QuantVPS ensures your RDP connections are stable, secure, and optimized for performance at all times.
Here’s how QuantVPS enhances both the security and reliability of your RDP sessions.
DDoS Protection and Reliable Uptime
In trading, uninterrupted connectivity is non-negotiable - any downtime can cost you valuable opportunities. QuantVPS addresses this with comprehensive DDoS protection, advanced firewall configurations, and constant monitoring to identify and fix issues before they affect your connection. This multi-layered security system ensures that even if your server is targeted, your saved credentials and trading data remain safe, while authorized connections continue without disruption.
Dedicated Resources and Ultra-Low Latency
QuantVPS provides dedicated resources, including AMD EPYC processors, DDR4/5 RAM, and NVMe M.2 SSD storage, to ensure your RDP sessions run smoothly and consistently. For traders, speed is critical, and QuantVPS delivers ultra-low latency from its Chicago datacenter - boasting connection speeds as fast as <0.52ms to CME Group[9]. This level of performance is crucial for executing trades with minimal delay.
"Our Chicago-based infrastructure is specifically optimized for ultra-low-latency trading, offering unparalleled processing power and stability to ensure your strategies run continuously and efficiently, independent of your local machine." - QuantVPS [9]
Additionally, QuantVPS supports global accessibility, allowing you to connect from any device - whether it’s a Windows PC, Mac, or mobile device. With Gigabit connections and 10 Gbps burst capability, your trading platforms remain responsive, even during high-demand periods.
Expert Support for RDP Configuration
QuantVPS offers round-the-clock expert support to assist with secure auto-login setup. Whether you need help with credential management, troubleshooting connection issues, or configuring security settings, their team is available via tickets, live chat, and a detailed knowledge base. Moreover, their secure remote desktop gateway ensures your credentials and connection integrity are verified before establishing your RDP session.
"Utilize our secure remote desktop gateway to connect to your dedicated trading environment on QuantVPS, giving you full control and visibility of your operations without geographical limitations." - QuantVPS [9]
With a strong reputation and an Excellent rating on Trustpilot[9], QuantVPS combines powerful infrastructure with expert support, helping you confidently implement secure auto-login while ensuring uninterrupted trading operations.
Key Points for RDP Auto-Login
This section delves into how RDP auto-login can enhance your trading workflow while maintaining the security of your VPS, ensuring a seamless and secure trading experience.
Enhancing Your Trading Workflow
RDP auto-login simplifies access to your trading platforms, allowing them to run continuously without interruptions - even if your local computer is offline or encounters connectivity issues. This means platforms like MetaTrader 4, MetaTrader 5, and others can stay operational 24/7.
With auto-login, your Expert Advisors and automated trading strategies remain active around the clock, capturing opportunities across global markets. For traders, every second counts. Servers located near major broker data centers can execute trades in as little as 1 millisecond, helping reduce slippage and maximize efficiency.
"A Forex RDP is a powerful virtual server that hosts your trading platform. You can access it using a remote desktop client from any device or location. ... The main benefit of a Forex RDP is that it stays connected to the internet 24/7. So even if you close your remote session, your trades will continue to execute in the background." - PunchNG
Continuous operation also shields you from disruptions caused by power outages, unstable internet connections, or hardware failures. By eliminating these technical concerns, you can dedicate more time to analyzing the markets and refining your strategies. When paired with robust security measures, this approach ensures a smooth and efficient trading experience.
Prioritizing Security and Reliability
While the convenience of auto-login cannot be overstated, security should always remain a key focus. Alarmingly, over 4.5 million RDP servers are currently exposed to the internet, making regular security reviews a must.
"Unsecured RDP implementations can compromise entire networks, as the protocol remains a common ransomware attack vector." - SentinelOne
To ensure the reliability and safety of your trading environment, choose providers that offer 99.9% uptime guarantees and dedicated resources. This ensures your trading platforms remain accessible during critical market hours. Additionally, monitoring session logs and keeping software updated with the latest security patches can help safeguard against vulnerabilities and emerging threats.
Steps to Integrate RDP Auto-Login
Ready to incorporate RDP auto-login into your trading setup? Start by configuring the security settings outlined in this guide before enabling auto-login features. Test your system during non-trading hours to verify everything works smoothly.
Your VPS requirements will depend on your trading style. Day traders managing multiple charts and automated strategies generally need more processing power and memory than those who trade less frequently. For example, QuantVPS offers plans starting at $41.99/month, with options for dedicated servers suited to heavier trading demands.
Once your setup is live, keep a close eye on it. Regularly review connection logs, update security settings, and ensure saved credentials remain secure. As your trading activities expand, be ready to upgrade your VPS resources to maintain top-tier performance.
A well-configured RDP auto-login system, combined with a dependable VPS, creates a professional trading environment that operates independently of your local hardware. This flexibility allows you to trade from virtually anywhere while maintaining the security and performance your strategies require.
FAQs
How can I keep my saved RDP credentials secure when using auto-login?
To keep your saved RDP credentials safe while using auto-login, make sure to use strong, unique passwords and activate multi-factor authentication (MFA) whenever it’s an option. Instead of storing credentials directly in RDP files, rely on Windows Credential Manager, which encrypts and securely stores them.
For overall system security, stay on top of software updates, limit access through firewalls, and consider enabling features like Credential Guard or managing RDP ports effectively. You can also strengthen your remote desktop setup by using Group Policy to enforce strict security policies and prevent unauthorized access.
What do I need to set up RDP auto-login on a trading VPS?
To enable RDP auto-login on a trading VPS, you'll need a device equipped with an RDP client - this works with Windows, macOS, iOS, Android, or Linux. A stable internet connection is crucial, with a minimum speed of 5 Mbps to ensure smooth access. The VPS itself should meet certain requirements: at least 2 GB of RAM, a dual-core CPU, and enough storage to handle your trading applications. Also, make sure the VPS has RDP ports open and that the firewall settings are configured correctly to allow secure connections.
What should I do if I experience authentication errors or disconnections when using RDP auto-login?
If you're dealing with authentication errors or unexpected disconnections when using RDP auto-login, start by checking your computer's clock. Even minor time mismatches can lead to login failures. After that, make sure Network Level Authentication (NLA) is properly enabled and configured, as it's a frequent culprit behind connection problems.
Still having trouble? Take a closer look at your system's group policy settings and confirm that your credentials are current. For encryption-related issues, you might need to reset specific registry settings tied to CredSSP. If the problem continues, updating your credentials or restarting the RDP service could help resolve any lingering configuration conflicts.


