
Claude Code is a command-line coding assistant by Anthropic that integrates directly into your terminal. It can edit code, manage git workflows, and execute shell commands, all while understanding your project context. Running it on a VPS ensures 24/7 availability, better resource allocation, and persistent sessions for remote development. Here's a quick summary of the setup process:
- Choose a VPS: QuantVPS is a solid option, starting at $59.99/month for a plan with enough resources (4 cores, 8 GB RAM, 70 GB NVMe storage) for Claude Code.
-
Prepare the VPS:
- Use Ubuntu 22.04 or 24.04 LTS.
-
Update the system (
sudo apt update && sudo apt upgrade -y). - Create a non-root user and set up SSH keys for secure access.
-
Install essential tools like
tmuxandripgrep.
-
Install Claude Code:
-
Run the native installer via
curlfor Linux or PowerShell for Windows. - Verify the installation and ensure the binary is in your system PATH.
-
Run the native installer via
-
Configure for Remote Use:
- Authenticate with your Claude Pro/Max account.
-
Use
tmuxfor persistent sessions, so tasks continue even if you disconnect. - Secure your VPS with firewalls, SSH key authentication, and tools like Fail2Ban.
This setup creates a reliable environment for AI-assisted coding, allowing you to work remotely without interruptions.
Prerequisites for Setting Up Claude Code on QuantVPS
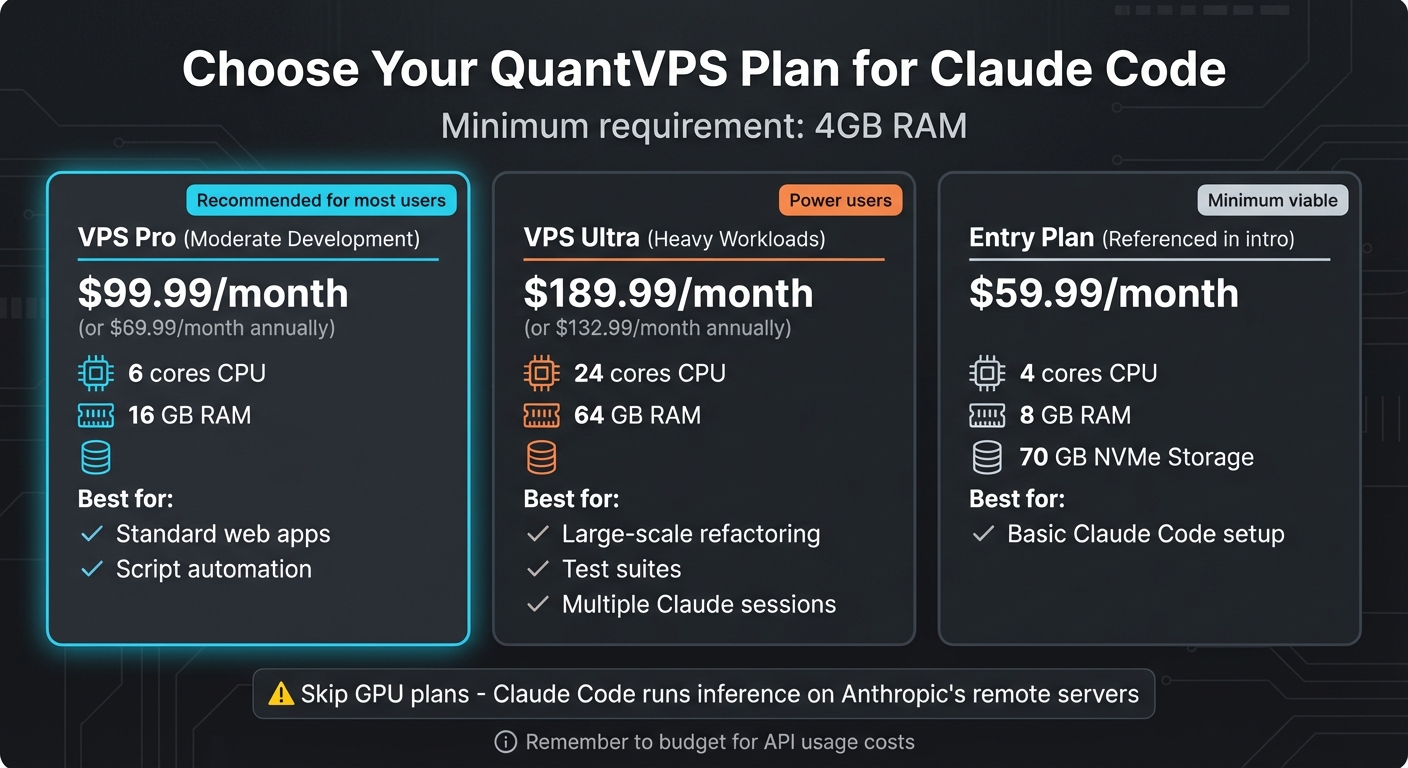
QuantVPS Plan Comparison for Claude Code Installation
To avoid installation hiccups, it’s important to have all the prerequisites ready beforehand.
Required Software and Accounts
First, you’ll need an active Anthropic account, which can be created via claude.ai or console.anthropic.com. Pair this with one of the following: a Claude Pro subscription ($20/month), a Claude Max subscription (ranging from $100 to $200/month), or an Anthropic API key with pre-paid credits. Additionally, a QuantVPS subscription is necessary to host your remote environment, along with an SSH client to access the server’s terminal.
Ensure the following software is installed:
- curl
- Git (Windows users should install "Git for Windows")
- tmux: This is essential for managing persistent sessions and enabling the "Agent Teams" split-pane mode. When configured in "Sandbox" mode, this feature reduces permission prompts by around 84%.
It’s worth noting that Node.js is no longer required for the 2026 native installer. Once these requirements are met, you’re ready to pick the QuantVPS plan that matches your workload.
Selecting the Right QuantVPS Plan
Your choice of VPS plan depends on the intensity of your workload.
- For moderate development tasks - like running standard web apps or script automation - the VPS Pro plan is a solid option. Priced at $99.99/month (or $69.99/month if billed annually), it offers 6 cores and 16 GB of RAM. This exceeds Claude Code’s 4 GB minimum requirement, leaving room for professional-scale projects.
- For heavy workloads, such as large-scale refactoring, running test suites, or managing multiple Claude sessions simultaneously, the VPS Ultra plan is better suited. It costs $189.99/month (or $132.99/month annually) and provides 24 cores and 64 GB of RAM.
Remember to account for API usage costs in your budget. However, skip GPU-based plans - Claude Code performs inference on Anthropic’s remote servers, so paying extra for GPU hardware won’t boost performance.
Once you’ve selected a plan, you can move on to preparing your VPS environment.
Preparing Your VPS Environment
After confirming all prerequisites, set up your VPS for maximum security and performance. Start by logging into your QuantVPS dashboard and accessing the server’s terminal via SSH. Update and upgrade your system by running:
sudo apt update && sudo apt upgrade -y
Next, create a dedicated user with sudo privileges instead of running Claude Code as root. Here’s how:
sudo useradd -m -s /bin/bash claude
sudo usermod -aG sudo claude
Choose Ubuntu 22.04 LTS or 24.04 LTS as your operating system for the best compatibility.
To enhance security, configure SSH keys. Generate them on your local machine using ssh-keygen (RSA 4096-bit is recommended), and copy the public key to your VPS. This eliminates the need for password-based authentication.
Set up a firewall using UFW to allow only essential ports, such as SSH on port 22. Additionally, install ripgrep, as Claude Code relies on it for analyzing codebases.
Lastly, configure npm to use a global directory (e.g., ~/.npm-global) to avoid permission errors during installation. With this setup, your VPS environment will be ready for Claude Code.
Run 24/7 while you sleep. Keep bots, platforms, and trade copiers online on a dedicated VPS.
Low-latency VPS hosting for your trading platform.
From $59.99/mo
Installing Claude Code on QuantVPS
With your VPS ready to go, it's time to install Claude Code. The native installer is your best bet - it's quick, reliable, and handles updates automatically.
Downloading and Installing Claude Code
For Linux-based VPS environments, the native installer is highly recommended. It’s simple, has no extra dependencies, and usually finishes in under two minutes. If you’ve set up your QuantVPS server with Ubuntu, just run this command:
curl -fsSL https://claude.ai/install.sh | bash
This command downloads and runs the installation script, placing the Claude Code binary in ~/.local/bin/claude. Avoid using sudo for the installation. The installer is designed to work within user space, and using elevated privileges can cause permission issues.
If you’re on a Windows-based VPS, here’s what to do:
-
For PowerShell, run:
irm https://claude.ai/install.ps1 | iex -
For Command Prompt (CMD), use:
curl -fsSL https://claude.ai/install.cmd -o install.cmd && install.cmd && del install.cmd
The installer also includes automatic background updates, so there’s no need for manual upgrades. Prefer the stable release channel? Add -s stable to the bash command for a version that’s been tested for about a week to minimize potential issues:
curl -fsSL https://claude.ai/install.sh | bash -s stable
Verifying the Installation
Once the installation is complete, refresh your session so the shell recognizes the new PATH entry. You can do this by running:
-
For Bash:
source ~/.bashrc -
For Zsh:
source ~/.zshrc
Next, confirm the installation by checking the version:
claude --version
For a more thorough diagnostic, use:
claude doctor
"If
claude doctorruns without errors, you're good to go!" - Ramsey Shaffer, Side Projects
The claude doctor command performs a full system check. It verifies your setup, checks authentication, confirms file permissions, and ensures dependencies like ripgrep are in place. If you’re running Alpine Linux, make sure to install libgcc, libstdc++, and ripgrep before proceeding with the installer.
Adding Claude Code to System PATH (If Necessary)
If typing claude returns "command not found", it means the binary isn’t in your system PATH. While the installer usually handles this, you might need to set it up manually.
For Bash users, run:
echo 'export PATH="$HOME/.local/bin:$PATH"' >> ~/.bashrc
source ~/.bashrc
For Zsh users, run:
echo 'export PATH="$HOME/.local/bin:$PATH"' >> ~/.zshrc
source ~/.zshrc
To confirm the PATH is configured correctly, use:
which claude
If the command still doesn’t work, try closing and reconnecting your SSH session to reload the shell profile. This should resolve any lingering issues.
Configuring Claude Code for Remote AI Development
Once you've installed Claude Code and set up your VPS, the next step is preparing the environment for remote AI development. This includes linking your Claude subscription, enabling session persistence, and securing your server.
Authenticating Your Claude Pro/Max Account
To use Claude Code, you'll need a paid subscription - Pro, Max, Team, or Enterprise. The free Claude.ai plan isn't supported. After installation, run the claude command and use /login to generate an authentication URL. Paste this URL into your local browser to authorize the session.
If you're working on a headless VPS, there's an alternative. Run claude setup-token on your local machine to create a one-year OAuth token. Then, set this token as an environment variable on your VPS:
export CLAUDE_CODE_OAUTH_TOKEN="your-token-here"
To make this change permanent, add the line above to your ~/.bashrc or ~/.zshrc file. Do not set ANTHROPIC_API_KEY at the same time, as having both variables active can cause conflicts.
To skip the onboarding process, manually create a ~/.claude.json file with the following content:
{
  "hasCompletedOnboarding": true
}
You can also include your account details in this file for a smoother setup.
Setting Up Persistent Sessions with Tmux
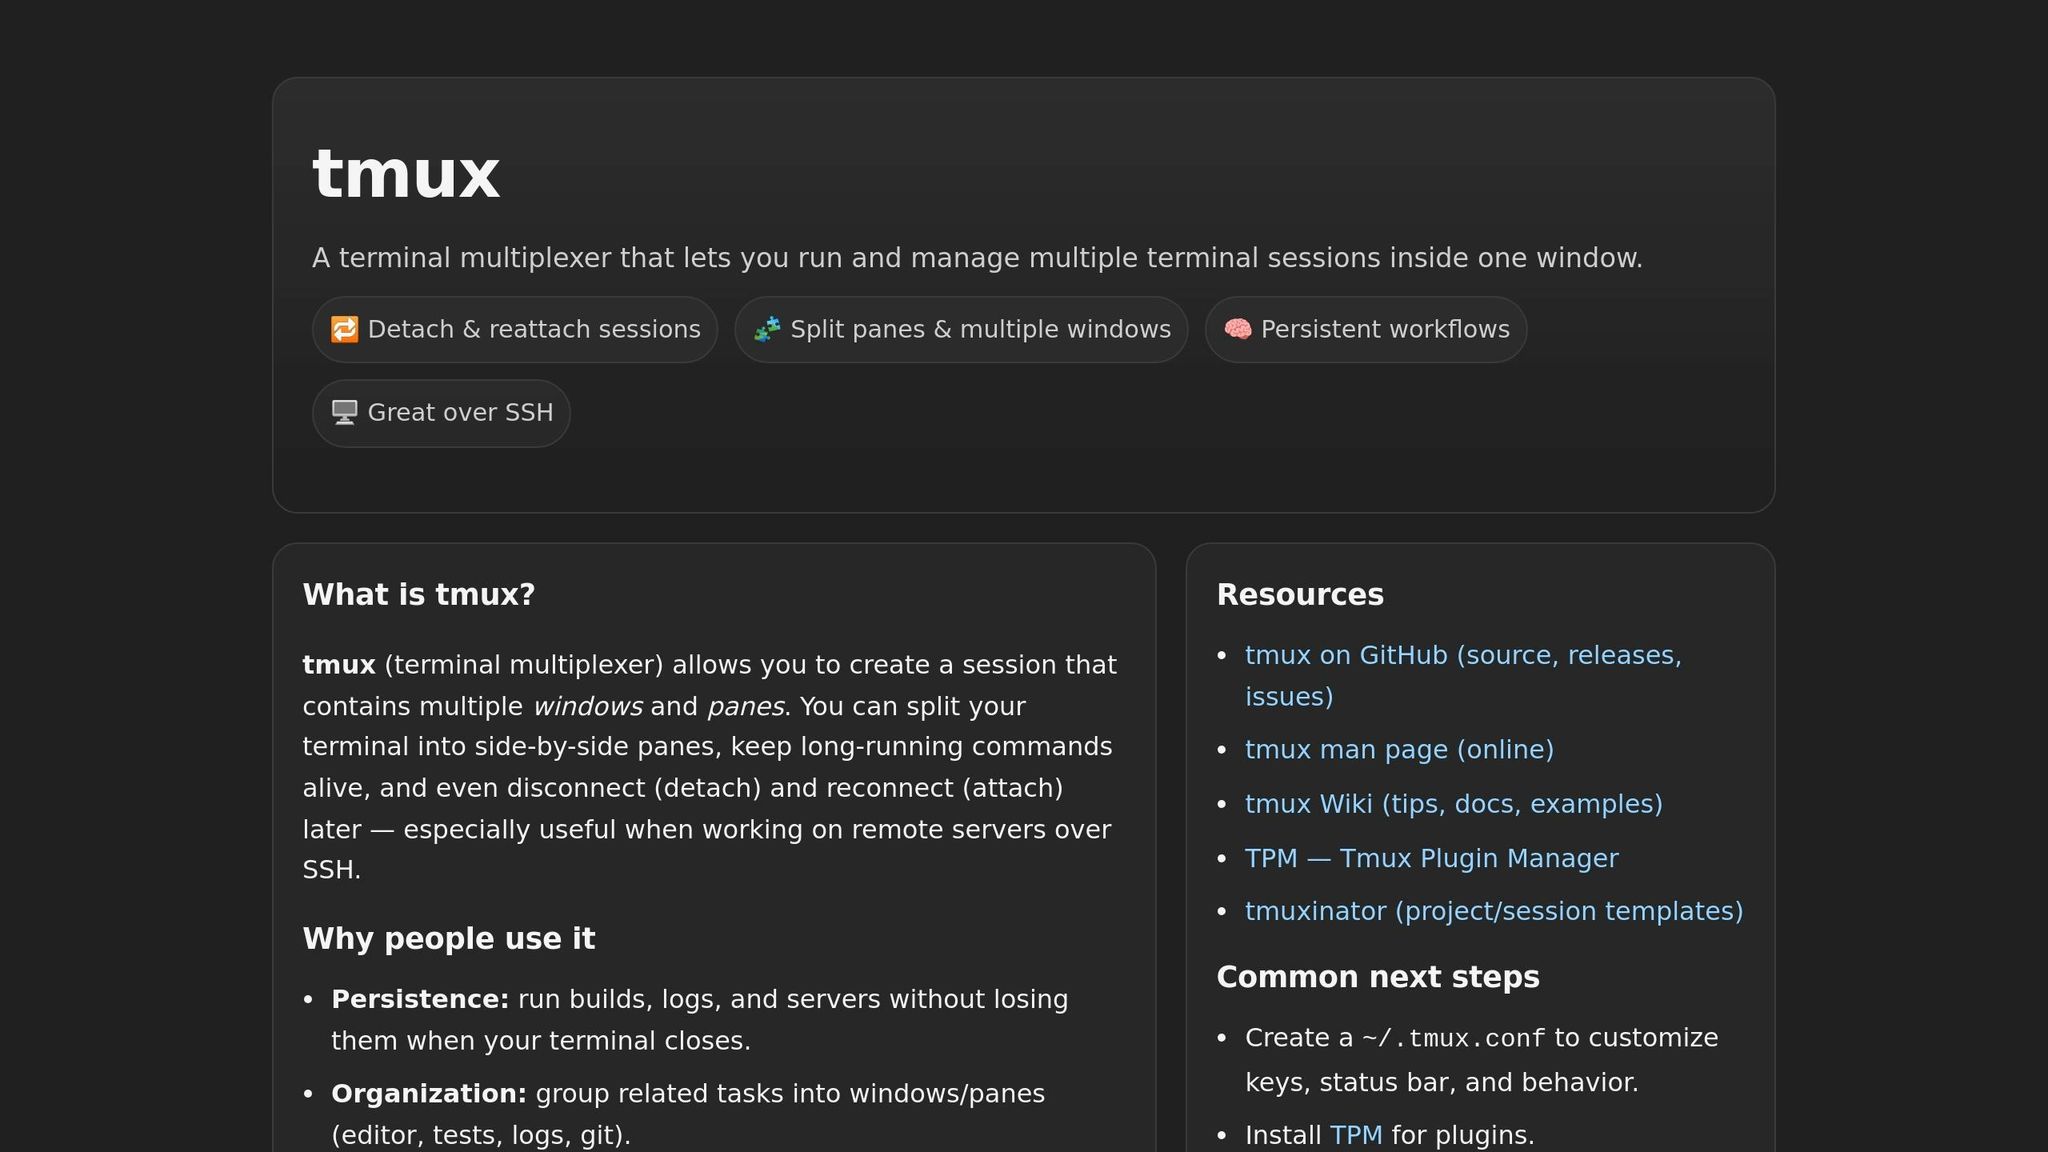
One challenge of remote development on a VPS is the risk of losing your SSH connection. If that happens, any running processes will stop. Tmux is an excellent tool to prevent this, as it keeps your Claude Code session running even if you disconnect.
To start a Tmux session, use the following commands:
tmux new -s claude-session
claude
If your connection drops, simply reconnect to your VPS and reattach to the Tmux session:
tmux attach -t claude-session
"The killer feature of tmux with Claude Code is session persistence. Start a complex refactoring task... your Claude Code session continues running on the server. Simply reattach and pick up exactly where you left off." - blle.co
For an improved experience, update your ~/.tmux.conf file with these settings:
set -g history-limit 50000
set -g mouse on
The first line increases the scrollback buffer, which is helpful for reviewing long AI-generated code blocks. The second enables mouse support, making navigation easier. For advanced setups, you can configure Claude Code to manage agent teams in separate Tmux panes by modifying ~/.claude/settings.json:
Stay online and closer to execution. Choose a VPS location for CME futures, New York markets, London FX, API trading, and more.
Host your platform near the market route that matters.
From $59.99/mo
{
  "env": {
    "CLAUDE_CODE_SPAWN_BACKEND": "tmux"
  },
  "teammateMode": "tmux"
}
With Tmux in place, you’ll have a stable and persistent development environment.
Securing Your VPS for AI Development
After configuring authentication and session persistence, it's essential to secure your VPS. Start by running Claude Code under a non-root user account. Next, harden your SSH settings by editing /etc/ssh/sshd_config to disable root login and password authentication:
PermitRootLogin no
PasswordAuthentication no
Switch to SSH key authentication, ensuring your keys are at least RSA 4096-bit for added security. Use UFW (Uncomplicated Firewall) to block all incoming traffic except for port 22. If you're using Tailscale, allow access to port 22 on the tailscale0 interface:
sudo ufw default deny incoming
sudo ufw allow 22/tcp
sudo ufw enable
For Tailscale-only access:
sudo ufw allow in on tailscale0 to any port 22
To protect against brute-force attacks, install Fail2Ban:
sudo apt install fail2ban -y
sudo systemctl enable fail2ban
For a more stable connection, consider using Mosh. Unlike SSH, Mosh handles roaming seamlessly, allowing you to reconnect without interruption.
"Mosh is the main piece that solved the connection-dropping problem for me... You can close your laptop at one café, open it at a different one three hours later... and mosh just picks up where it left off." - Duane Storey
With these steps - authentication, persistent sessions, and security measures - your VPS is fully prepared for advanced AI development tasks.
Troubleshooting and Performance Optimization
Sometimes, you might run into issues like the command not found: claude error. If this happens, check that ~/.local/bin is included in your system PATH as explained in the "Adding Claude Code to System PATH" section. Once you've updated your PATH, use claude doctor to confirm that everything is set up correctly.
Here’s a breakdown of common problems and their solutions.
Fixing Common Installation and Login Issues
If the installation process stops unexpectedly, it’s often due to insufficient memory. Claude Code requires at least 4GB of free RAM. On systems with limited resources, the Linux Out-of-Memory (OOM) killer might terminate the process. To address this, create a 2GB swap file using the following commands:
sudo fallocate -l 2G /swapfile && sudo chmod 600 /swapfile && sudo mkswap /swapfile && sudo swapon /swapfile
For a more permanent fix, consider upgrading to a plan with more RAM.
On headless servers, the automatic browser-based OAuth flow may fail. In such cases, type c in the terminal to copy the authentication URL. Paste it into your local browser to complete the login process. If problems persist, check for network restrictions or outdated certificates by running:
sudo apt-get install ca-certificates
Improving Performance on QuantVPS
After resolving installation issues, you can focus on boosting performance.
While 4GB of RAM is the minimum, 8GB is recommended for handling large projects or running multiple instances. QuantVPS plans with NVMe storage can also improve file indexing and speed up startup times for large codebases.
For a smoother workflow, you can add an alias to your shell profile:
alias cc='claude --dangerously-skip-permissions'
This command starts Claude Code in an autonomous mode - use it carefully.
Efficient context management is another key factor. Create a .claudeignore file to exclude heavy directories like node_modules, .git, and build artifacts. This reduces token usage by skipping unnecessary files. For extended sessions, use the /compact command to condense your conversation history, keeping the context manageable. Adding a CLAUDE.md file to your project root can also provide persistent context about your architecture and frequently used commands, minimizing repetitive prompts.
Monitoring and Managing Resources
Keeping track of system resources helps ensure smooth operation. The QuantVPS dashboard provides real-time monitoring of CPU, memory, and network usage. For more detailed tracking, install a tool like htop on your VPS to monitor resource consumption directly from the terminal.
If you notice that Claude Code is hitting memory limits during demanding tasks, consider upgrading to a higher-tier VPS plan. Advanced users can enable OpenTelemetry (OTEL) support to export metrics and logs to platforms like Grafana Cloud or Datadog. To enable telemetry, set the following environment variable:
CLAUDE_CODE_ENABLE_TELEMETRY=1
Then configure an OTLP endpoint to monitor API requests and latency in real time.
| Error Message | Primary Cause | Recommended Resolution |
|---|---|---|
command not found: claude |
PATH not updated | Add ~/.local/bin to your .bashrc or .zshrc |
Killed during install |
Insufficient RAM | Add swap space or upgrade your VPS plan |
EACCES: permission denied |
npm/sudo conflict | Use the native installer and fix folder ownership with chown |
TLS connect error |
Outdated certificates | Run sudo apt-get install ca-certificates |
Illegal instruction |
Architecture mismatch | Verify your CPU architecture with uname -m |
Wrapping It Up
Now that you've tackled installation and performance issues, you're all set to enjoy the perks of your dedicated QuantVPS setup. By following this guide - provisioning an Ubuntu VPS with at least 4GB of RAM and setting up Tmux - you’ve built a 24/7 development environment that operates independently of your local machine. As Ramsey Shaffer put it, "Having Claude Code running on a dedicated server feels like a pretty big upgrade from the copy-paste workflow. It can actually understand your project structure, make changes across multiple files, and handle complex refactoring".
One of the standout benefits here is the isolation and accessibility the VPS provides. Your server dedicates its resources solely to AI tasks, ensuring smooth performance even during demanding operations like multi-file analysis or complex refactoring. Whether you're connecting via SSH from your phone or using a web terminal like ttyd, you can initiate backtests, check results, or deploy algorithms from virtually anywhere. For trading developers, this setup integrates AI-driven analysis, error correction, and code compilation seamlessly into your workflow.
FAQs
What VPS specs do I need for Claude Code?
To run Claude Code on a VPS, you'll need the following minimum specifications:
- RAM: 1GB or more
- Operating System: A Linux-based system, such as Ubuntu
- Additional Requirements: Node.js 22+ and an API key from Anthropic
If you're handling larger tasks or want smoother performance, it's a good idea to aim for 2 vCPUs and 4GB of RAM. You can always adjust resources depending on the workload's complexity or if you're managing multiple instances.
How do I log in to Claude Code on a headless VPS?
To log in to Claude Code on a headless VPS, start by generating a long-lived OAuth token on a machine with browser access. Use the command claude setup-token to create the token and make sure to store it securely. Once you have the token, transfer it to your VPS and set it as the CLAUDE_CODE_OAUTH_TOKEN environment variable. For convenience, you can also create a ~/.claude.json file on the VPS to bypass the onboarding wizard. This method ensures you can authenticate without needing a browser directly on the VPS.
How can I keep Claude Code running if my SSH session drops?
If you want to keep Claude Code running even after your SSH session ends, a tool like tmux is your best friend. By starting a tmux session before launching Claude Code, you can detach from it anytime and reattach later. This ensures your process keeps running smoothly, making it perfect for handling long-running tasks or autonomous workflows on your VPS.


